Yeah, I’d love to know where that face came from; it’s not even remotely close.
Exactly why a number of us have been asking for a masking brush.
2 Likes
Hi… thanks for checking. I did not request support, I just reported it here in the forum in the 0.10 threat.
My System:
Windows 10 Pro 21H2, AMD Ryzen 5 3600X / GeForce GTX 1060
Hello,
I like the idea of combining several features within a single app. However, the current implementation has some critical flaws (for me).
The first and the most important: SharpenAI provides better output image quality and gives me a wider choice of models. It looks like PhotoAI uses only an equivalent of ‘Standard’ model for sharpening. ‘Too Soft’, ‘Motion Blur’ and ‘Out of Focus’ models in SharpenAI work much better for my images. PhotoAI sharpening is too strong and inaccurate even with the lowest strength = 1.
‘Enhance resolution’ filter in PhotoAI gives something similar to what I can get from SharpenAI, but without fine tuning the parameters and with ‘jagged’ artefacts on diagonal lines.
The second problem - autopilot. I’d like to disable it completely. Each time when I start PhotoAI, autopilot tries to ‘detect subject’ on a landscape photo, suggests to suppress noise on a medium format picture. This wastes my time.
The third issue: all manual settings are lost when the app is closed.
I’m uploading three crops taken from the same photo. From left to right: SharpenAI ‘Out of focus’ model, PhotoAI enhance resolution without sharpening / noise reduction, PhotoAI sharpen with strength = 1.
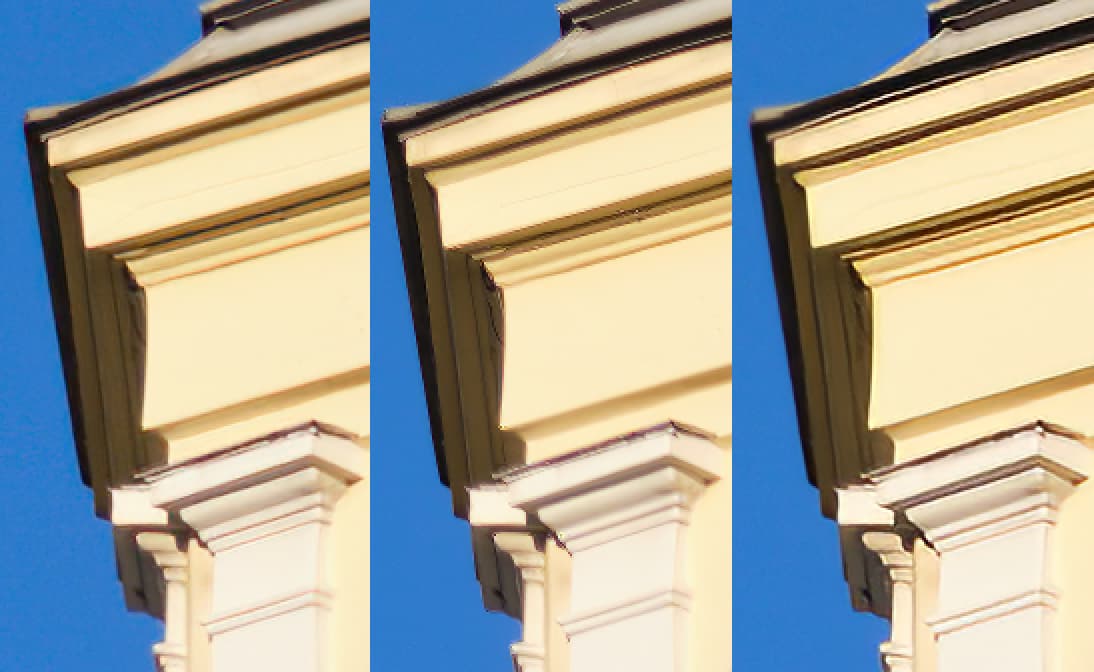
Staying with SharpenAI / GigapixelAI / DenoiseAI for now. ![]()
4 Likes
Since the devs didn’t pick up on it, I guess you should report it.
Good in theory, with some maturity it could be a great program, but needs to bring in some more advanced controls.
Also - missing the ability to add noise after processing during export (especially useful for upscale/denoise)
Little bit of added noise over the processed image makes it much more believable a result.
1 Like
OK, just some clarification please.
Is this a new free product or an upgrade for current users?
Received email yesterday telling me I can have it for free but as it was only released yesterday how can my product Active date run out on the 24th July 2023 when we are in September 2022 not July 2022?
Thankyou.
Oh good!
The 60’s don’t have me (still) hallucinating…
And, I definitely want my Adobe RGB colorspace that I use consistently in all photo related programs; not a program ‘helping’ me by changing to ProPhoto.
I may want to change from jpg to tiff or vice versa. That means I wouldn’t choose ‘use input format’. When I change format I always want to retain my colorspace like I could in previous PAI releases. I need to see that choice in my Save options again to be assured there is consistency.
I was a beta tester for PAI.
The new PAI LR integration is much superior to DXO PureRaw. PAI returns you to folder/collection used to launch and creates a LR stack with the original and processed image. This is great!
Whereas PureRaw creates its own collection and forces you into it, disrupting your workflow and thought process.
The noise reduction on my M43 images is very good.
However The release version of PAI seems much slower on my MacBook M1Pro.
Much of the time seems to be autopilot attempting to find subjects, Faces and other ‘auto’ things. Upto 15-30 seconds. Useless on photos that don’t have a distinct subject such as landscapes, astro etc.
I would like the ability to shut off AutoPilot for Subject and Faces.
2 Likes
It is quite a bit slower than previous releases on my Win 11 too. And, I have a high power brand new PC.
Well explained elsewhere … You have an automatic ‘free’ PhotoAI license if you already own all 3 of the others. Denoise, Sharpen, Gigapixel. PhotoAI doesn’t replace them, it provides an easier, simpler, streamlined workflow combining all 3 into one spot.
1 Like
And, if I may add a guess to your reply.
I suspect the user who asked why their free year ends in Jy and not Sept has a current annual upgrade plan that ends in Jy 2023… since the freebie is tied to & offered to those who own the 3 programs and an active upgrade plan.
Batch processing is a mess.
When the film strip opens, the first image selected is on the right. Since most of us (in Europe and the Americas anyway) read from left to right, this is counter-intuitive:

Since processing is VERY slow, especially when there are many faces in the image, you then have to click on the images in sequence to get them all to start searching and pre-processing. An icon appear to indicate that this is the case. There is no keyboard shortcut for this, ie the forward or back arrow.

Only then can you go and make a coffee or retire for the night. Eventually you can come back and click on the images individually to decide if you want FaceAI on or off, or to change the upscaling ratio. Once all that has been done, processing can begin. If you are lucky. This sequence has now been stuck for half an hour, so I guess it’s a case of starting all over again. Very tedious.

And here is an example of where Recover Faces hits the wrong target. Fortunately the two faces in focus did not really need FaceAI:

1 Like
This morning I just downloaded Topaz Photo AI and gave it a spin. I have been taking digital photographs since the introduction of one of the first digital cameras, Sony’s Mavica that used floppy disks way back in 2004 that produced images of only 640X480. So, I thought I might as well try Photo AI on one of those images to give it the ultimate test for me. I own Gigapixel AI but have had really poor results trying to increase the resolution of such low res images. However, this morning I was really pleased to see Photo AI increase the resolution 4X and still produce an acceptable image. After watching the QuickStart video, I learned how to adjust the levels of noise reduction and sharpening to produce an even better image. Like some of the other users, I, too, think the sharpening tool is too strong in auto mode. After adjusting the strength manually, I was able to restore some of the fine details that were lost. I’ve attached one of my test images (640X480) and the resulting 4X image (2560X1920) with manually reduced sharpening to try to preserve the granulation (gold beading) around the butterfly pendant. (I don’t know why the image size is indicated in the filename as 850X637 since Windows 10 indicates the file size is 2560X1920 just like the image I produced with automode.


You were a bit late then. I got my first digital photo camera in 2002 and it was the very first 5 megapixel photo camera, the Nikon Coolpix 5000. At that time people used one, two or three megapixel digital cameras already. ![]()
I use this software as a standalone program, it is a fantastic program, for me it would be greatly enhanced with a crop tool, it would then really be the 3 tools in one application. As it is, I have to first crop in another application before bringing it into Topaz Photo AI usually as a Tiff, would prefer to use Photo AI with a raw file.
1 Like
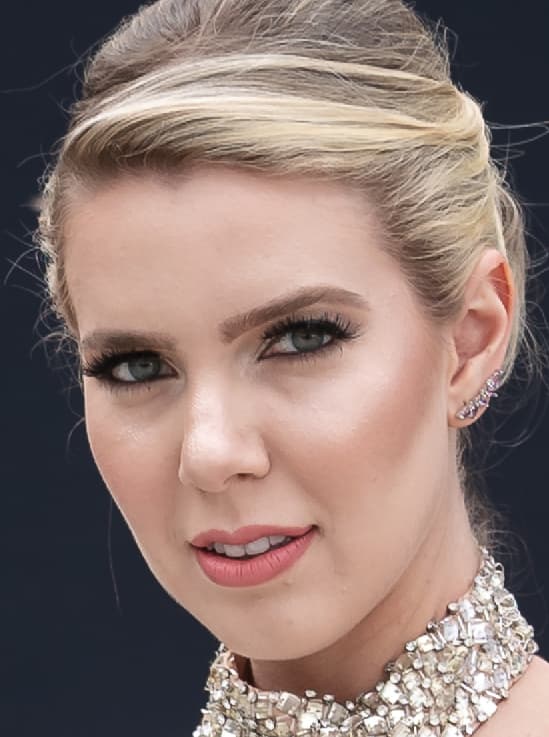
I turned off noise reduction and kept the “recover faces” option turned on. The face in the “before” image has clear and distinct eyelashes. The face in the “after” has blurry eyelashes that appear to be cut short even. Sharpen defaulted to off, but turning it on did not bring back the eyelashes. Enhance resolution also did not help. It appears that the program aggressively decided her face needed to be recovered (I saw nothing wrong with it) and in the process made it worse.

i did test the software and in my case all pictures come off as if i had run trough a photoshop filter to make it look like an old blurry painting. not to mention the auto pilot set up insane settings like scale the image by 228x the original size making it look like a NASA outer space picture. and it was a panda image witch the software could not detect the panda face… so very dissapointed.
Your post might be more useful if you had uploaded the source image…
1 Like


