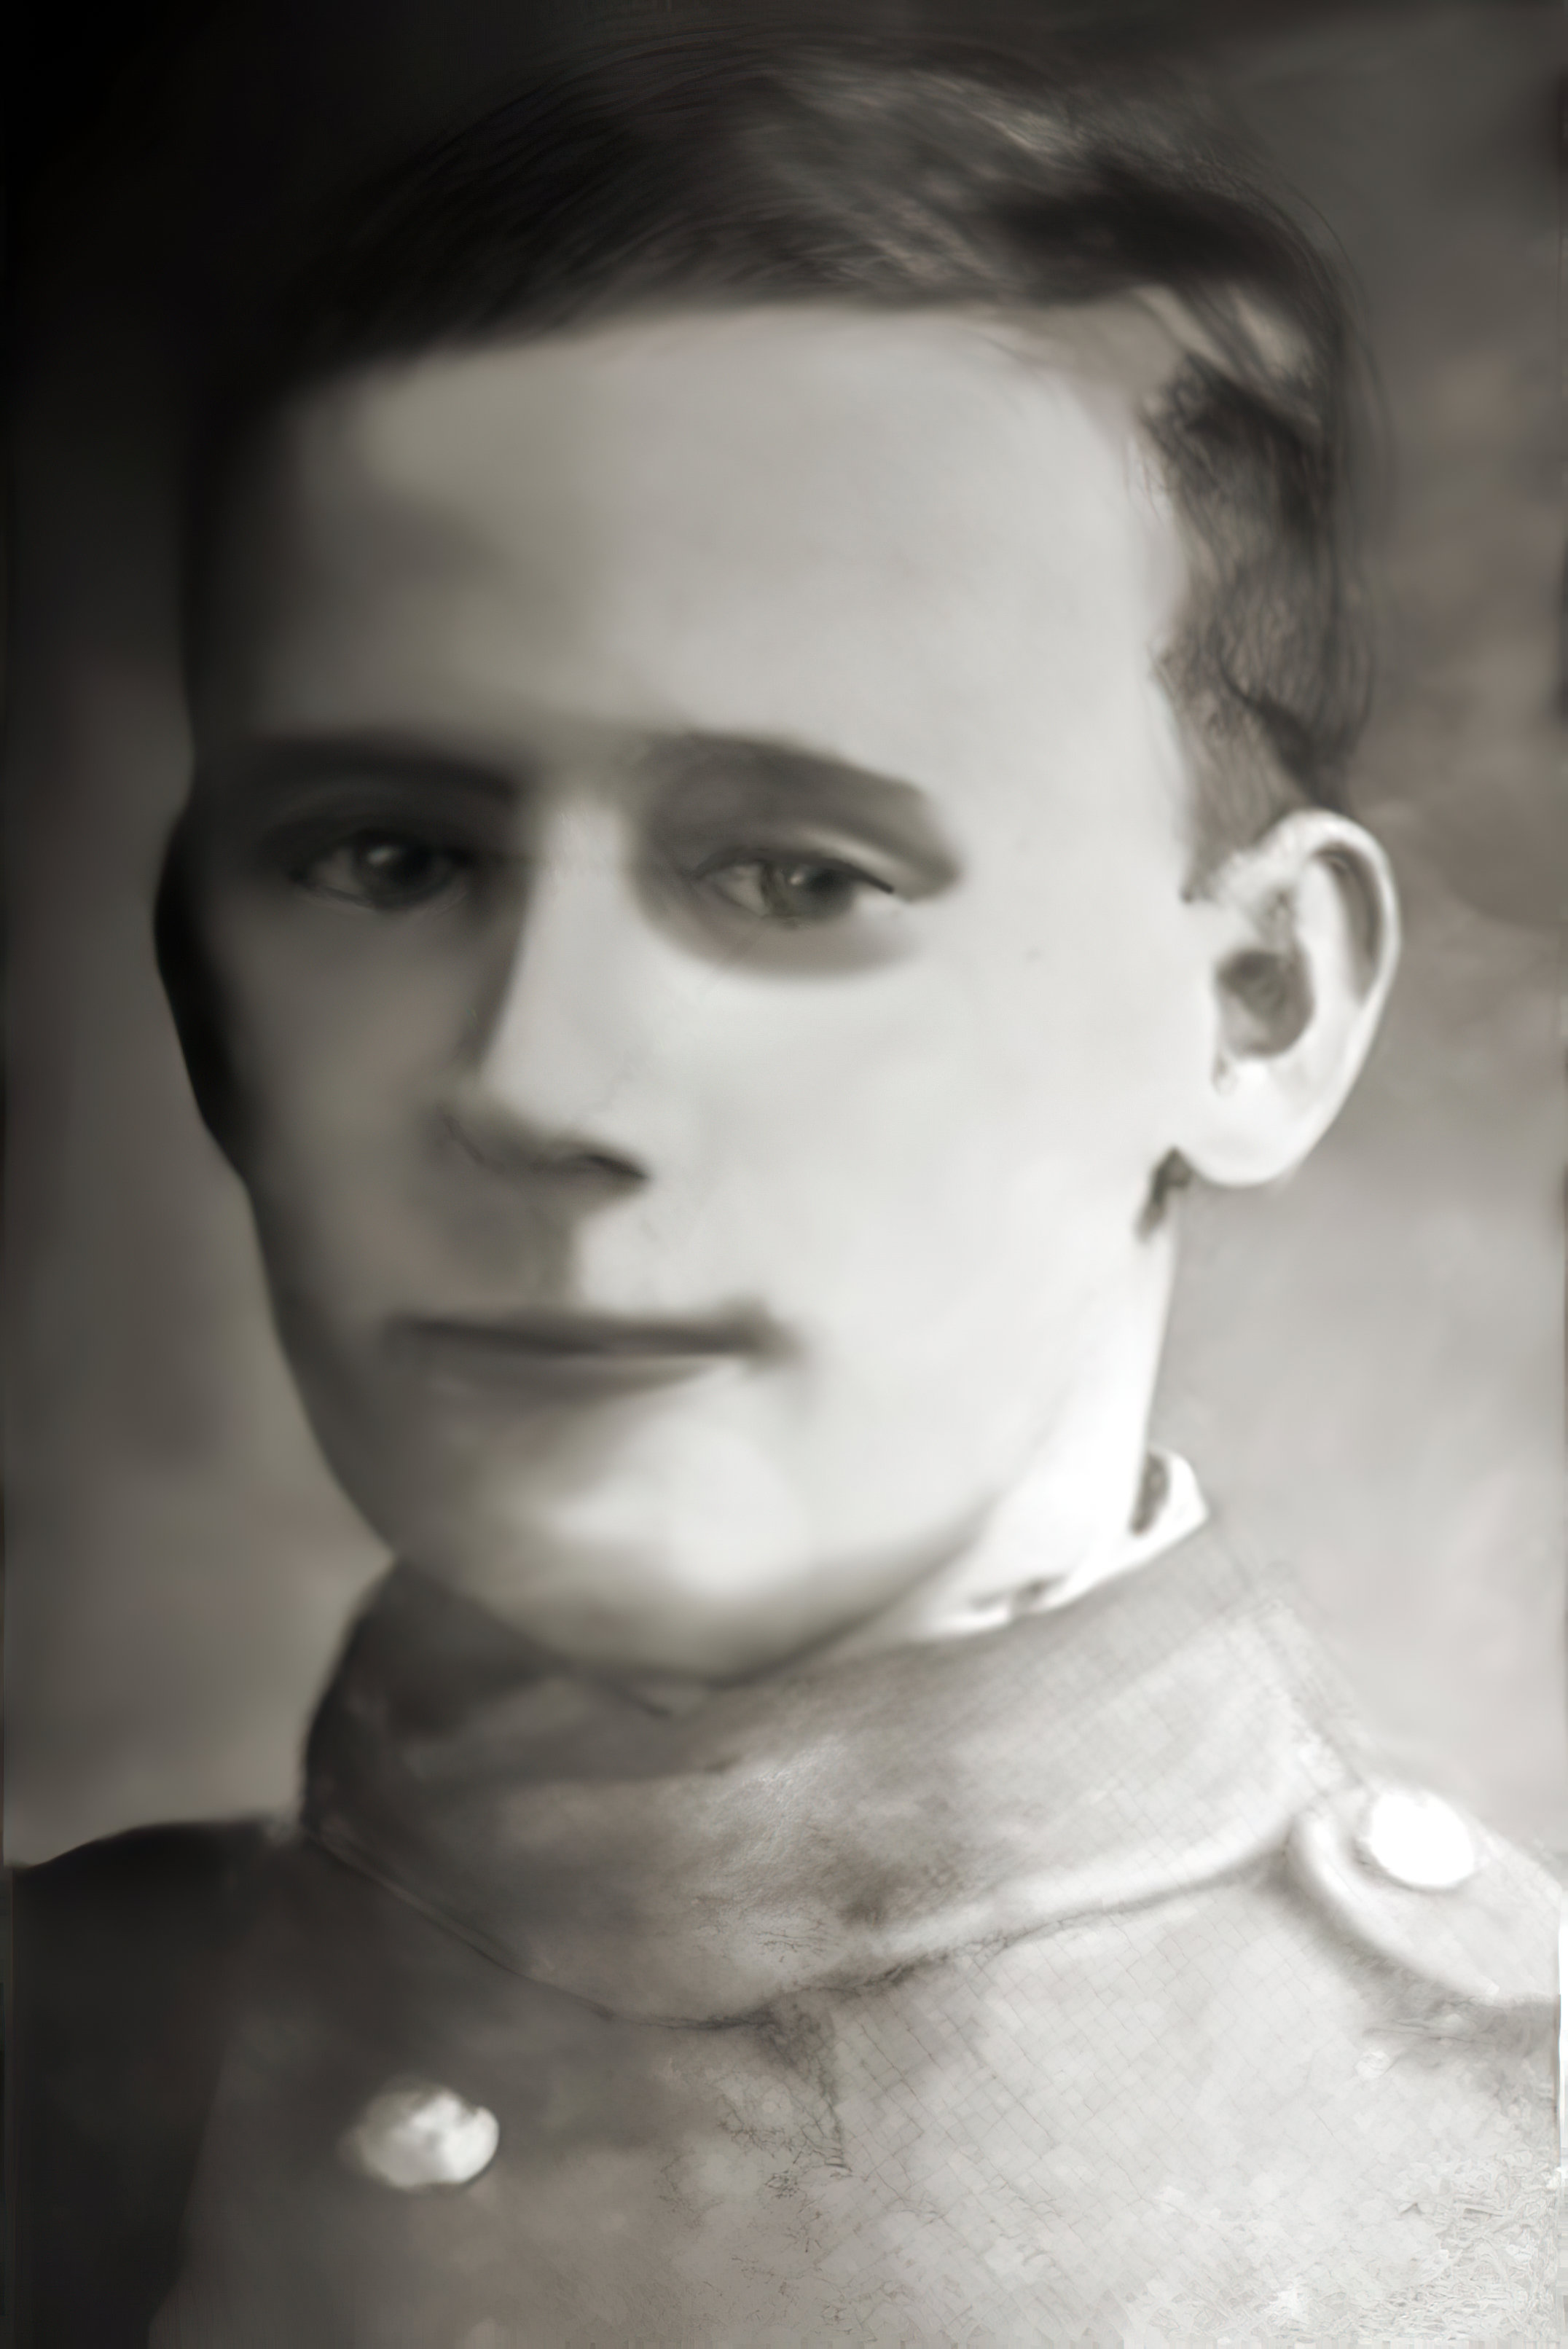
I took your posted halftone picture and in Affinity Photo did a frequency separation (in the Filters menu). Uncheck the High frequency layer leaving the low frequency layer. Then I applied a curves adjustment to improve the contrast. Finally, I used Denoise AI (from within Affinity Photo) to add further smoothing. I enlarge in gigapixel for posting here. See what you think of the process.

1 Like
Thanks for taking the time to experiment, Artisan, it is appreciated. That’s not a bad result, well done. I am still waiting to see what the Sattva Descreen filter can do, but I will certainly keep this in mind just in case.
Thank you once again, Artisan.
I have restored some old photos so I worked on this one just for fun. It does take some knowledge and skill that comes with practice. Here is the results.

2 Likes
That is an even better result Artisan, well done again. It would be interesting to see how that looks printed out on my printer at approximately 50mm x 80mm portrait (the intended printed size), however, this picture doesn’t give me the option to download and I am not sure if simply copying it will reduce the quality, any ideas?
regards,
Pete.
Pete, you should be able to just right click on it and save the image. Or, if you want I can upscale it in Gigapixel and send it to you via private message.
1 Like
No problem Artisan, i’ll just copy it, Thanks.
I went to the Sattva Descreen website and downloaded their examples of scanned photos that were in halftone. I ran my method (no curves adjust) on a few of them ( twice or three times) then applied Topaz Denoise AI as the last step. The results were superior to the Sattva method.
Website: Sattva Descreen plug-in for Adobe Photoshop

After my method:

3 Likes
Hello Artisan,
I have to agree that is impressive, nice work.
Now don’t take this the wrong way, because what you did with my halftone was also impressive, but, when I look at it I can’t help thinking it looks almost “cartoon” like and is bordering on looking like a different person if you get what I mean.
Is there any way the halftone could be removed but still retain more of the original look of the picture, even if it would be at the cost of some clarity/sharpness.
If you look at the Sattva Descreen examples you will notice that the second example is a black and white halftone. Could your method replicate this but using your method with a better outcome? Hopefully, that makes sense.
Finally, just to mention that I do appreciate all your help with regards to my problem and would be grateful for any further help going forward,
Regards,
Pete.
I took a stab at this again using the Topaz Studio adjustments. My intent was to get something that looked more natural, like what I see when I view the halftone original at a great distance.

The Adjustments were:
Blur (to hide halftone pattern) - Gaussian Amount 0.35
AI Clear (to smooth out artifacts) - Remove Noise High, Enhance Sharpness High, Recover Details 0.10, Exposure 0.0, Clarity -0.75
Tone Curves (at 50% Opacity to get closer to the tonal distribution of the original) - Decrease Contrast Preset (steeper in the darks and lights, and flatter in the mids)
Precision Contrast (at 50% Opacity to dehaze the image a bit) - Micro 0.25, Low 0.33, Medium 0.33, High 0.25, Equalization Low
1 Like
Another very good attempt Andy, i will print it out later, much appreciated mate.
Have you tried the Sattva Descreen download to see what results it gives on your image? There’s a free version available. The result depends much on the condition of the original image itself. I use the same method as Artisan. In his image, more time was spent in the blending but some details were not distinctive enough in the image itself to clearly define. In my tightening up of his version, I removed artifacts that came up with magnification and burned edges of where some detail had been lost. If your intent is to work with these type of old images frequently than the Sattva Descreen plug-in definitely should be tried out, would save a lot of time.
1 Like
Well, you can have something that is smooth or one that is speckled and dirty looking. If you don’t apply the Denoise AI it will not be as smooth.
1 Like
Thanks for the advice Eleanor, however as far as I can see it requires Photoshop to get the best out of it and I don’t have PS, I don’t even have the expertise to use it.
Basically, I have approximately 150 of these types of picture to correct in order for me to complete a commemoration to the men who died locally during the First World War, the research of which has taken me many years.
These pictures (for me at least) are an extremely important part of the commemoration. Given that I have no experience in this field I was just trying to find the best way to correct them before I start spending money on software etc., I didn’t want to pay for something that wouldn’t work. Even if I manage to achieve this I am going to be on a very steep learning curve.
Maybe I am asking too much, given what there is to work with, maybe it can’t be done.
Regards,
Pete.
Just so I understand, are you saying that if you ran your method as above, my picture would come out just the same as before? If that is the case then what would the image look like if you applied your method but without denoise? Any help or advice greatly appreciated.
regards,
Peter
Below is the Kitchen picture where I ran my Halftone removal but did not use Topaz Denoise (which is the last step). I made a macro for Affinity Photo so I ran it twice.

1 Like
I see that the Sattva calls for Photoshop. I don’t have it either, I’ve been using a relatively cheaper program, Corel’s Paintshop Pro ($50). It can do almost everything that Photoshop can albeit without some of the bells and whistles. There is another program, Affinity Photo (now $25), that mimics Photoshop probably even more so but I have a problem with the difference with some of the terminology since I’m already ingrained in PSP. You don’t mention if you own any photo editing program. PSP normally takes Photoshop plug-ins and I’m going to try to see if I can get it to work.
1 Like
Hi Eleneor,
i don’t have any photo editing software at the moment as i have been holding off, waiting to see which would offer the best solution for me, hence going round the various forums trying to find an answer to my problem.
I have in the recent past tried some free trials, Paint Shop Pro 2020, PS and Photo Affinity and taking into account my lack of experience i found PSP 2020 to be the most intuitive and PS the least.
I remember a few months ago trying to get the best out of PSP using this picture but i couldn’t quite get there. I have the notes recording the steps i took as follows,
Remove Moir - 6
One step fix
Black and White Film
Sharpen
Sharpen More.
When this was applied and then printed out the results were still a fraction too dark and needed a litte more sharpness but as i tried to adjust the sharpness further the halftone started to come back.
With my lack of knowledge i gave up in the end and began trawling various forums trying to find a solution.
It would be interesting to see if Sattva worked with PSP, please let me kow how you get on. Thanks for all your help,
regards,
Peter.
That still looks fairly good Artisan. Would you be kind enough to apply that method to my picture please, and see what the results are without the Denoise. Any help greatfully appreciated,
regards,
Pete.
There’s no doubt that Photoshop is the leader when it comes to photo editing but it’s a steep learning curve and although their new way of offering it by month makes it affordable, you never own it. PSP2020 can do just about anything you need to do, the tools are there and its a one time fee where you own it and can use it indefinitely. It rarely changes its user interface so once you know it, it’s easy to find your way around. While some Topaz products are standalone and can be used without an external editor, you really do need to have an editor, Topaz products are like icing on a cake, taking abilities to a higher level but they do not have the tools of an editor.
The project you are undertaking is ambitious and most likely you will find the quality of the originals you have will not be uniform so what works satisfactorily for one may not on another. Newspaper and magazine images are printed with the dots to save ink while a photograph does not have them. Blurring is the basic premise of getting rid of them. Sattva does that, but you will note from their samples that it isn’t a perfect science but it does save time. That being said, the app is supposed to be compatible with PSP. It’s files are all in a recognizable format but it does not self install. I’m running into a message in PSP that it can’t find a necessary file although it is in the download file saved.
1 Like