That sadly confirms, that the reported bug in 2.0.5 about multiple face detection was ignored and nothing was fixed in that area. This is the 3rd user report I have seen thus far about the issue.
I don’t understand, why newly introduced bugs in previous versions aren’t treated with priority for the next iteration. If you don’t do that, more and more bugs are introduced and stacked + new features which also introduce bugs - until you reach a point of no return…
Topaz Labs is already ignoring the thread no more fancy features, please bugfix altogether, even though already 68 users voted that it is important…
But no problem; we got new camera profiles; what else do we need…
I apologize if this has been mentioned already, but since the newest update I can longer use the BETA features to adjust color and lighting? I was able to previously.
I have tried to use Photo AI on an image processed as HDR in lightroom and saved as DNG.
Error: cannot save non-raw image as DNG. I did the exact same process prior to the upgrade and saved the image.
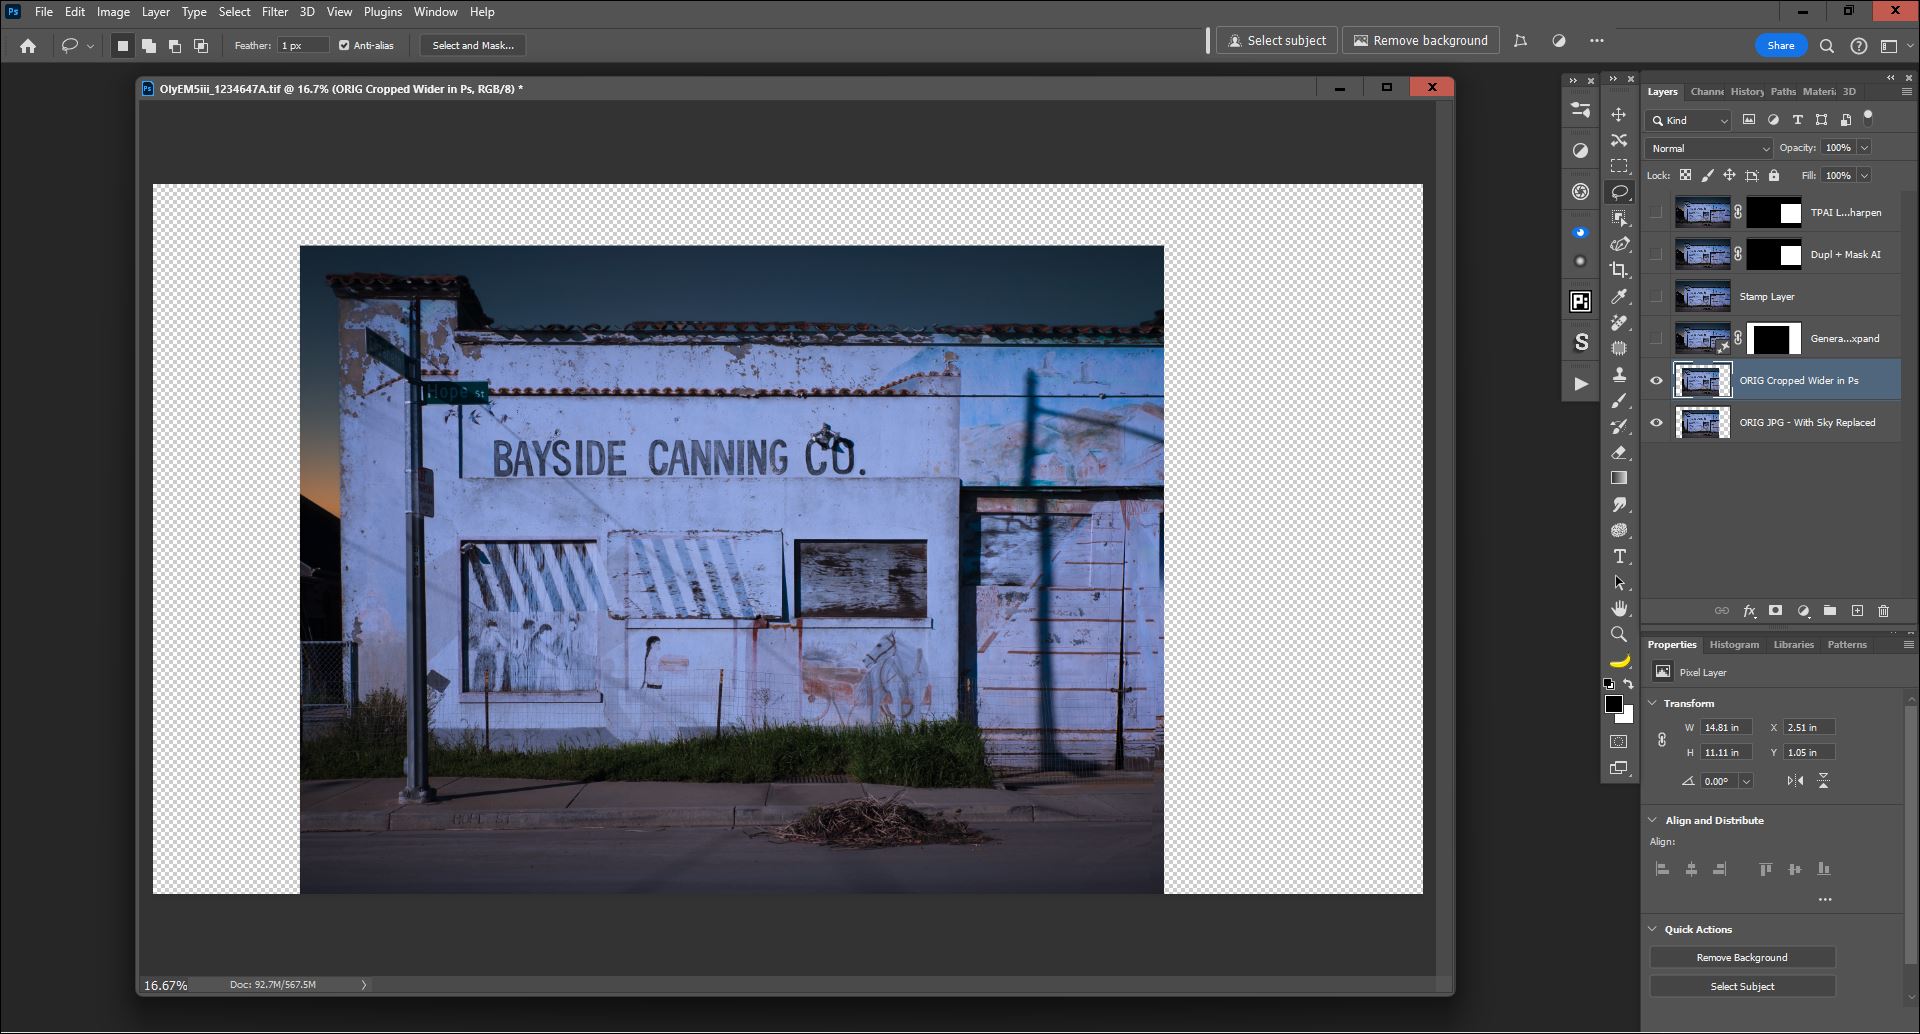
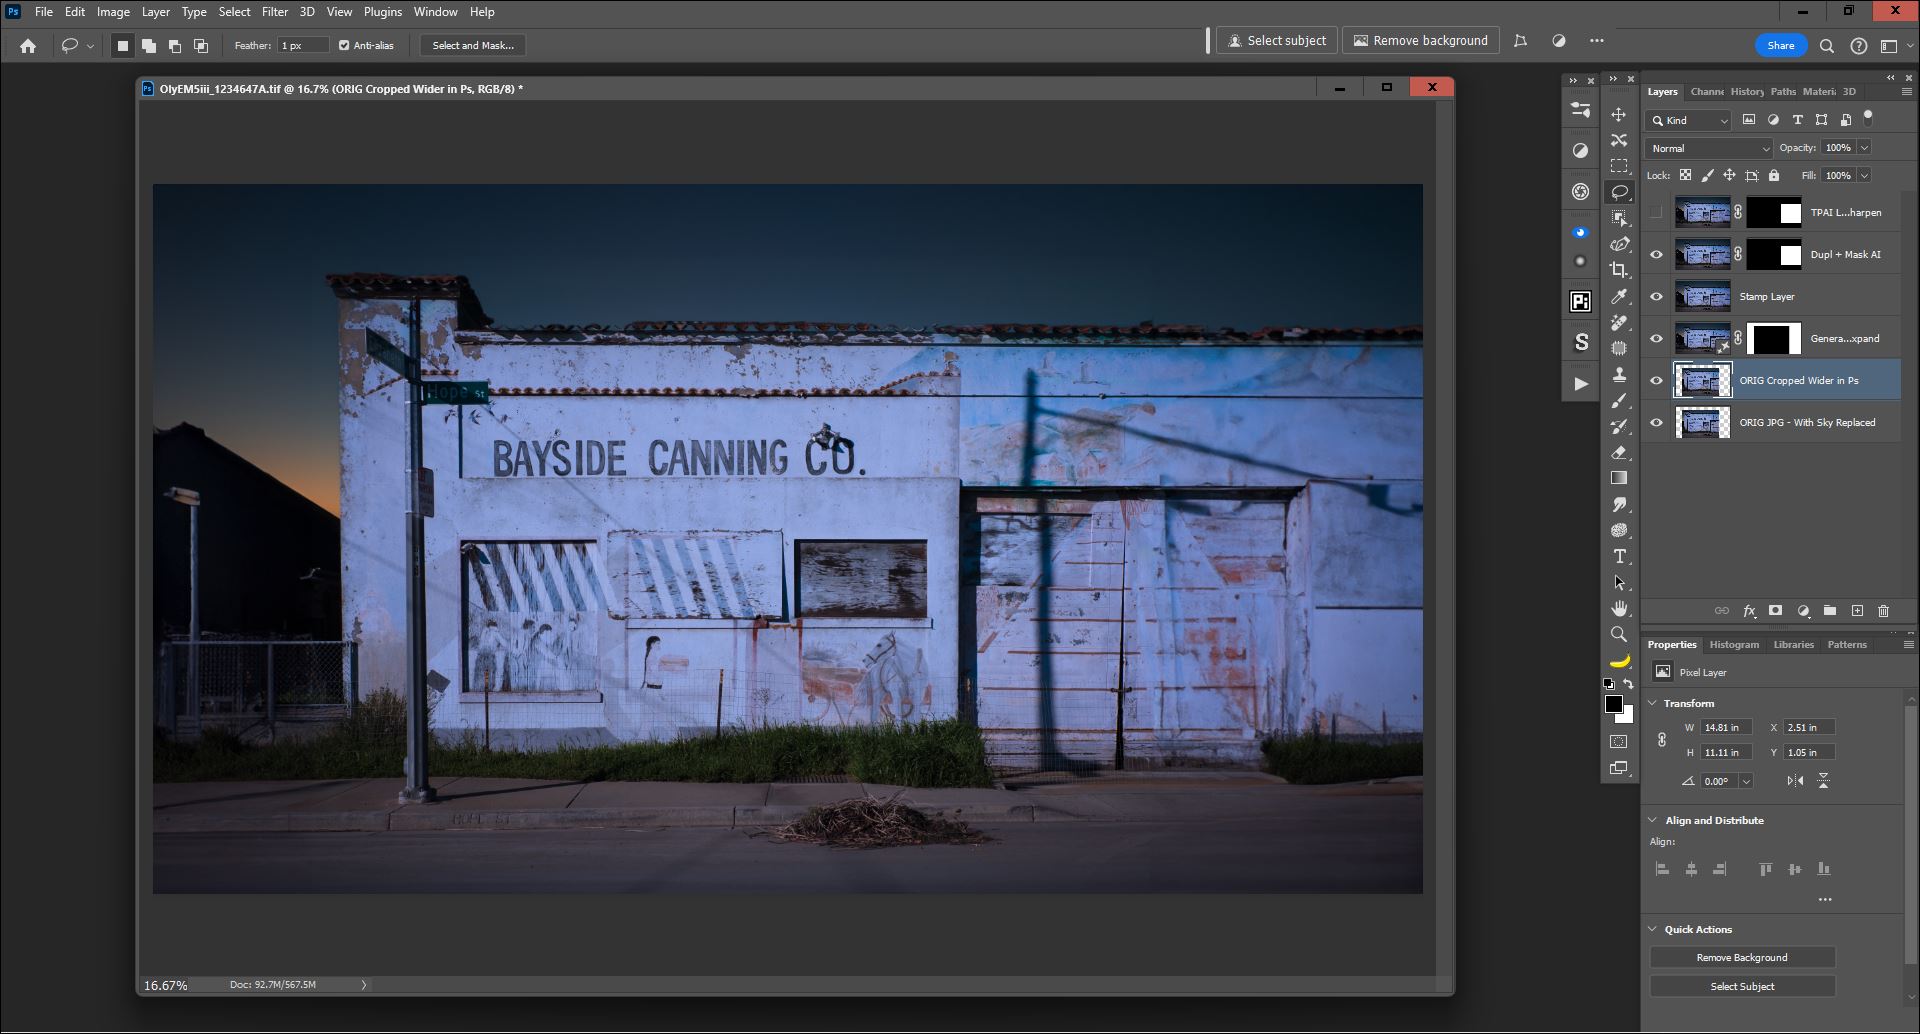
Goal: Work with Original, unprocessed daytime JPG image of deserted bldg, convert it to a night scene (Ps Replace Sky & color grading), use Ps Firefly Generative Expand to extend the original scene. Then use Topaz PAI to fix/improve the soft, low res quality content Ps Generative Expand (& Ps Generative Fill) currently use to create, fill or extend a user’s content. i.e., Can Topaz PAI correct and make up for the shortcomings of Ps 2024’s current generative content quality. Spoiler Alert: It did improve the low res Ps Gen Expand content and match the quality in the rest of the scene for this image (I haven’t tried this using a starting Raw image yet …).
Steps: (Labelled in Filenames & on each layer in the shown Ps Layer Stack). BTW. Look at the layer stack to see where Eye Icons are turned on…not the highlighted base layers to know which layer reflects which work…
In the PAI 2.0.6 Ps 2024 Plugin I worked with the Enhance & Sharpen panel settings and also applied Text Preserve to keep the words on the bldg and the street signs intact. FYI, I have autopilot and auto anything turned off in my PAI Prefs. I set everything manually in PAI. (Clearly I’m not a purist & do use auto functions in photo processing s/w when they support my needs, but I like to control PAI settings to my personal taste - whether for good or bad, it’s my vision).
Hello all,
I have several images where I want to apply noise and sharpening. But in the menu for the automatic mode must be preferred, between noise and sharpening. Why is there no option to enable sharpening and noise together for all images?
The automatic mode is great, but I want to decide what to do with the images. I have a lot of images that need to be processed automatically and I miss this option.
The Topaz folks may have another answer, but here’s my assumption as an FYI…
In the Preferences I believe you tell PAI to correct for the most prominent issue it recognizes in your images (denoising or sharpening). What that means (at least in terms of my experiences when I ran the auto processing…) is that the PAI autopilot typically will activate one or the other of those two function panels for your image. Presumably the one that the image needed more help with.
That doesn’t mean you aren’t getting (or can’t get) some adjustment to the opposite function.
For instance, if autopilot thinks your image needs more sharpening than denoising, my guess is it will turn on the sharpening settings panel and not the denoising panel (some of this may be determined by how you set your Preferences in the Edit menu - where you can tell PAI the levels of sensitivity you want). But there is still a denoising functionality slider in that sharpening panel, so if some lesser denoising is needed as well that should be activated inside the sharpening panel. You aren’t without denoising even if the predominant fix needed/detected as needed in the image is sharpening. I hope that makes sense. But I’m sure someone from Topaz will clarify!
Thank you for your answer.
I looked at the settings in the menu for the autopilot. Yes, the presets and the condition of an image is what determines whether the autopilot does final denoise or sharpening.
But if I have images that need both denoise and sharpening, the autopilot will choose the one that seems more necessary.
With face detection, the autopilot works perfectly.
If there is a person in one of 10 pictures, the autopilot activates the face detection. I would like to see the autopilot do it all together.
For example: I activate all three options (In the next version I hope)
Removing Noise - Stregth 29
Sharpening - Strength 23
Recovering Faces - Strength 33
Not sure about the other newly introduced bugs as mentioned here, but I think the face recognition thing is not a newly introduced bug. This can be verified by running the same image in certain pervious version.
The three items you mentioned are actually two things.
Thing 1:
This is expected, not bug. We use grey boxes to indicate low confidence face detections. Yellow boxes to indicate high confidence face detections. By default, auto pilot, only yellow box ones get processed. Grey ones are still shown, and clickable, in order to benefit users fast select any missing faces.
The core thing to understand here are: 1) face recognition model (industry or research) can never be perfect, such that we give some extra predictions to users to avoid missing; 2) and the model output is probabilistic (box is face = 66.67%, instead of box is face = either 0 or 1), so we take advantage to provide some low probability predictions. This feature is explained one past release I think around 3 or 4 month ago.
Thing 2:
The reason here is face size is bigger than face recognition model’s perceptual field. This problem is solvable, by training a model that has larger perceptual field, so that the model can see a whole face, rather than a part of a face (and think one face to be multiple faces). However, there is another thing, face refinement model is better at recovering smaller faces, and large faces tend to get better results with base filters (eg sharpen).
To conclude, we know shipping another bigger face recognition model can get better recognition on bigger faces; but those bigger faces get better results without face refinement model. Meanwhile, shipping another face recognition model can take extra space, longer runtime. Considering the above, we did not ship the model/decided to not to ship the fix.
Of course, one single lightweight model recognition model that can detect faces of any sizes is the perfect solution, but that’s need another round of model iteration, and there are many technical challenges (each year top computer vision publications still see many new face recognition related papers trying to solve a lot of those challenges).
The Ps beta is not a stable commercial product & causes a lot of operating bugs wrt features even inherent to Ps b/c of its beta nature. Have you tried the PAI plugin with the commercial release of Ps? It works there.
I do both.
A few days ago I came home from holiday, from the North Sea in Germany with around 500 pictures. The weather wasn’t perfect, so the pictures need to be denoised and sharpened a bit. With 500 pictures, batch processing is the order of the day.
But on special pictures, I work on one image at the time.
Sometimes I come home with 10 or 20 pictures. In such cases, individual processing is no problem.
Windows 11. When I do batch processing by sending files from FastRawViewer, I don’t seem to be able to choose the folder where I save them. They all go to the original folder. Using PAI as stand alone I can choose a folder. Can we have the option of choosing the save folder no matter how we send the images?
Tried version 2.0 again or 2.0.6 right now after having a lot of issues with the first release of 2 and went back to 1.4.x. Much improved now so thank you team!!
I do not like how Topaz Video AI sharpens content or the ways previews work compared to Photo AI previewing individual frames. Not sure best way to share this but currently going thru 30k in frames and have one image that seems to open fine for me if I double click it in Windows, will crash Photo AI 2.0.6 immediately.
Note: it’s crashing on the one image while AutoPilot is assessing the image. Wish I could turn that off completely as don’t use it but interesting item. Even if I open the image in question in MSPaint and copy it, then paste it into a new MSPaint session and save it with some random name, that one image will keep crashing Photo AI 2.0.6 when AutoPilot runs. Note didn’t originally list it however as it crashes no matter how I format the image thought I’d attach it.
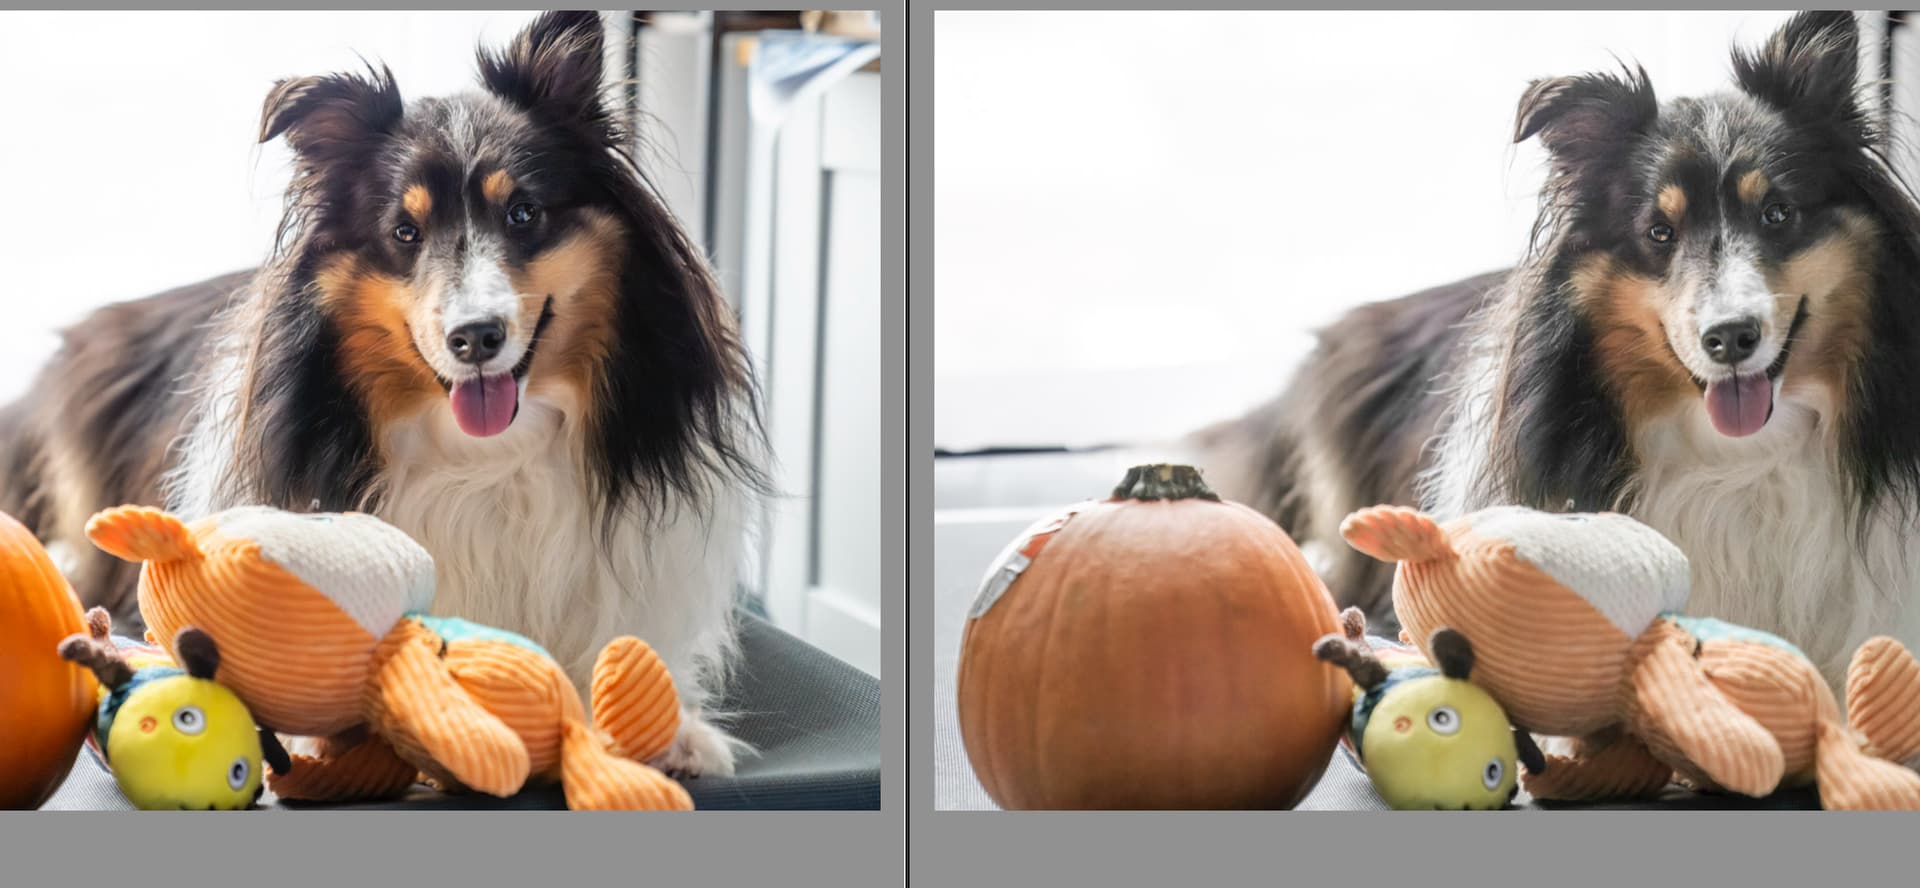
I wanted to see how much brightening and how much noise Sharpen Standard v2 is adding to images, so I tried a simple black to white gradient. Starting with a 16-bit Adobe RGB blank document, I made the gradient, then pixellated it to 10 steps starting at almost black and ending at almost white. Then I applied the two TPAI Standard sharpening models.
Here are the results. Sharpen Standard v2 is adding noise and brightening by roughly 4 levels (out of 256) and warming the image by brightening the blue channel by one or two levels less than the others. If you zoom in you will see all the noise that is added; I had to use an 11 × 11 pixel average to sample the v2 swatches. (Edit: Message board JPEG compression seems to be eliminating most of the noise in my sample image.)
“Minor Denoise” in Standard v2 actually adds more noise the higher you move the slider. The Strong model brightens and warms the image in the same way, but does not add noise.
Because much of my work (art reproduction) requires exact colors, I can’t use Sharpen Standard v2 or Strong due to the brightening and color shift. Please don’t eliminate v1 until this is rectified.
Editing an NEF file via “File, Plug in Extras” (LR & Topaz at latest versions in Win 11 Pro) the "PROCESS VERSION in LR is reset to version 1 (not current version 6) when image is returned to LR. Tried this multiple times with different images.