Thanks for your efforts! I did not go for the full-cleanup, but your work shows what is possible.
1 Like
Gigapixel add Face recover tool since 6.0, before this , I used AVCLabs Photo Enhancer AI and HitPaw Photo Enhancer, all of these tool can only repair the face
,if an old photo the face is blurry,the hair and cloth and other would be blurry too,if we only make the face clear,the photo will looks strange。So I had to repair other
parts manually (in Ps with other filter tools,such as AKVIS software,I never use Adobe‘s before PS 2024). I don’t think any software can repair an old photo alone.
To Colorize an bw photo,now ,all mode is the same one,eg. HitPaw Photo Enhancer,AVCLabs Photo Enhancer AI,PhotoGlory, they can colorize bw photoes
automatically with the same model,but the result is not always good, the nature part with plant, will looks very good, the detail part such as people’s face, clothes
we must paint it manually , though PS can do this job, But it’s very troublesome。
Akvis have a tool to do this job, but the best tool is CODIJY Colorizer Pro. and I
think Topaz needn’t add Colorize tool to Photo AI,Maintain Topaz own style:that is Upscale and clear image with tomorrow’s technology .
2 Likes
Just to let you know, if you don’t already, the Detail slider doesn’t affect the recovery model processing, and you can alter it after the lengthy rendering is complete, as it’s just a post-process filter.
1 Like
The graphic style of the icons, with the slight white reflection giving a certain volume, reminds me of the MacOS icons.
Huge congrats to the Topaz team on releasing Gigapixel 7.1.1!
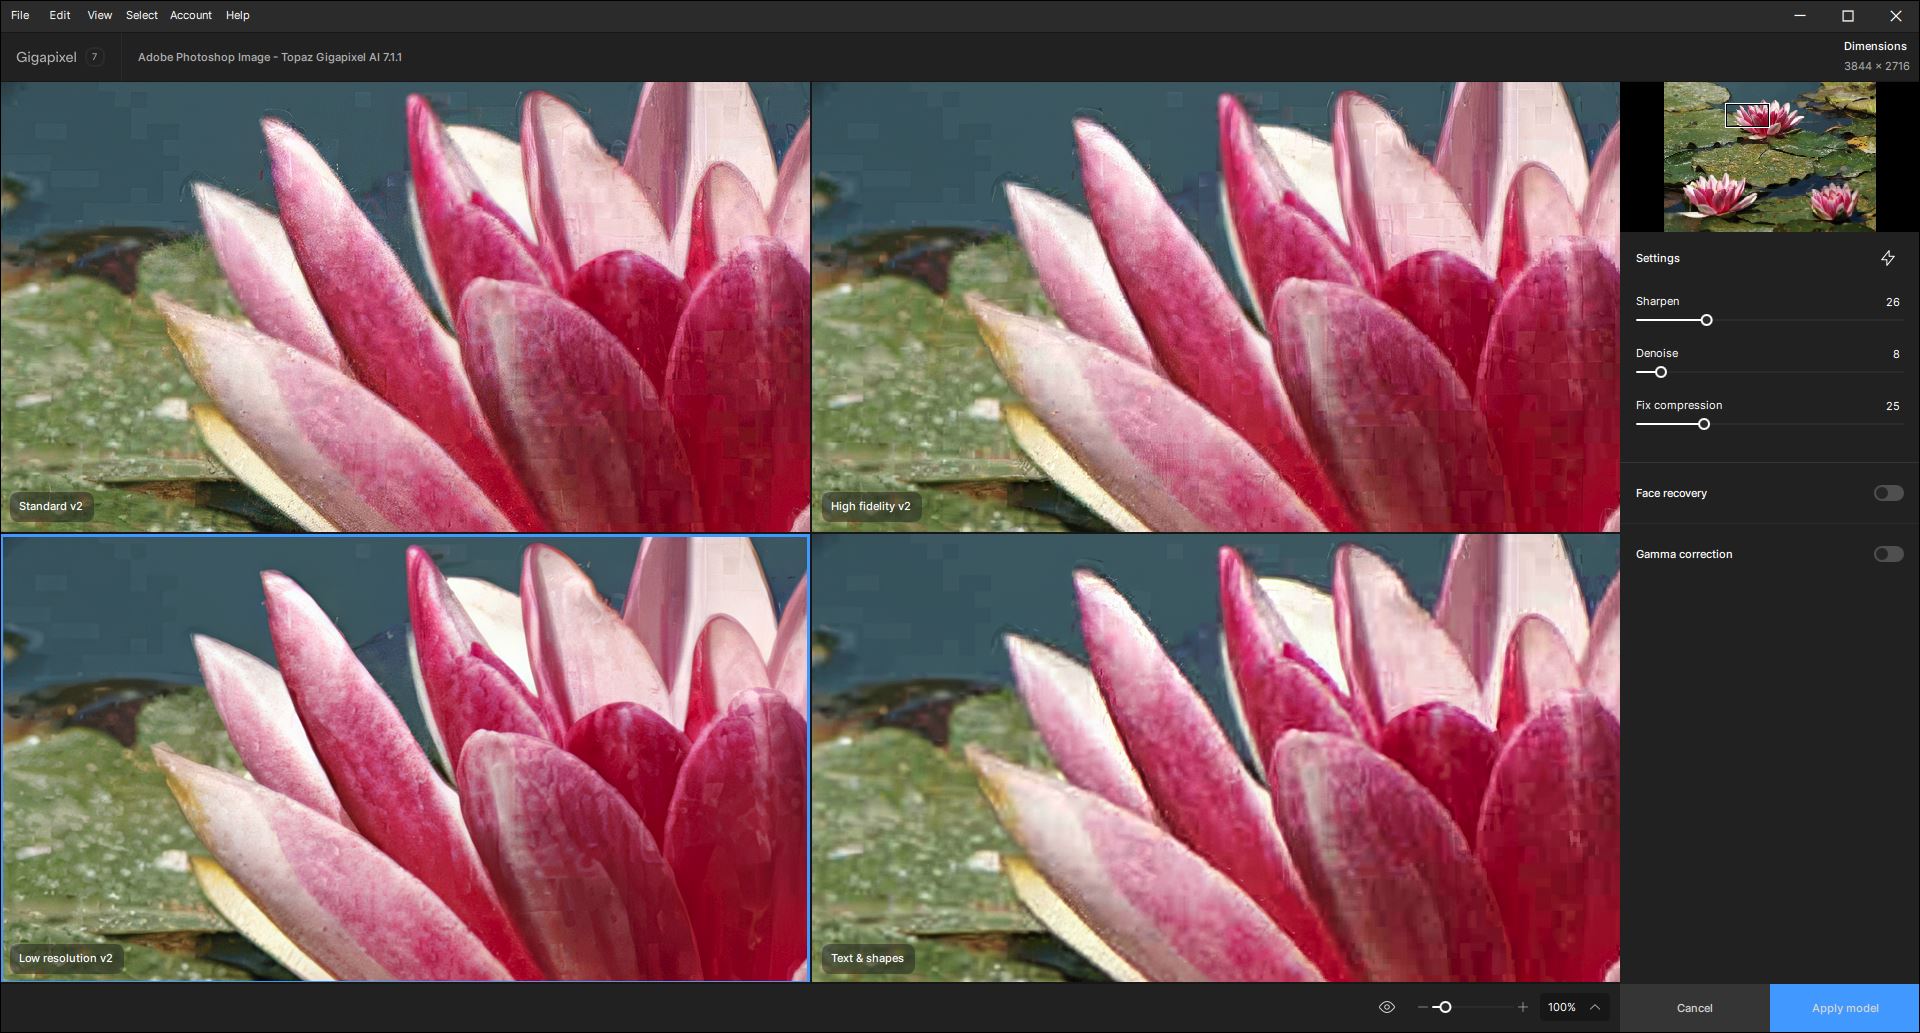
There’s a ton of exciting new features in this version. It’s great to see the “comparison view” back, and the new diffusion recovery model looks very promising – I’m sure there’s room for further improvement and faster inference in future Gigapixel releases. The text & shapes model is also quite solid.
The low resolution v2 model does wonders on photos with a lot of noise and compression, but it can introduce artifacts on some images.
I’ve been playing around with different model revisions, and seems that the gmpv2-v3 models (specifically gmpv2-v3-fp16-192x192-4x-ox.tz and gmpv2-v3-fp16-192x192-2x-ox.tz) give better results compared to the v6 model included in the official release. For low resolution 1 model, I get the best results with gmp-v2-fp32-384x384-4x-rt806-8601-rt.tz2 and gmp-v2-fp32-384x384-2x-rt806-8601-rt.tz2.
Keep up the great work, Topaz! I’m eagerly waiting for the next releases.
Edit: For those of you who are trying to “colorize” grayscale photos, I highly recommend the free program Chainner. You can find it on GitHub. You’ll need to download the ddcolor model to colorize photos. I was very impressed with it.
As for commercial programs, I think one of the best is Pixbim Colorsurprise.
2 Likes
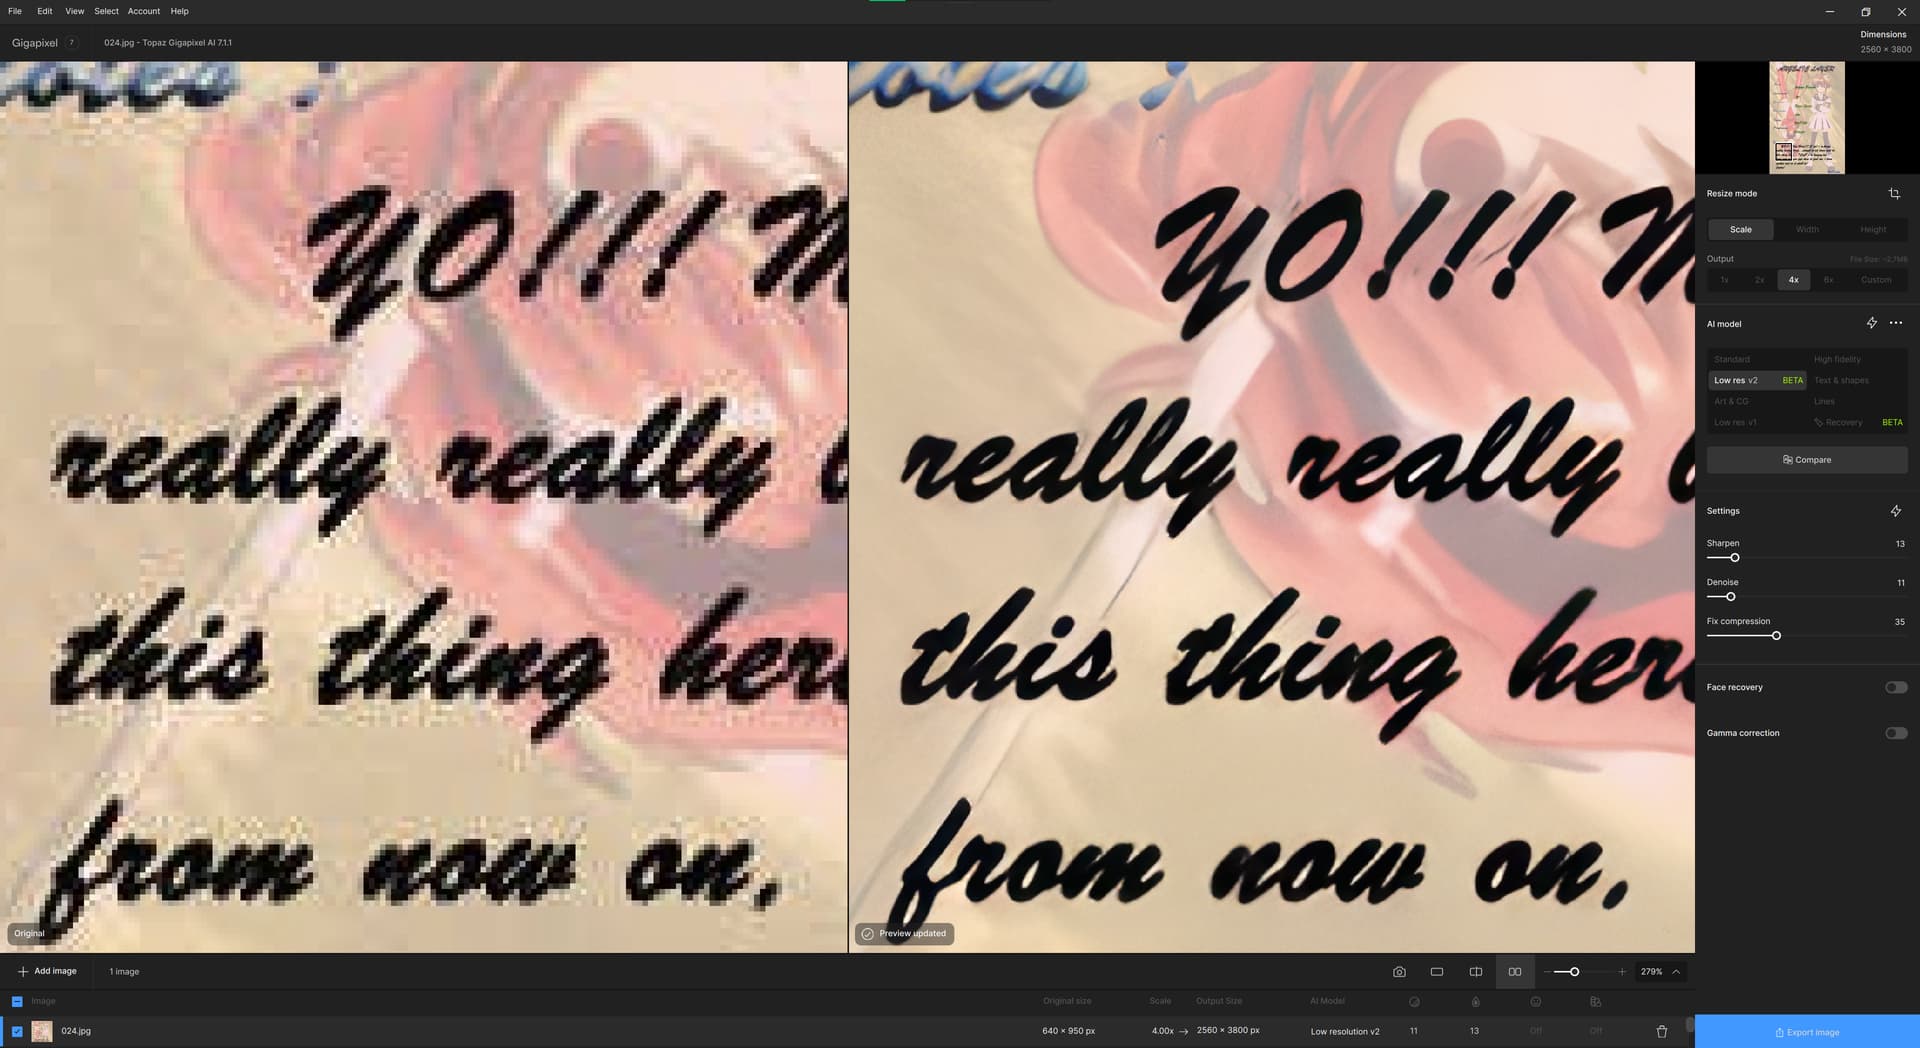
Whoa, the quality of the ‘restorative’ model is amazing! ![]()
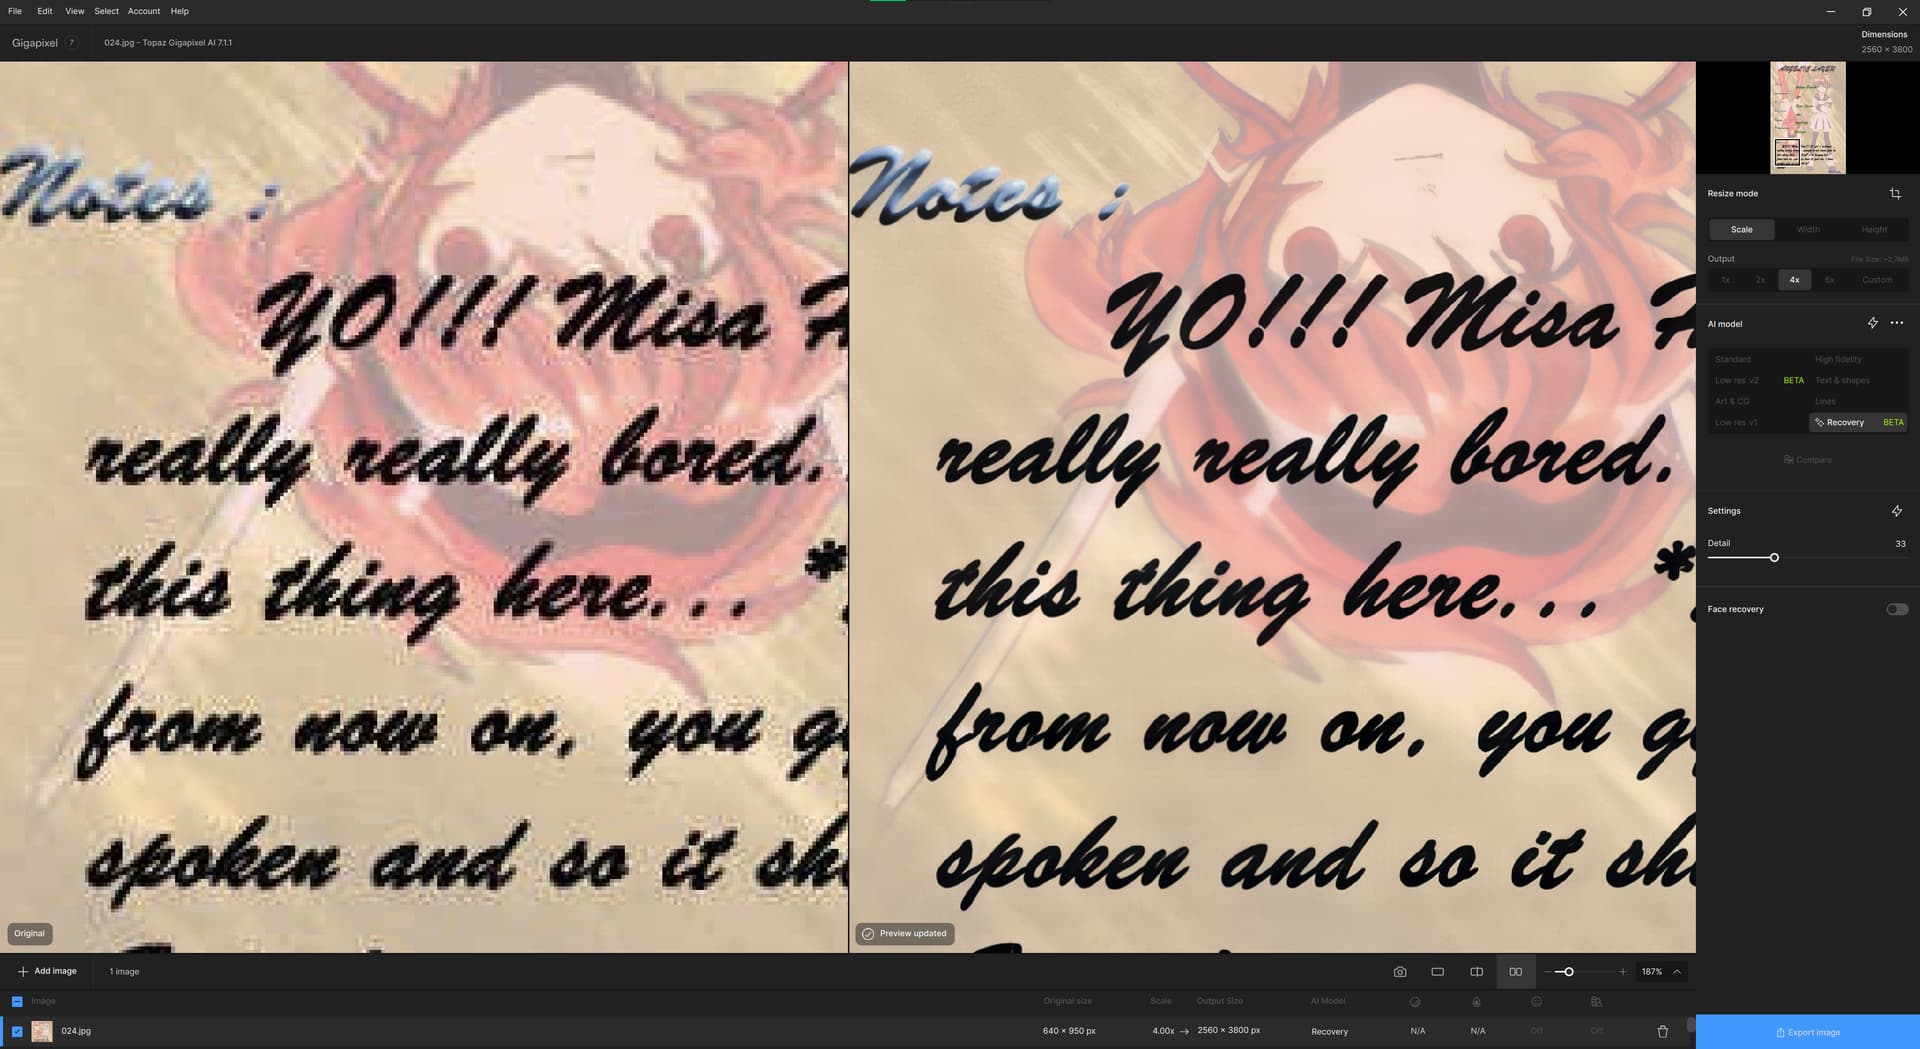
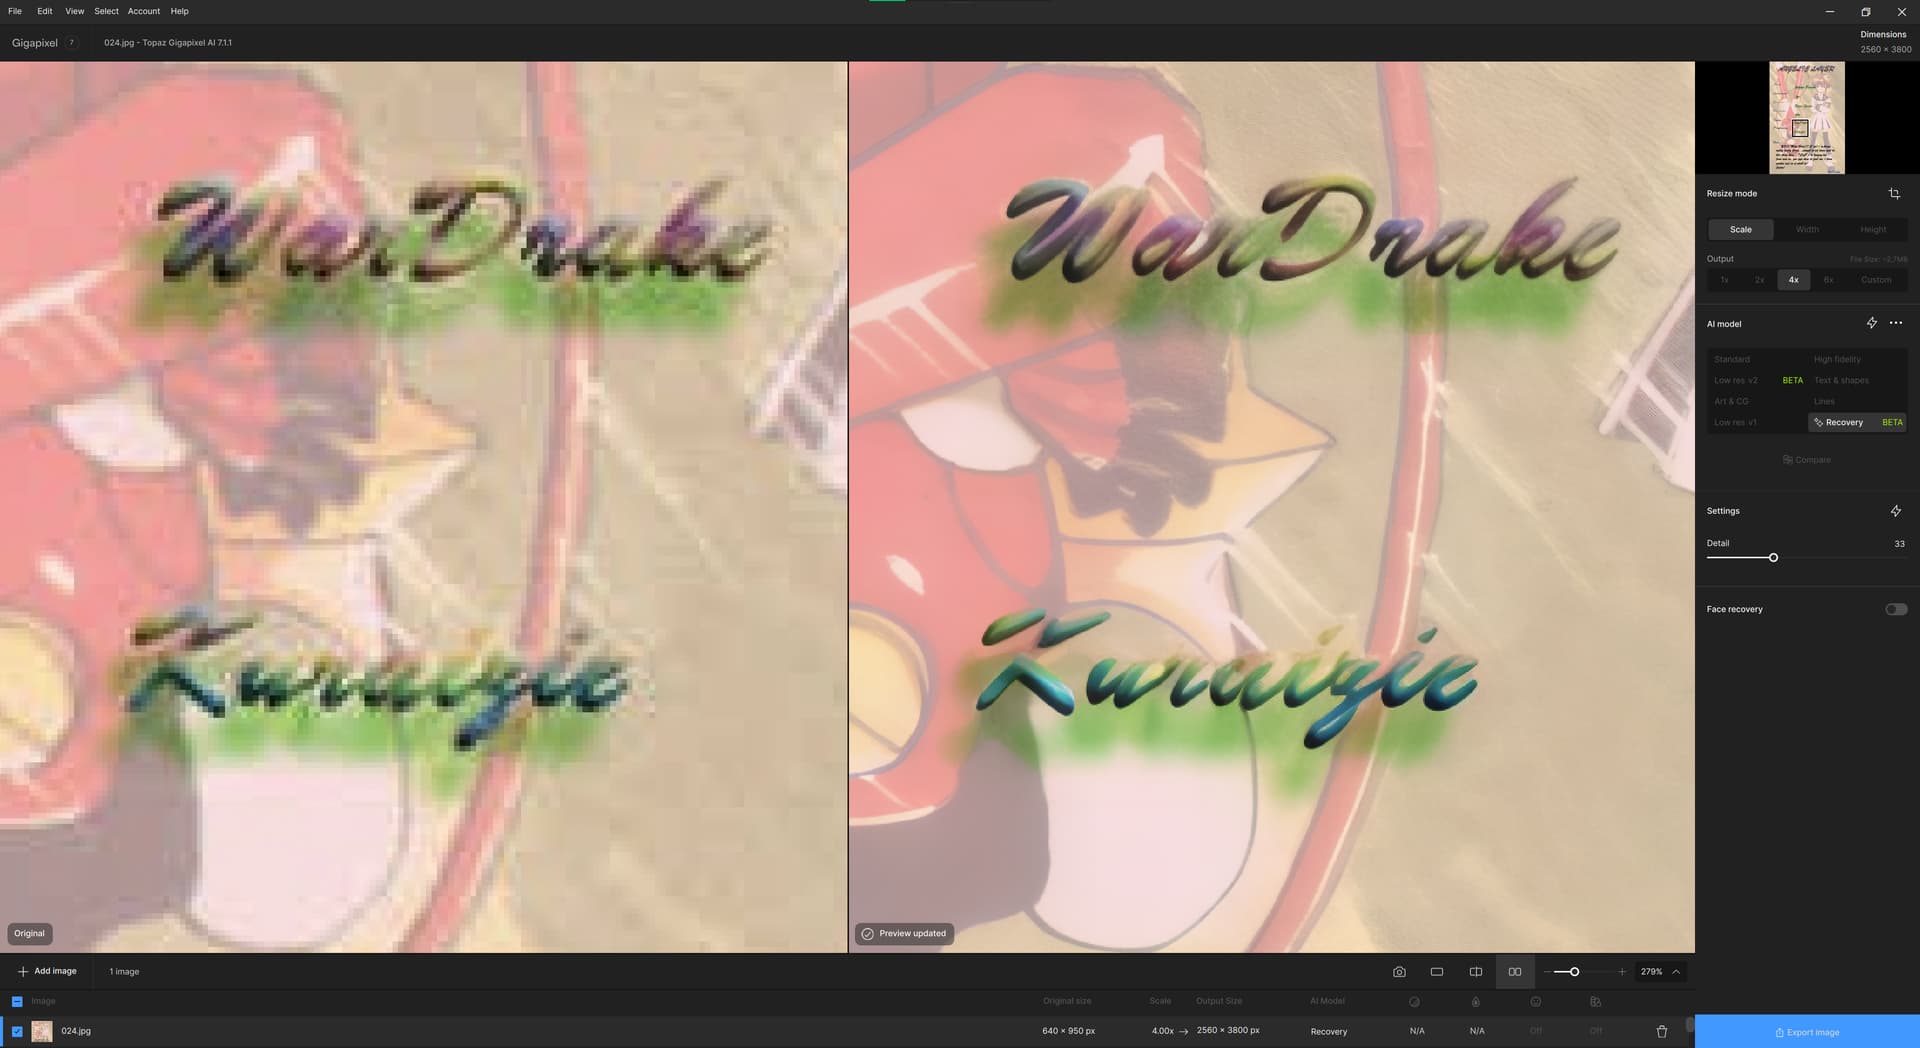
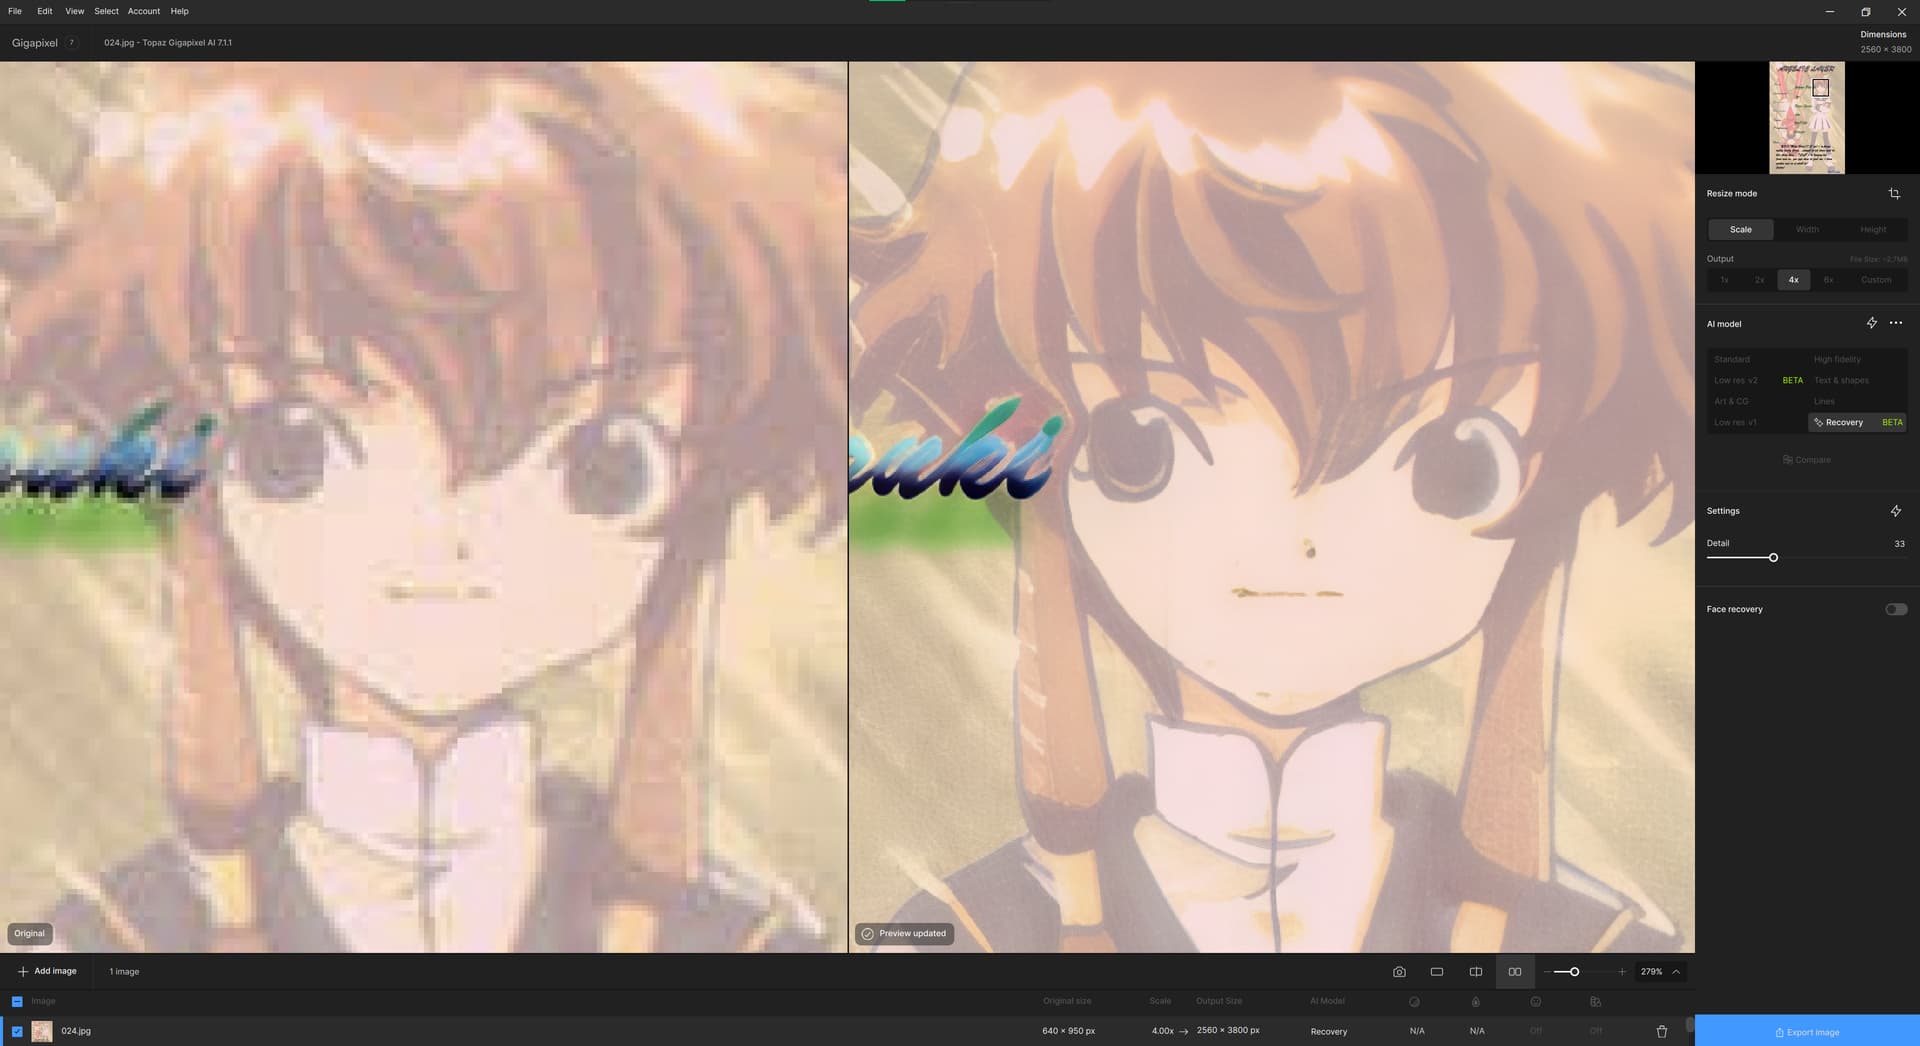
…and that’s from an old ‘Angelic Layer’ manga scanlation project.
LowRes v2 model, after slight adjusting, looks good, too. ![]()
6 Likes
Thanks, Dakota had mentioned the post-adjustment bit (which was a nice surprise!), but I didn’t realize the slider had no effect on the front end. Maybe that needs to be made clear somehow in the UI as my assumption was valid, given that a setting usually affects the processing to come immediately afterwards.
2 Likes
Thx for the reply! And, mentions of the software you worked with. I haven’t heard of most of them. So it’s enlightening.
I do work with a few AKVIS programs. But likely not what you used. Do they have a portrait or old photo restoration product?
I’ve primarily used their AKVIS Sketch & Nature Art s/w (which I earned by developing usage tutorials for them…). I also have a denoising product from them. But I know they have a full suite of different programs for different artistic software effects more along the lines of what Topaz used to offer. And, I believe they have a host program that the individual products can operate within.
I was interested to see what you produced above. Thx for posting.
Yes. Agree. Because the Detail slider is slidable pre-processing it gives users such as us the impression that it will influence the outcome. It seems as though that slider should be greyed out and unusable until it will make an impact.
2 Likes
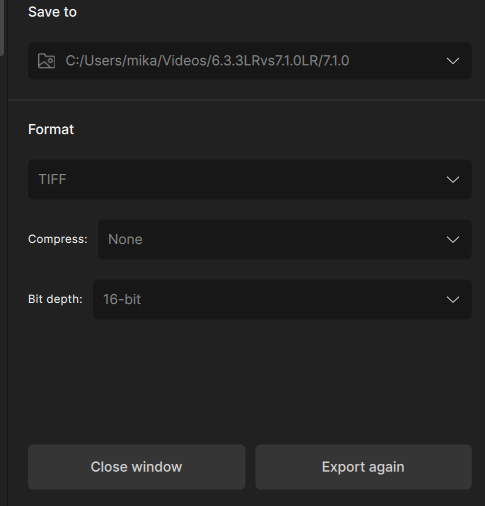
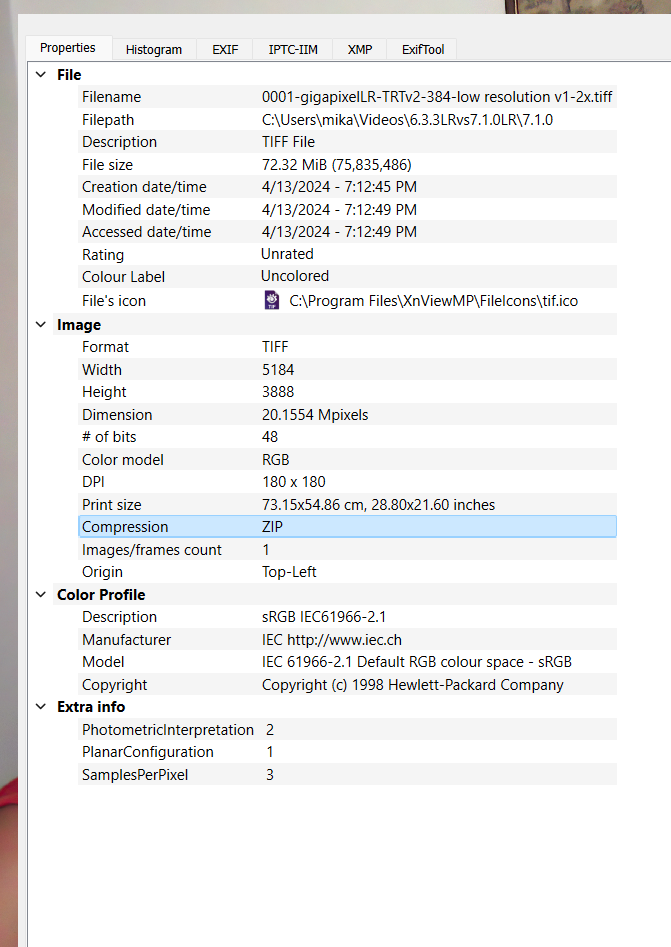
Even though I disable TIFF compression for the output file, the resulting TIFF is still ZIP compressed. This wouldn’t be a major issue, but I notice a significant difference in export speed for a large number of files. How can I completely disable TIFF compression?
Additionally, as I mentioned before, it would be great if you could add a “2nd pass upscale” option in the advanced settings, similar to what’s available in Video AI.
By the way, I conducted a quick test to compare the speed of versions 6.3.3 and 7.1.1:
- 6.3.3: Upscale 2x to TIFF format, no compression, fp32, OX, TZ model
Processing time for 26, 5-megapixel input photos: 1 minute 30 seconds
- 7.1.1: Upscale 2x to TIFF format, no compression (although the program actually compresses the files - see screenshot), same model but fp32TensorRT (which should be faster)
Processing time for the same 26, 5-megapixel input photos: 4 minutes 14 seconds
This is almost 3 times slower for exporting to TIFF. I believe JPEG export is also slower, but not to this extent. For now, I’m using both 6.3.3 and 7.1.1 side-by-side, as each version has its pros and cons.
On Windows OS:
- To avoid the new version overwriting the old one, rename the folder containing Gigapixel 6.3.3 (e.g., to Gigapixel 6.3.3) in the Program Files directory.
Program Data Folder:
- Version 7.1.0 retrieves models from the “models” folder, while 6.3.3 uses the “tgrc” folder. This means there’s no conflict and you don’t need to use Sandboxie (which would add complexity).
And while adding DNG export would be great, allowing us to choose the output color space would be a welcome improvement.
4 Likes
Thanks for the info and advice!
On my M2 Mac Mini I’ve got Chainner installed but immediately ran into problems with a “missing model” (FaceSR; I was testing Upscale Face) that it seemed to already be referencing.
Please PM with more info and I will also watch some videos. Imaging is becoming so heavy right now!
I am used to using DiffusionBee with downloaded models, as well as the geekily-installed Stable Diffusion.
1 Like
I’ll help you of course. I’m not 100% sure if it will work on MacOS, but I think a Metal Performance Shaders (MPS) backend for GPU was added, so you can try it.
Edit:
Maybe I should put this in a post instead of a private message, in case someone else needs it too. I hope the moderators don’t mind.
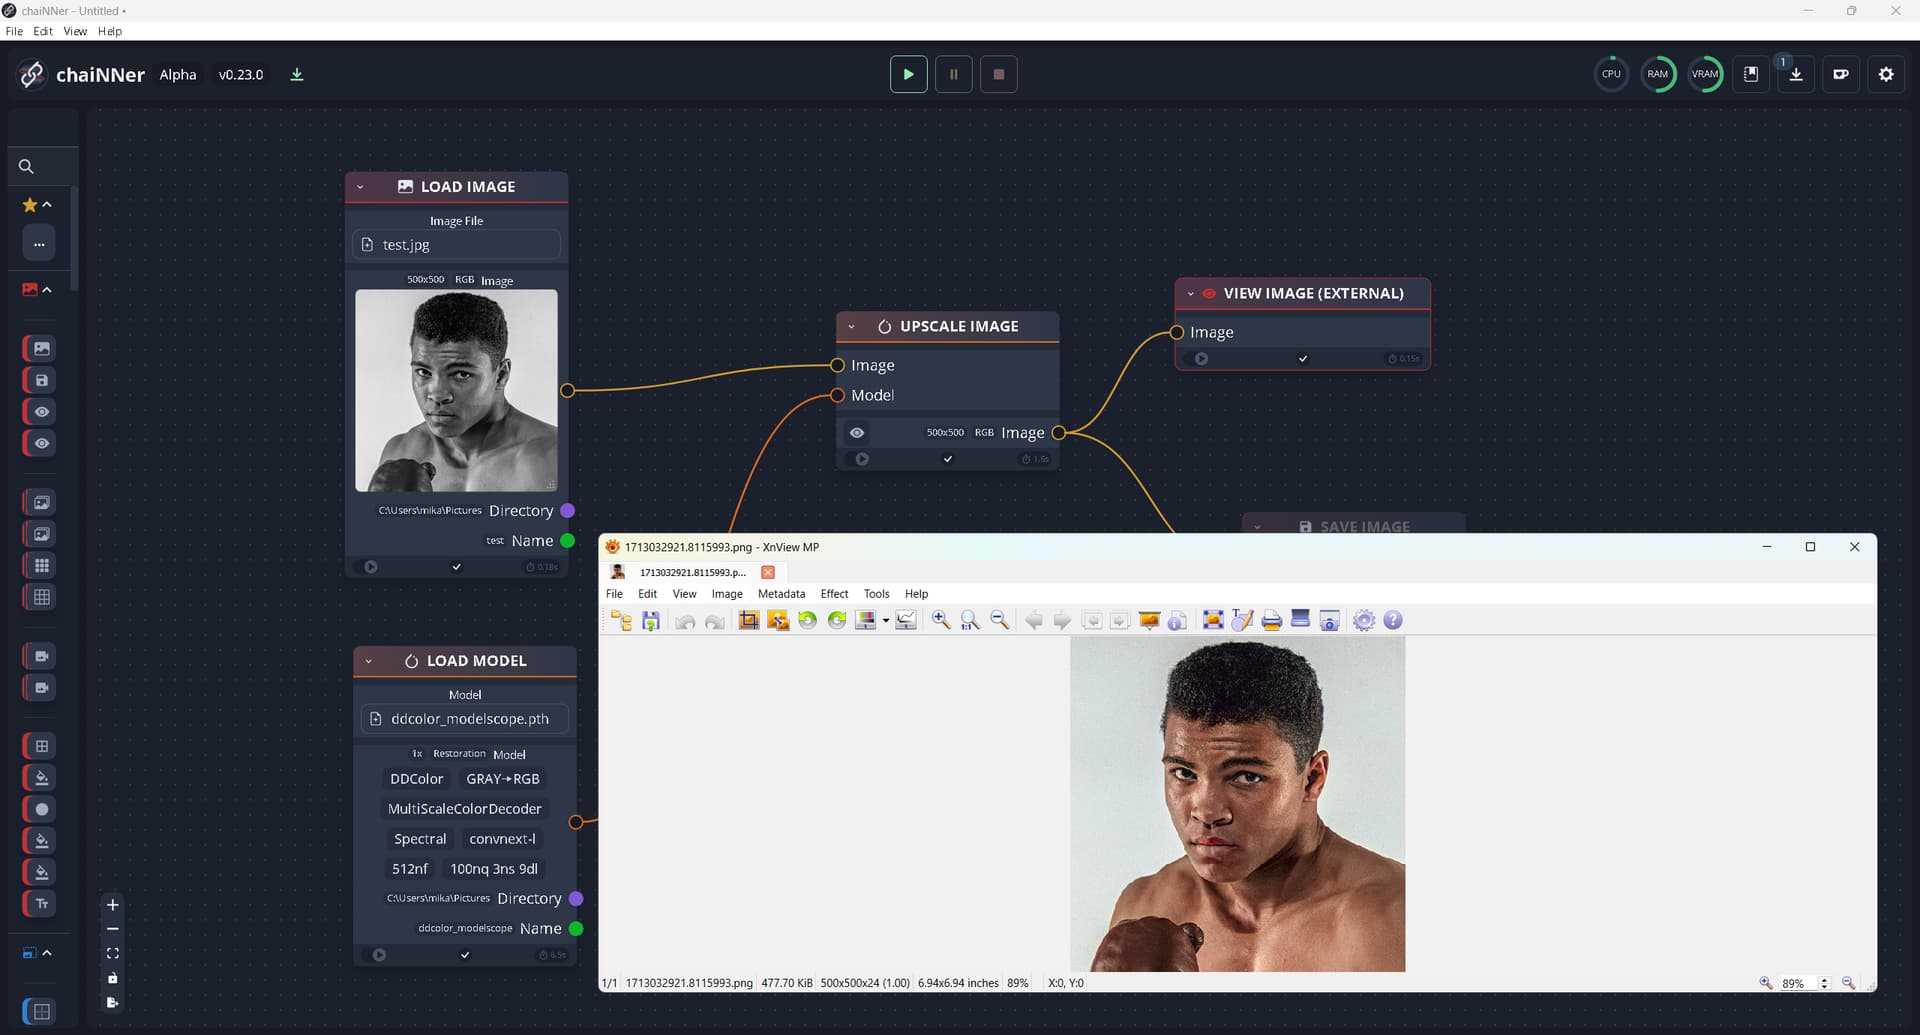
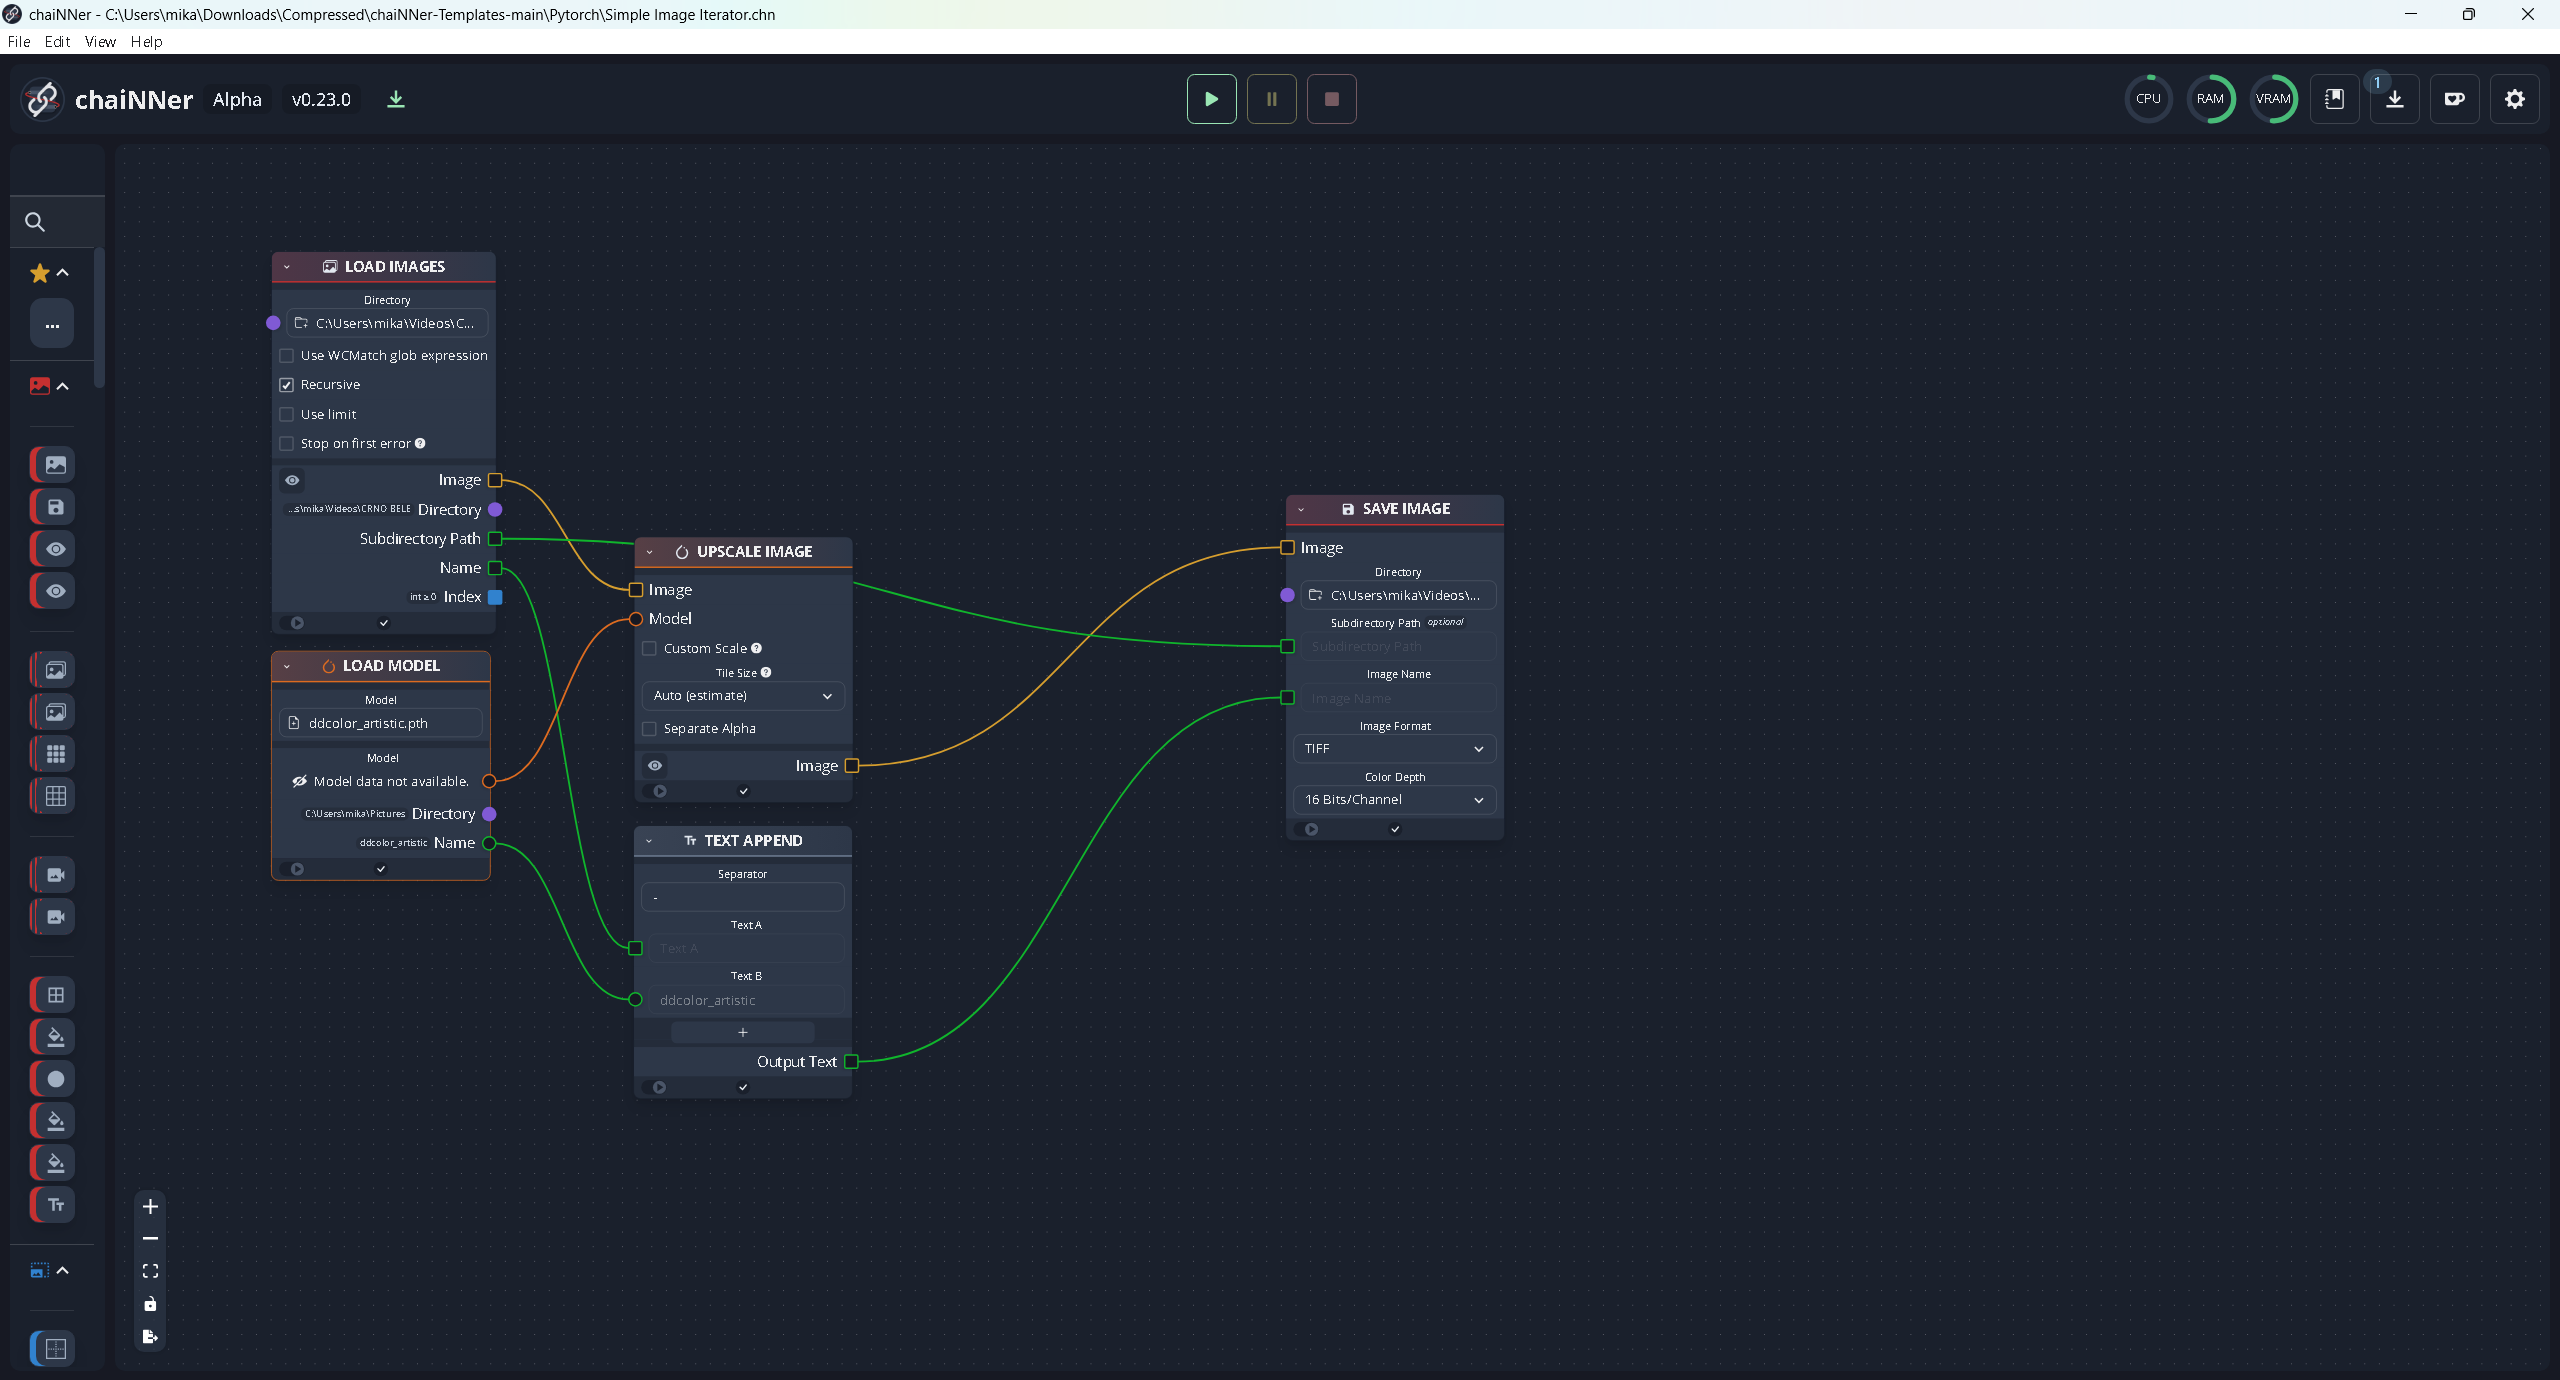
**After Chainner installation ( Releases · chaiNNer-org/chaiNNer · GitHub )
, you’ll need to grant it internet access so it can download Python components like PyTorch and other necessary libraries for inference. Then, I recommend restarting ChaiNNer.**
Models for colorization, can be downloaded from here: GitHub - chaiNNer-org/spandrel: Spandrel gives your project support for various PyTorch architectures meant for AI Super-Resolution, restoration, and inpainting. Based on the model support implemented in chaiNNer. under the “colorization” section. Try the “modelscope” and “artistic” models, both are good.
Afterwards, you can add a node in ChaiNNer to test it out, like in the screenshot. Or, for batch processing a folder, you can use the approach shown in the other screenshot.
Chainner templates you can find here.
Good luck!
4 Likes
Win 11 Pro PC. Using GAI 7.1.1 Ps (2024) Plugin. Processor = AMD RX6800 XT (16GB VRAM).
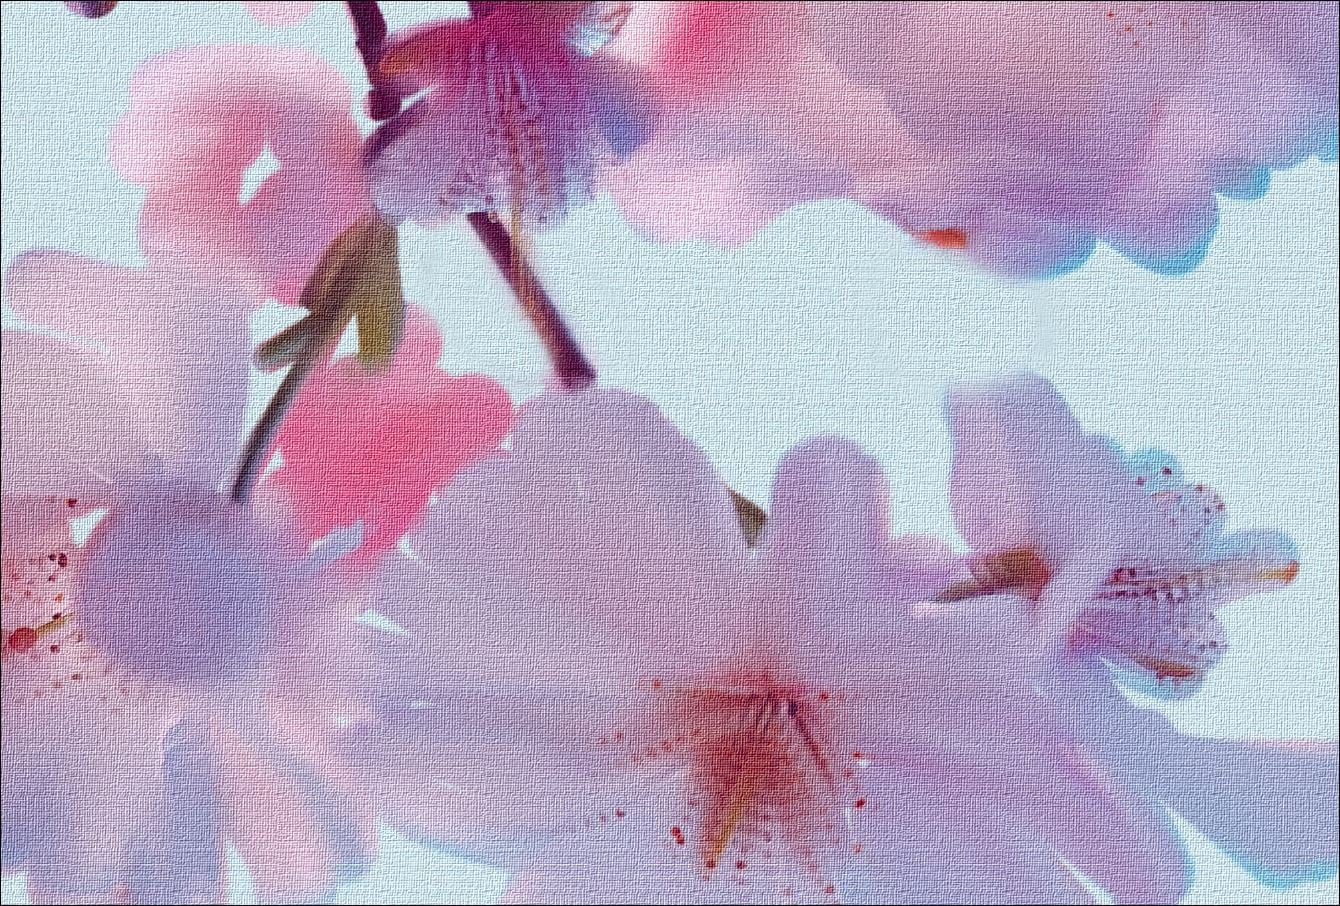
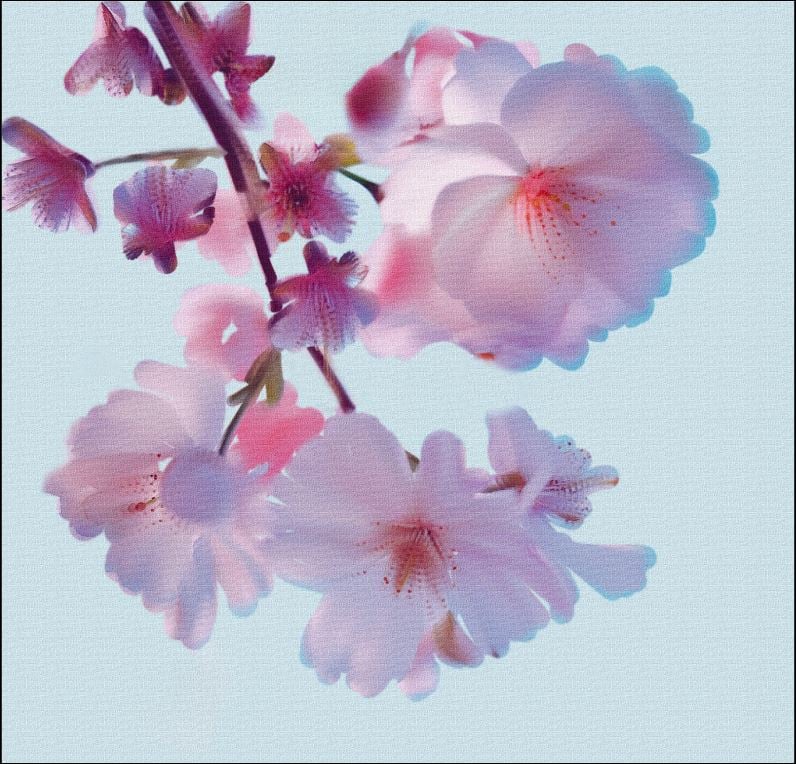
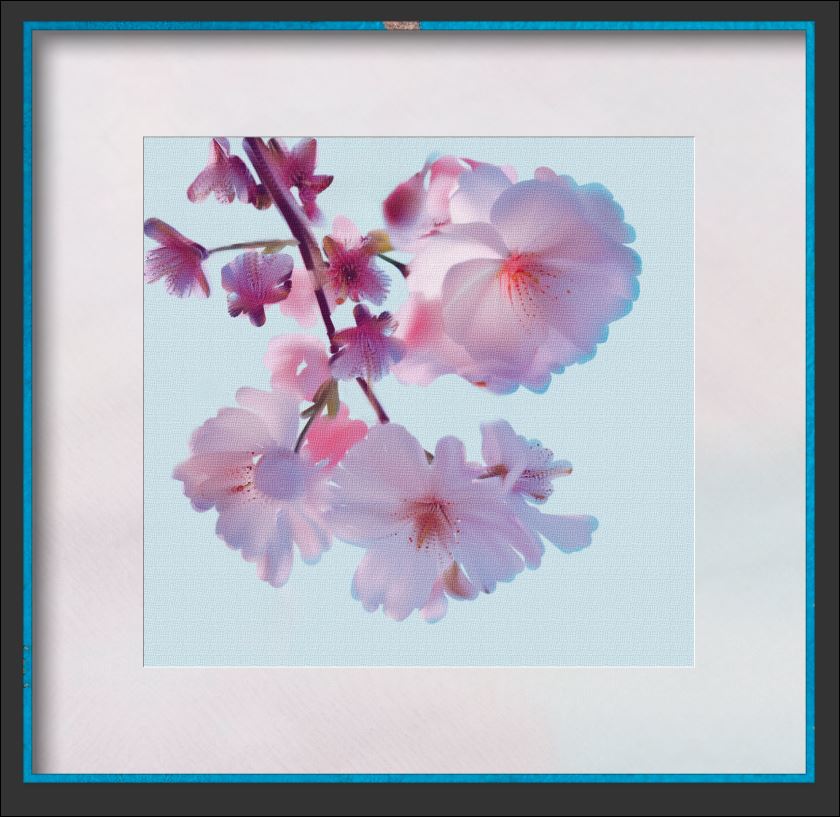
Goal: Try the Art Model on an artificially-created artwork to see how it retains details, color, textures, etc.
Process: I grabbed a stock photo of cherry blossoms (seems au courant with the Wash DC cherry blossom fest happening now…). Used the Mixer Brush tool in Ps (set to Moist) to digitally paint a portion of the stock photo. After painting I used the Texturizer filter in Ps to add a canvas look.
I wanted to see if GAI 7.1.1 would retain the painted look and details as well as the texture of the faux canvas and upsize all of that 2x. The coup de grace, after saving back to Ps, was to add a Topaz Studio digital frame to the digital painting (in the snip attached below, the mat is a cream color and the frame is a patterned blue color - the black surrounding it is just me cropping wide for the snip & not part of the frame).
Rationale: I tried it b/c if GAI is evolving toward being a print pre-processor then I suppose there are people out in the world who may want to upscale and print not only ‘straight’ photographic versions of their photos but also digital paint manipulated ones; that they can either print themselves or send to a commercial print facility (like Bay Photo, etc.).
Impression: I think the Art model in GAI accomplished what I hoped it would in terms of color, texture, level of detail desired for a faux ‘painting’ and retaining the faux canvas look.
Snips (labelled in filenames):

3 Likes
same.
![]()
If the GAI logo shows an image getting bigger, I figure the PAI logo should show an image getting ‘prettier’.
1 Like
This is an image that I think benefited most (comparing to other models in the UI) from the Low Res v2 model. A nature shot that’s a very low res image (7 MB orig.).
2 Likes
Next Bug is back ![]()
The Preview-Rendering is again rendering twice!
1 Like

Nice illustration!
What do you mean by the comment I’ve snipped?
Are you talking about the Recovery model beta in the commercial release 7.1.1?
Or, saying the commercial release, in general, limits the size of an image you can work with or limits the quantity of images in a batch you can run?
1 Like
Double Clicking on Topaz GigaPixel AI doesn’t open it. In fact nothing opens it (I tried going to the program folder and right-click ‘Open’ from there and again, nothing happens.
The previous version that was installed also didn’t open (but I can’t remember what version I had installed, perhaps the immediately previous version to this one, 7.1.1).
Please can someone advise?
I’m on Windows 11.
Thanks.