More than a bit disappointed in the new update. The Raw engine leaves artifacts that the others do not. I have the same results on both a mac and a PC.
Would love to have included images of examples, but you know those pesky rules.
More than a bit disappointed in the new update. The Raw engine leaves artifacts that the others do not. I have the same results on both a mac and a PC.
Would love to have included images of examples, but you know those pesky rules.
After using the latest version standalone on an NEF there are problems I’d like to solve.
First test I picked retain preserve source sormat. Then in LR, I synced that folder. Image was very dark.
It seems that whichever output choice I make during save file, the resulting file is messed up.
When importing this screwy file to Lightroom Classic (current version) the image is much darker and all of the Adobe default color profiles are just gone. The only choices are “Color” and “Monochrome”
Usually you see Adobe’s Color, Landscape, Portrait, Vivid, and Monochrome, but only for this DNG file they are just gone. I’ve tried saving with all the formats options, etc. But no matter which, this same problem.
If I edit my image from Lightroom ----> DenoiseAI it works properly and does not discard color information. But then it becomes a tiff and no longer an NEF
I won’t claim I am some expert with this tool, but it functions perfectly as long as I use the standalone in RAW mode.
I’m probably missing something obvious, so please feel free to let me have it!
Thanks in advance.
I have the exact same issue. From what I’ve seem on the web this issue appears to be camera specific. I have a Nikon D500. Sent note to Topaz. No response yet.
Do they have a problem with Nikon?
Even the lightroom module denies nikon NEF for RAW mode. Hopefully it gets addressed soon. Mine is a D90…
No I read about other camera models from different manufactures having this problem
Oh very interesting…thanks
Programs from the Topaz Software package become more and more multifunctional as they develop.
Some modules sometimes have functions that are not inherent to them initially, and are similar to the functions of other modules (I mean Sharpen AI and Denoise AI).
But these modules do not exclude, but complement each other, because they use different algorithms.
And this is very good, since the user has the opportunity to choose.
Users can have very different tasks and very different materials for processing.
Therefore, it is not correct to unequivocally praise or criticize any particular development product.
I am writing this because I am very grateful to the development team for the added “Severe Noise” mode of operation.
And also for the fact that the developers continue to improve the work of this module.
In the latest version, this module has started to work even better.
The fact is that “Severe Noise” is the only mode that allows me to process old and damaged black-and-white negative films scanned in high resolution with very coarse graininess. This is my job.
If it were possible to automatically remove long straight scratches I would be happy.
I repeat - this is my personal opinion about a particular module of the program.
Other users with other tasks may have different opinions.
Therefore, in my comments I preferred not to criticize the shortcomings that will always be,
but to highlight successful solutions of developers in order for developers to keep them in future versions.
There will always be critics.
I suspect that the dng output from denoise is not raw. ie it is just a tif inside a dng container, hence the lack of ability to edit the dng with all the latitude of a raw file afterwards.
If the dng really was a raw file, then you’d be able to reset it to a base image in LR, losing any denoise edits.
All seems a bit misleading to me…
Understanding those limitations though, it still looks like you can get some good output from denoise/raw, especially with severe noise files where the colour balance is close to where you want it. If the colour balance was way out when you shot it, then you’ll want to edit the raw file, then send tif to denoise.
I can’t see myself using it for the majority of images though, but I had good success with an ISO 6400 pic.
When taking dng back into LR, be sure to turn off/reduce sharpening & noise reduction settings, or you’ll be doubling up.
How could one “reset” in LR?
Correct, RAW files only come from a Camera sensor.
I want to be clear in no way was I intending to criticize. I merely was reporting a bug/oddity with a new feature that seems like it was fixable.
Anyway, yes I usually get wonderful results without staying RAW, but I do like the idea of keeping my files RAW until editing is done.
I would simply like the NEF files to work using the new version. Otherwise I will just keep using the other modes.
dng can be a raw file.
raw files do not only come from a camera sensor. Proprietary raw files only come from a camera sensor.
dng is just a container, so it can be raw data + settings, or it can be flattened image + settings. eg you can convert a jpg into a dng, but it does not become a raw file. You can also convert your nef/cr2 etc into dng and it can remain a raw file, depending on your export settings.
Part of the problem with dng trying to become a standard is that you have no idea what the contents are…
Re my comment ‘I suspect that the dng output from denoise is not raw’ – this means that the dng output is not ‘raw data + settings’ but some sort of ‘flattened image’, with no ability to remove settings and get back to the raw data. Given the file size, I suspect the denoise dng file contains a tiff with zip compression.
In grid/loupe view, right click the image and select Develop Settings/Reset. In dev view, the Reset button is bottom right. These both take you back to your program default settings, which you may have changed from the camera defaults.
To get back to camera defaults, select Camera Defaults under Defaults in Presets, when in Dev module.
To fully get back to zero, you may need to manually move the Sharpening/Noise Reduction sliders.
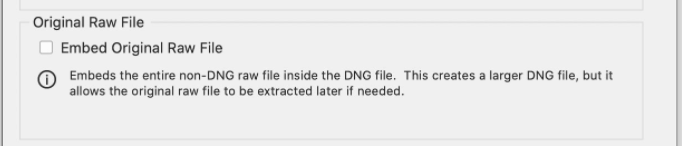
Although some cameras produce RAW with a DNG extension they are RAW images. For ordinary DNGs converted from RAW you can only accomplish that if you embed the original RAW during the process.
The output from the DeNoise operation is a TIF with embedded profile and that is why you cannot allocate other profiles or additional lens corrections. FYI a DNG is a TIF format anyway.
Just so you are aware the DNG Converter from Adobe can be run in background mode to create a single DNG file during a process, here is a 4 page parameter list:
https://wwwimages2.adobe.com/content/dam/acom/en/products/photoshop/pdfs/dng_commandline.pdf
This program does produce DNGs that can be processed like a RAW file for some camera models That is all the color profiles are available and controls act correctly. This is shown on YouTube. This program apparently isn’t producing DNGs correctly for some camera models.
Here is some good info about regular DNG and linear DNG:
The worst update ever. Is it possible to go back? - found the way to get back.
No. I have converted thousands of old NEF files into DNG without embedding original raw file, and the result is just as editable as the raw NEF.
Okay. So, you applied denoising in DAI (or DxO Prime… whatever), and now want to open it in LR, ACR, or any other program which does not have this denoising algorithm. How do you want this original file “with settings” be opened there? The modified (e.g. denoised) image must be flattened, the only option to keep such changes, which apparently are destructive, and this indeed happens with losing other features of the original RAW file.