Thanks. I’m not sure I understand the finer details, but I’ll play around with it.
I tested between 720 x 540 and 768 x 576, I still got better results with 768 x 576.
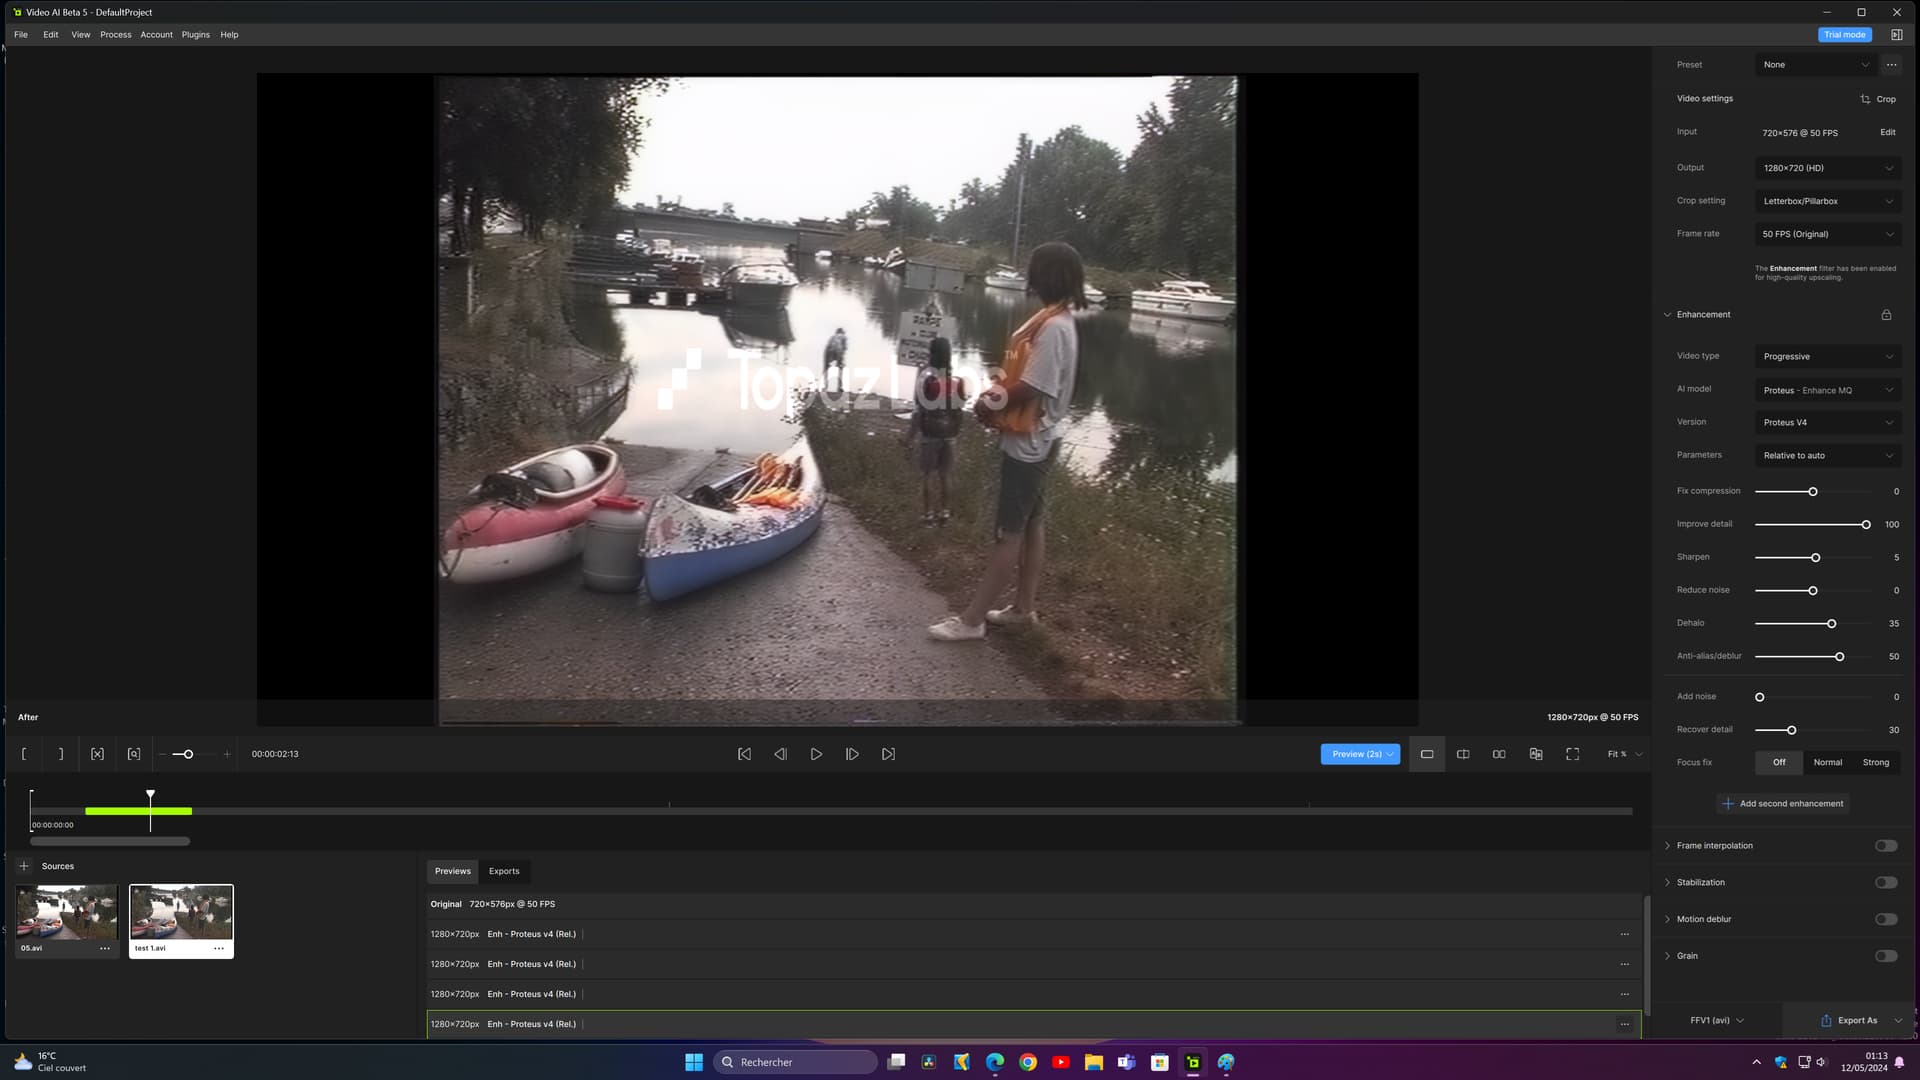
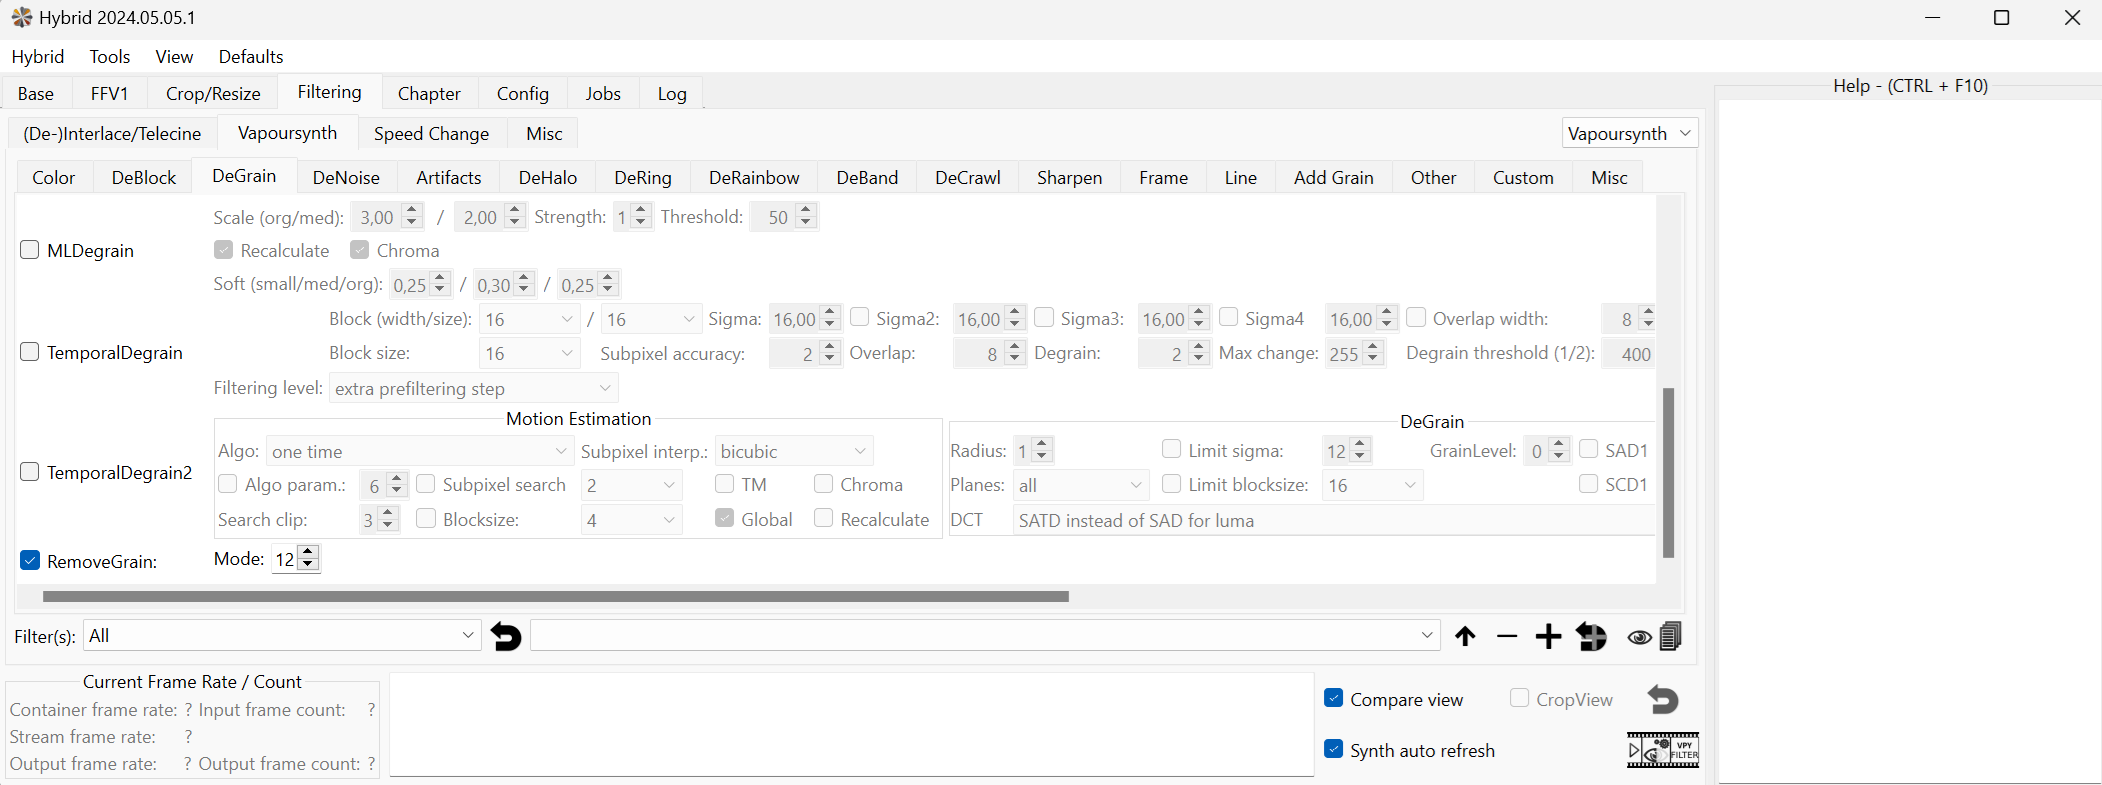
yes, I also tried using Dione DV interlaced, or in the second pass, Dione SD footage cleanup, it gives good results but there is some loss of detail, and the dehalo is a little too strong, on the other hand I I found another setting with qtgmc, before I thought it destroyed the quality but in fact it’s better, when you define “final temporal smoothing” to 1, or more, you have to check “lossless: after temporal smooth” it there is less loss of detail and fewer artifacts, so when we directly apply proteus v4 in hd afterwards, the video is really clean, even with the preset: placeboo and “final temporal smoothing: 2” there is less loss of details on movements only if we leave “lossless” disabled
look how it looks with a high level of detail, there are no artifacts, no noise, the edges are smooth, and the details look natural:
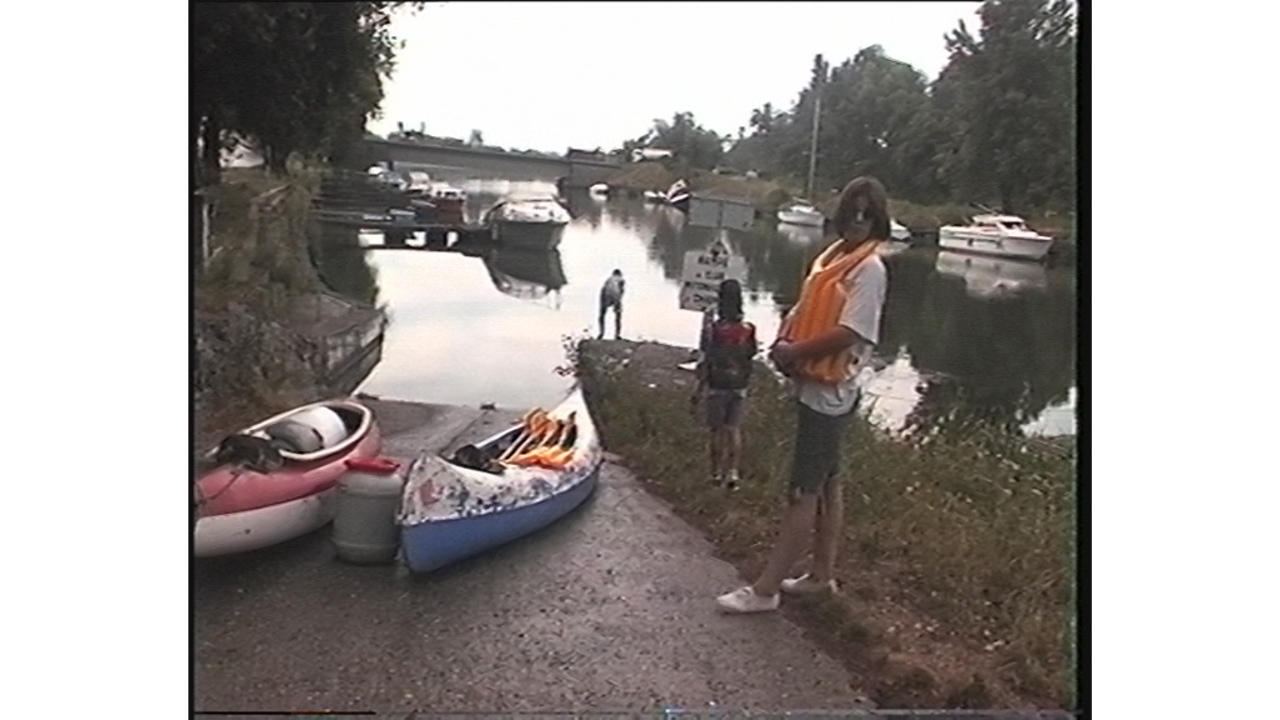
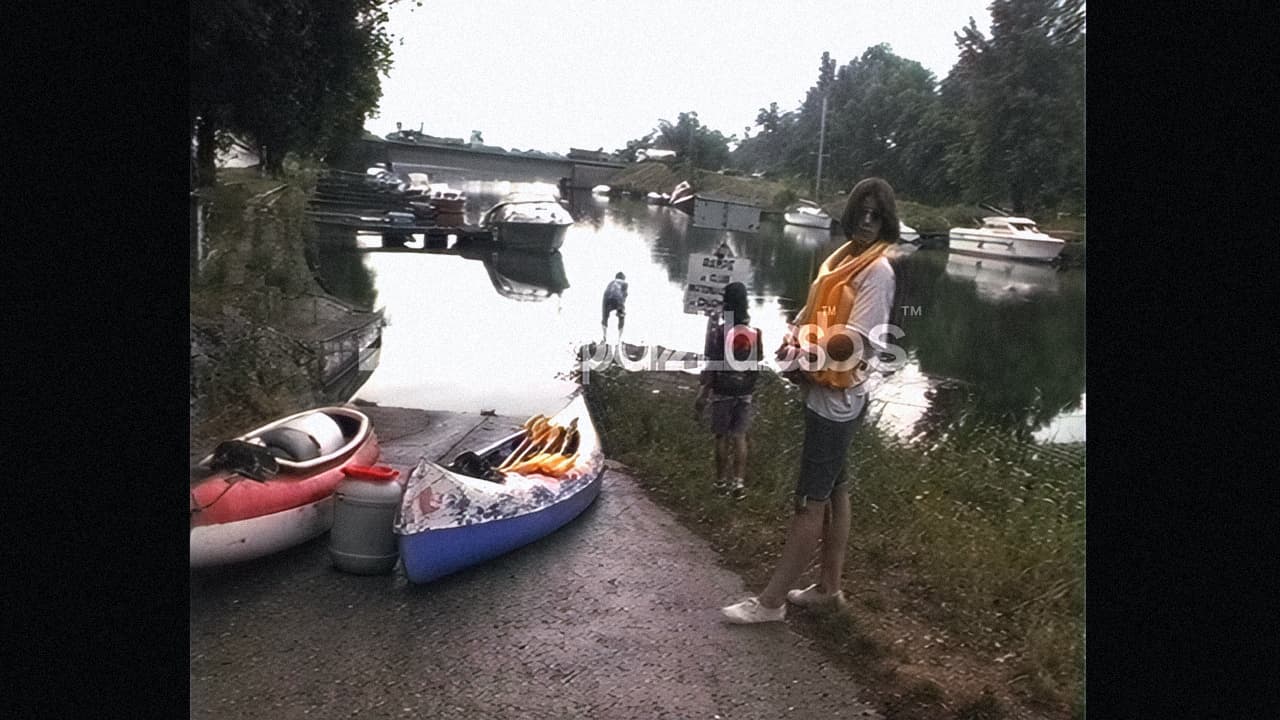
the face is distorted (bottom picture)
and it is even more distorted in the top photo ![]()
the top photo, maybe a bit blurry and a bit not cleared , but not as distorted like the bottom one.
anyway my opinion only, i guess it is a matter of taste.
believe me that these are the best settings I’ve found, I think I know why it looks like the face is distorted on the screen, it’s because I applied a little grain, and the graining is confusing of the neck. And then the face is really small and quite far away. But I’m posting a video as soon as I can;)
1 Like
*** UPDATE***
I found a new improvement method, in general it removes all the artifacts and it retains maximum detail, it’s in three productions, one with hybrid, two with vai, I also use vegas pro to refine :
- Hybrid:
Use QTGMC to deinterlace as on my screen, without affecting the resolution
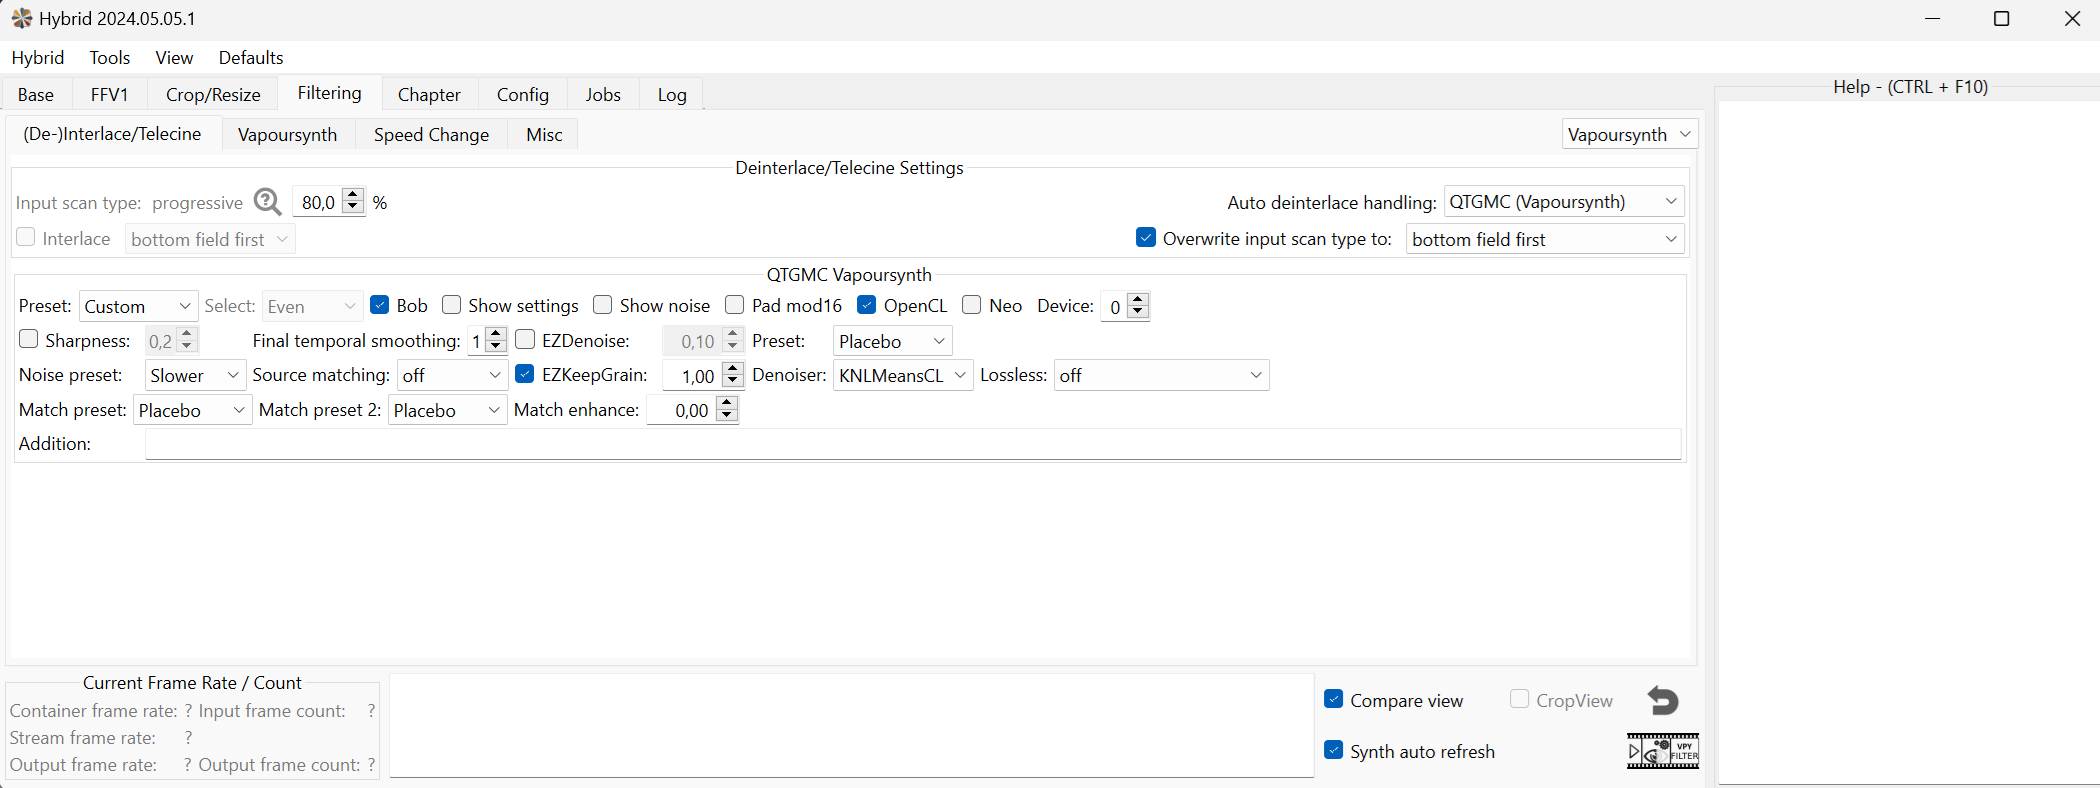
In “grain” go to the bottom as on my screen, on “remove grain” and select mode 18 or 12, I found that 12 is a little better.
produce in ffv1 without loss and import into vai, it looks like this:

- VAI
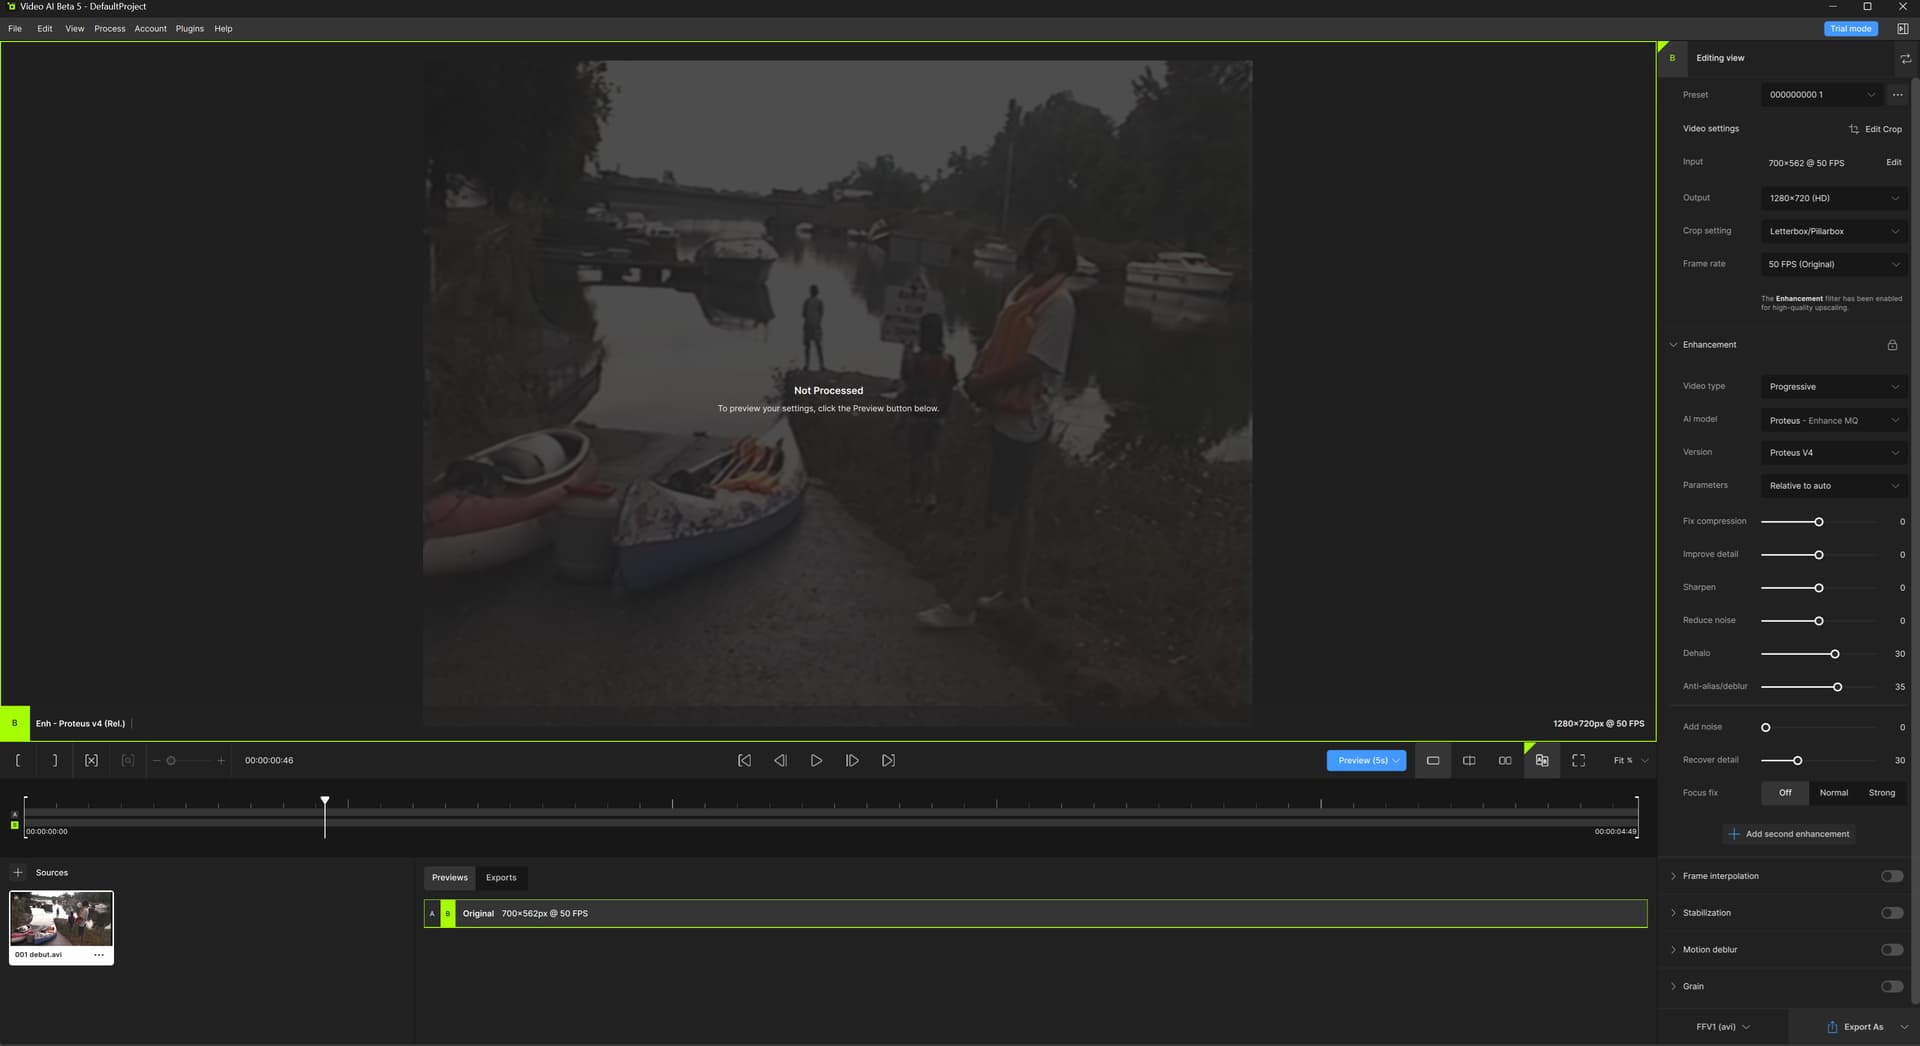
Personally I crop the visible borders, in my case it gives 700 x 562
1st pass with the proteus model (relative to auto), with recovery of details at 30 (ffv1 avi) as on this screen:
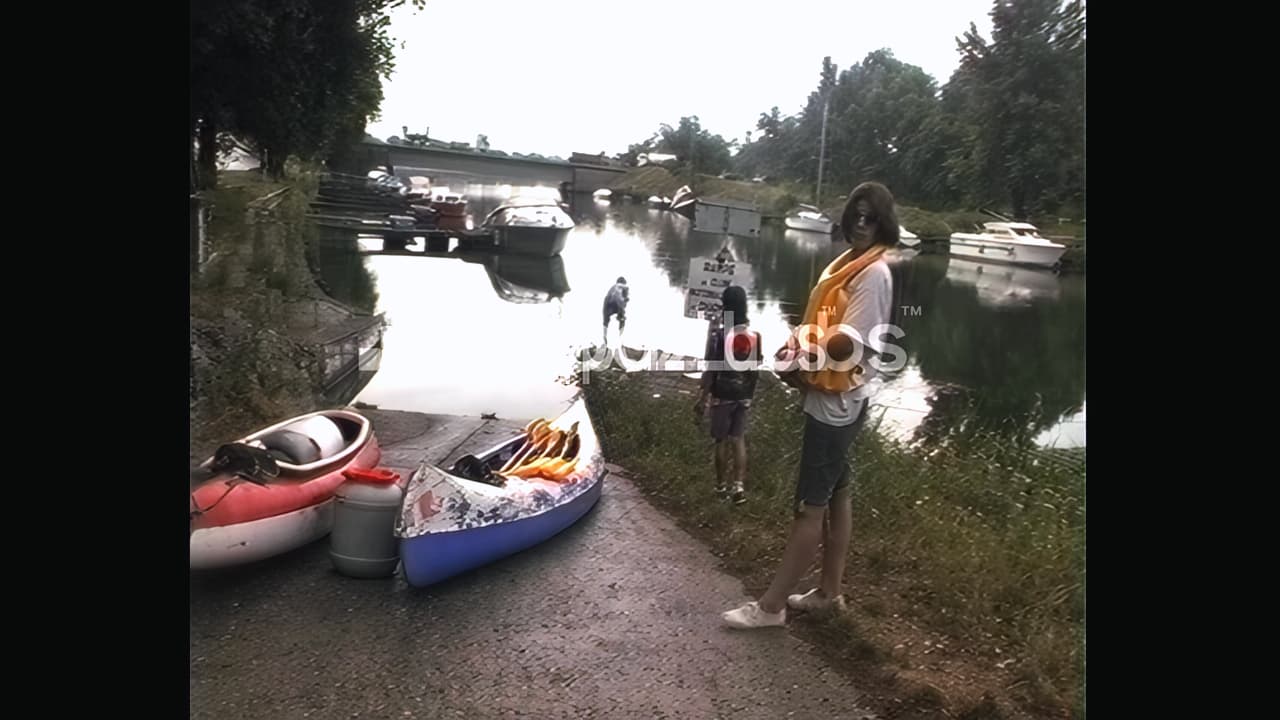
the result :

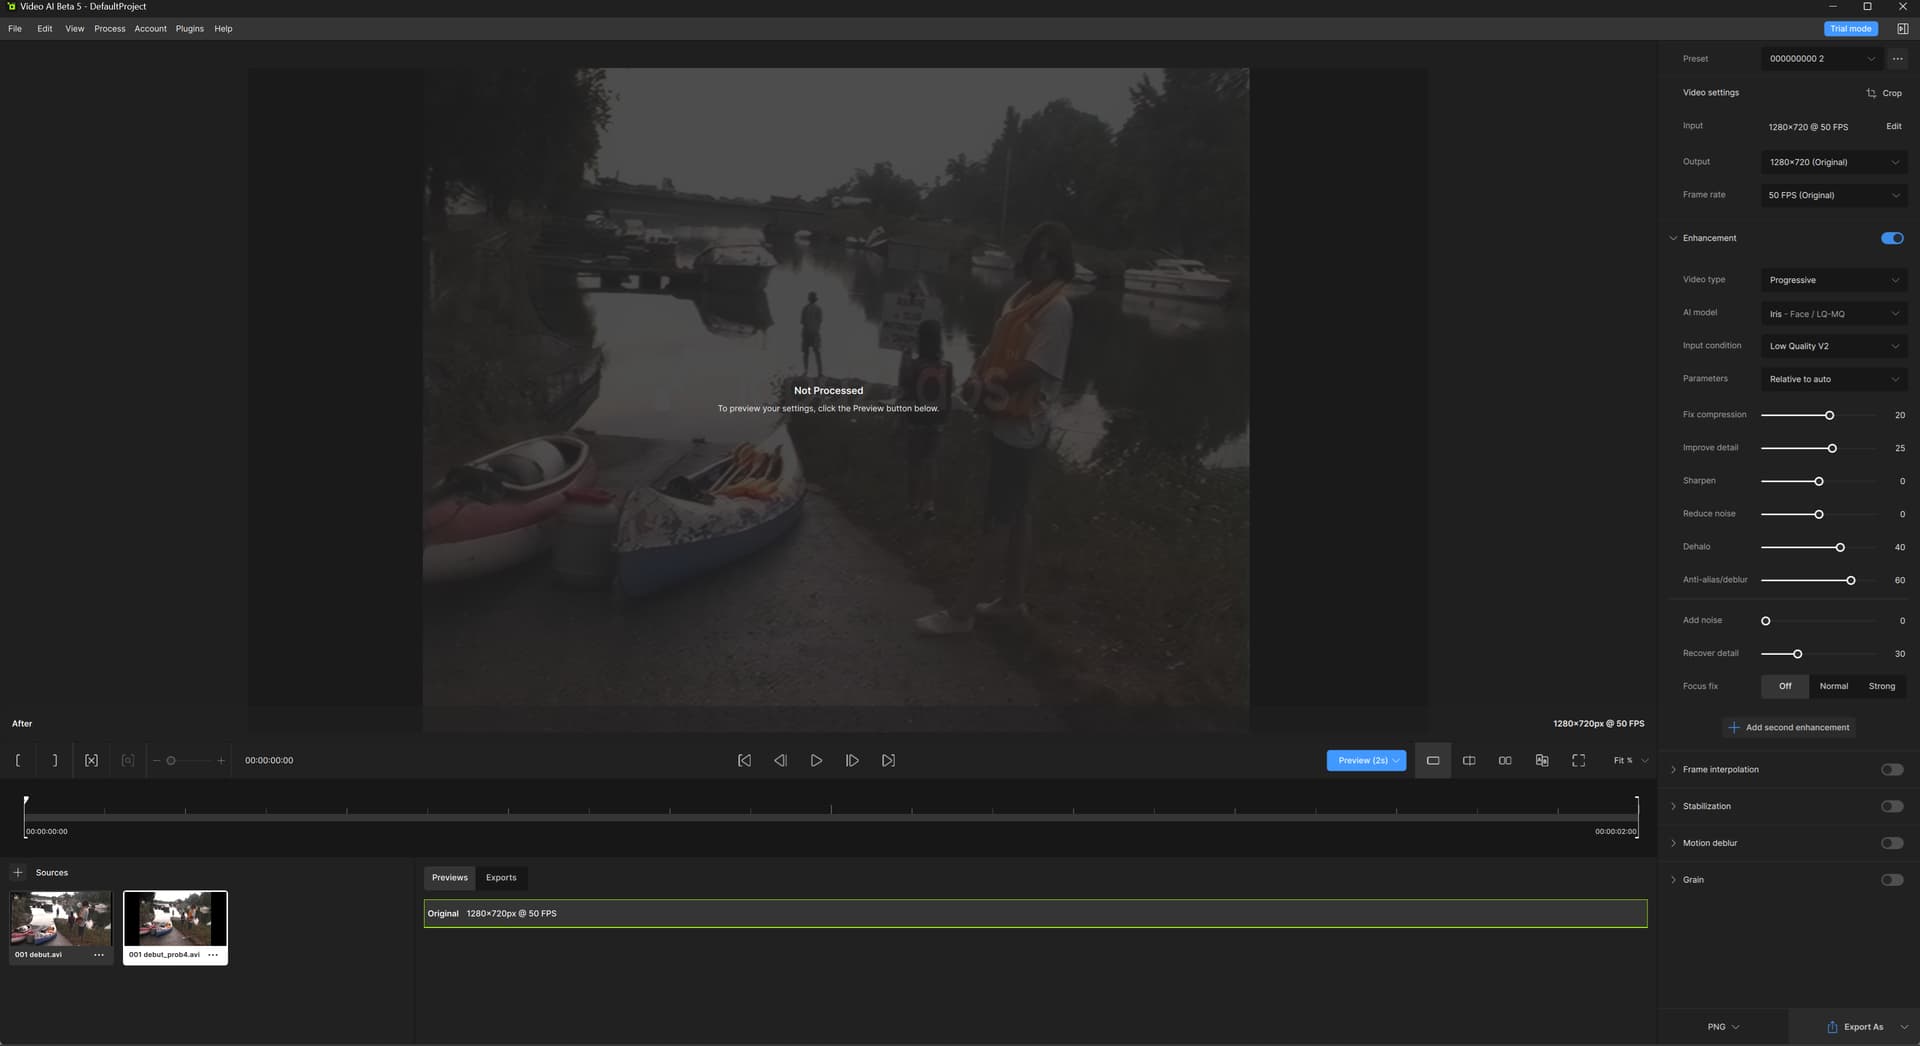
2nd pass using iris as on this screen:
the result :

then I use vegas pro to get this result in the end:
(I forgot about the compression of the site so we don’t see the maximum quality and we don’t even see the added grain)

the final result without added grain:
and here is the original with vegas pro deinterlacing:
There you go, as for “remove grain” in hybrid, I haven’t yet tested below 12, I started from mode 24. and I haven’t yet tested too much playing with the proteus and iris settings , there may be better results with other parameters or models, perhaps another pass, but obviously, the video which comes out of hybrid and once processed with proteus in auto gives very good results to start with. from this base, in my case it removes all artifacts and allows you to have maximum detail on the movements, the higher you go “final temporal smoothing” in QTGMC, the more you lose detail on the movements and the environment become unrealistic, I already find that with this parameter at 1 is a lot but I base myself on the strands of hair of the girl on my video to have an overview of what it does, if I set it to zero, there’ has a bit of visible artifacts and if I set it to 1, more artifacts while still maintaining good quality of detail on head movement. So yes, the face is not yet restored to perfection, but I tell myself that it is quite far away in the videos, the restoration on the faces in closer shots still works wonderfully, and I am going to refine it already in using the other grain modes below 12 with the same vai settings, then when I have the best one if it’s something other than “12”, I will tweak using other settings with vai.
the only problem I encounter is the dehalo, it is not perfect even if most of the black borders are reduced, there are still beautiful black borders like here, along the t-shirt on the back of the girl. I noticed that iris removes this big halo well but if it is set with detail recovery at around 20 or 30, but at this level, the quality changes and is no longer good. I don’t really understand the dehalo filters with hybrid, especially for the bright halos like the one visible behind the black halo on the girl’s t-shirt.
In the meantime try at least this setting with “remove grain” on 12 with an auto proteus pass at 20% or 30%, you will see for the assets and details. ![]() after all it probably depends on the video sources, noise, grain, resolution etc… I haven’t tried with other sources yet
after all it probably depends on the video sources, noise, grain, resolution etc… I haven’t tried with other sources yet
I’ll produce a short comparison video and update, it’s always better to see in playback than in a still image ![]()
2 Likes
I’ll give it a shot.
your last Process from about a year a go I still use up to today (the QTGMC Hybrid part). let’s see what your new one has to offer ![]()
One question: Why do you use OpenCL in QTGMC? what does it gives you better?
OpenCL has to do with using the GPU to speed things up. The results should be the same.
1 Like
yes, opencl doesn’t change anything in the final quality of the file, and in my case, I didn’t pay attention if it was faster because I always render short videos. for “removegrain” at 12 or 18 it removes the artifacts well I think but it kills the very fine details a little, so even if it helps with the upscale, in the end the original details are a little changed and when we look Ready for comparison reading, we have the impression that all the details are well restored but I still find that it has a slightly unreal effect, but not because of these settings, it is due to any improvement with vai, as long as we upscale it is almost impossible in fact to have the original details at 1 or 2 pixels ready, but I am very demanding. I still think that this setting with remove grain can be a good basis. and the author of the software prefers it to “24” according to him, the least destructive, to try to refine with too.
1 Like
I now consistently use QTGMC deinterlacing for all my interlaced source work. The difference in quality between it and the Topaz AI deinterlacing is substantial, especially on old 50i and 60i motorsport videos where interlacing artefacts are arguably displayed at their very worst. With the Topaz deinterlacing (and every other deinterlacing I have tried) the dead giveaway (that it is problematic) are that the numbers and decals on the sides of the cars “swim” and generate quite noticeable artefacts which are never present in native progressive footage.
This shortcoming is substantially mitigated (and often 100% eliminated) - using QTGMC. I am using the placebo setting if only because my machine is fast enough such that it is no imposition - the other steps in my process are much more time consuming that a step which can run at approximately real time for 50i PAL content.
I have heard some criticism that the perhaps the resultant picture is a little “soft” and that some ghosting can be present however in all my testing, the end result correlates - to my mind at least - how it would have looked like originally had it been shot using 50p instead of 50i. As for any ghosting, it exists in the source material. The only reason it might appear more prominent is because the result is so clean but does nothing to get rid of what is effectively baked into the source material to begin with. This is just a shortcoming of old school analogue video technology. If it bothers people they can add a small amount of noise to disguise it but so far as I am concerned it is not overly bothersome - certainly not remotely as bothersome as the artefacts of swimming decals on the sides of the cars.
Infact I am so impressed with this workflow that I am now unhappy with the results I am getting where the source material was originally 50i but for whatever reason, the end commercial product ended up as 25p. I never got an explanation from the original vendor as to why they ever did this for some titles (being told for “technical reasons” is just obfuscation) but the problem is the deinterlacing they used is inferior (so about the same standard as Topaz AI). Luckily I do not have too much of this material since there is not much I can do about it. I have been trying lots of techniques but nothing really makes any substantial difference over simply using Proteus and Aion in Topaz AI. Sometimes the source material is so bad to begin with that you can only do your best to achieve nothing more than a barely mediocre result. And to be fair, it would be a near miracle if the result were any better!
the reason why they probably deinterlaced it by throwing half the fields is because of resolution and potential bobbing effect.
Even though most claim that it is a good practice to bob / double the fps (e.g. 50i → 50p) for motion smoothness it doesn’t come without its own issues.
i.e. each frame has half the vertical resolution, or resolution equal to that of each field that the frame was made from. Bobbing prevents combing artifacts and maintains smooth motion but can cause a noticeable reduction in picture quality from the loss of vertical resolution and visual anomalies whereby stationary objects can appear to bob up and down (hence, the name “bobbing”) as the odd and even lines alternate.
The level you use in QTGMC (e.g., Medium, Slow, Placebo, etc.), is only for the amount of denoising level and not on the deinterlacing process itself. as more you denoise , more details loss you get from the video. I would suggest you to look into using a much lower (or custom) profile and let Topaz enhance it later after it is deinterlaced (that way topaz has more details to work with).
the exact profile or custom settings that most likely would produce you the best results is something you should consult with @ssbroly as he/she tested many settings and configuration on 576i content and published few iterations of Hybrid/QTGMC settings in the past that works best for this type of content that he/she observed.
1 Like
yes, the closer you get to the placebo profile, the more it denoises. i noticed that even with the fast, super fast or even ultra fast profile, you lose details. you have to use draft mode to keep everything, with this mode, there are quite a few combing effects but at the moment, proteus v4 is powerful enough to correct them. there are still some artifacts sometimes, so i tried to apply additional noise reduction, or grain reduction. (i tried “remove grain” from mode 1 to mode 24, nothing very conclusive).
for a few days, i have been trying other deinterlacing methods with virtualdub. but i’ll come back to that later. a few months ago, i found that deinterlacing my sd sequence with vegas pro using the gpu, it made some artifacts but it kept more fine details than with qtgmc. again, proteus is powerful enough to fix them by upscaling to HD. Then, I noticed that still deinterlacing with vegas pro but with interpolation gives a little better quality. (i know i already tested it a while ago but i tried again, and i don’t know if it’s because before i left “recover details” at 20% with proteus or if it’s because i just upgraded from a gtx 1660 to an rtx 3060 ti. i now use “recover details” at 0% and most of the time, all the default options. But for a few days, i tried again several deinterlacing modes with virtualdub, the default deinterlacing with bob mode is a little better than with vegas pro. i tried the “duplicate field” mode also always doubling the images, it gives a good result once the upscaling with proteus v4 is done, but by deinterlacing this way, the image jumps slightly, which can be corrected by applying a slight stabilization with vai at the same time as proteus. in overall, with the “bob” technique it works really well, but I think that in some cases it might be better to deinterlace with qtgmc if there is text even if it means losing a bit of detail. To get back to qtgmc, with the draft profile and exporting in ffv1 range color slice4 in avi etc… supposedly lossless, I have the impression that there is a loss and that exporting with virtualdub or vegas pro gives more faithful results because you can export directly in uncompressed avi. I don’t really know if it’s qtgmc that still applies a little denoising with the lowest level or if it’s because in ffv1 avi it’s not lossless. but I managed to couple the bob deinterlacing with a vhs cleaning filter and its almost zero parameters which removes some artifacts without removing too much detail. namely that I always use proteus by going from 720 x 576 to 1280 x 720, I do my previews with proteus in hd always in ffv1 avi or png and that I never convert to square pixel with hybrid in my tests. having tried this, I have not noticed any differences. in any case with the placebo profile in qtgmc, the noise reduction is really good but we lose a lot of details, especially in the movements, because by going to placeboo, “final temporal smoothing” ends up at “3” and even at “1” already the loss of details is obvious. and even with the placebo profile and “final temporal smoothing” at 0, there is loss of details. but I will continue my tests and especially see if with hybrid we can export without loss, make sure that I really do it, I had read some time ago on the hybrid forum that the creator of the software “selur” said that he did not see the interest of including the video export in png or tiff, it was not his thing the sequences of images, but maybe he has incorporated it since the time he said that, so in this case the qtgmc in draft is to be retested I think. in any case, what gives me the most faithful details is to use the bob deinterlacing with virtualdub, or else, install the “muskun” deinterlacing filter which works quite well.
3 Likes
Quick question, have you tried deinterlacing with MSU deinterlacer in VirtualDub?
the site claims it should be the most accurate deinterlacer. I did not try it, wondering if you did or willing to test and let us know about your findings?
what is that VHS cleaning filter? is it part of VirtualDUB?
1 Like
a yes? so yes I tried it, I tried several, I only kept muskun, but I will try again. muskun and msu, i found it on google, it’s pretty quick to load it into virtualdub. i’ll post some comparisons so you can see. the vhs filter seems pretty powerful, it removes some minimal details but also quite a few artifacts. i didn’t push the setting all the way, i’ll experiment with it again
if you referring to vxVHS, i just tried it, it did not go well on my videos. it added stains on some body parts
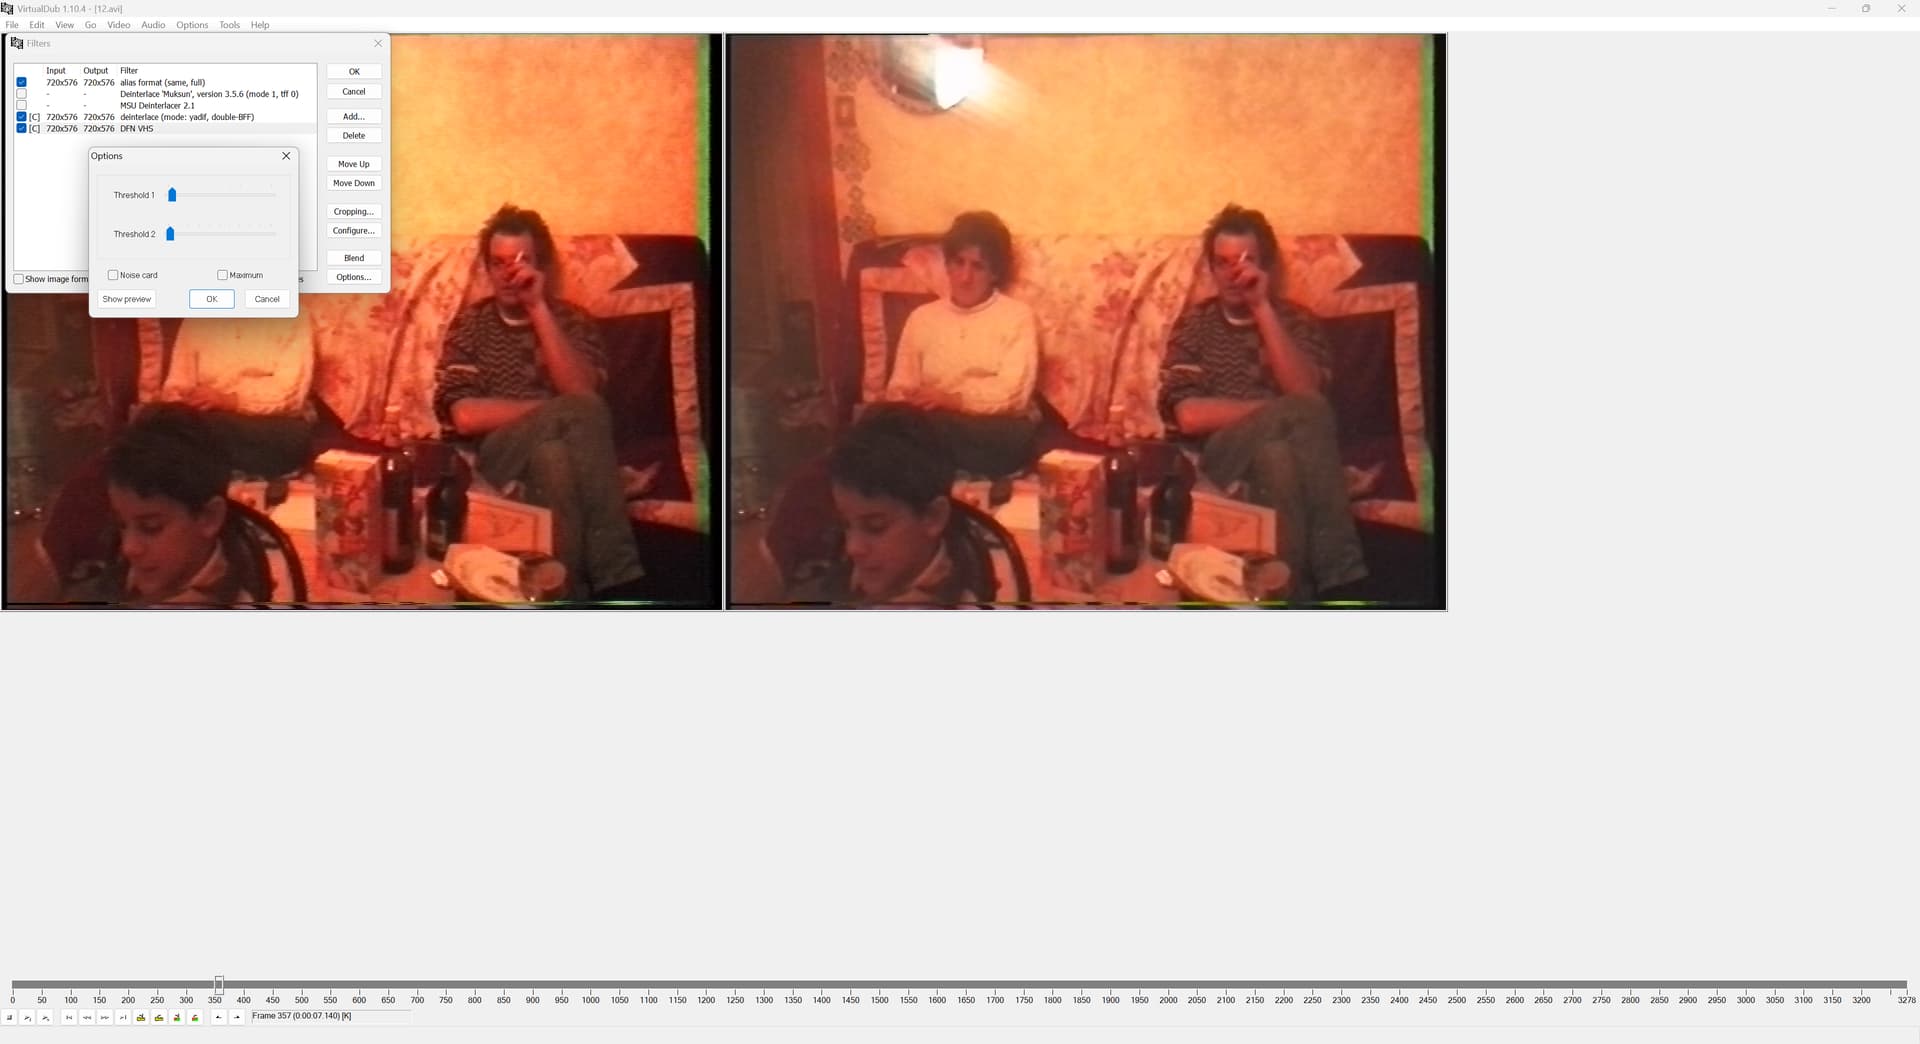
it’s dfn vhs.
edit :
here is a small comparison between bob, yadif, eula, muksun and msu deinterlacing.
Strangely, I notice that msu is much superior to the others, but once the upscale with proteus in HD, the best results are with yadif and eula which are close.
1 Like
so based on your reascent results, what would be your workflow now?
what deinterlacer, etc.?
Where can I download the dfn vhs for VirtualDUB?