Unfortunately, I still haven’t tested speed difference yet. With 576p, I upscale by 4× to reach 4K. With 480p, I either do the same or upscale by 3× to 1440p.
Not sure if you have noticed the same thing, but with 576p i get at part at the bottom of the image that stands out (by being darker) when running SLM by 4×. So, to avoid that, I scale the image down to 540p first (in VirualDub2).
Ever since Starlight Mini was first released, I’ve noticed that it distorts the content slightly in some areas of the image when the target resolution is set to 3840x2160px (4K/UHD).
It doesn’t seem to matter whether you’re upscaling from a lower resolution to UHD (whether 2x, 3x, or 4x) or using a 1x UHD source—at least based on my testing with various sources so far.
The slight distortion isn’t a problem if you’re satisfied with the result and continue to use it as is. However, it becomes problematic when the result is overlaid on other video tracks with reduced opacity in order to combine or blend different upscaling model results. And it’s particularly noticeable in tripod shots when the camera isn’t moving and there are straight lines or patterns in the image.
Here’s an example – just a scaled-down GIF animation that shows a comparison of a single frame, but even at this size, you can see the SLM distortions in the center of the image when looking at the movie theater seats:
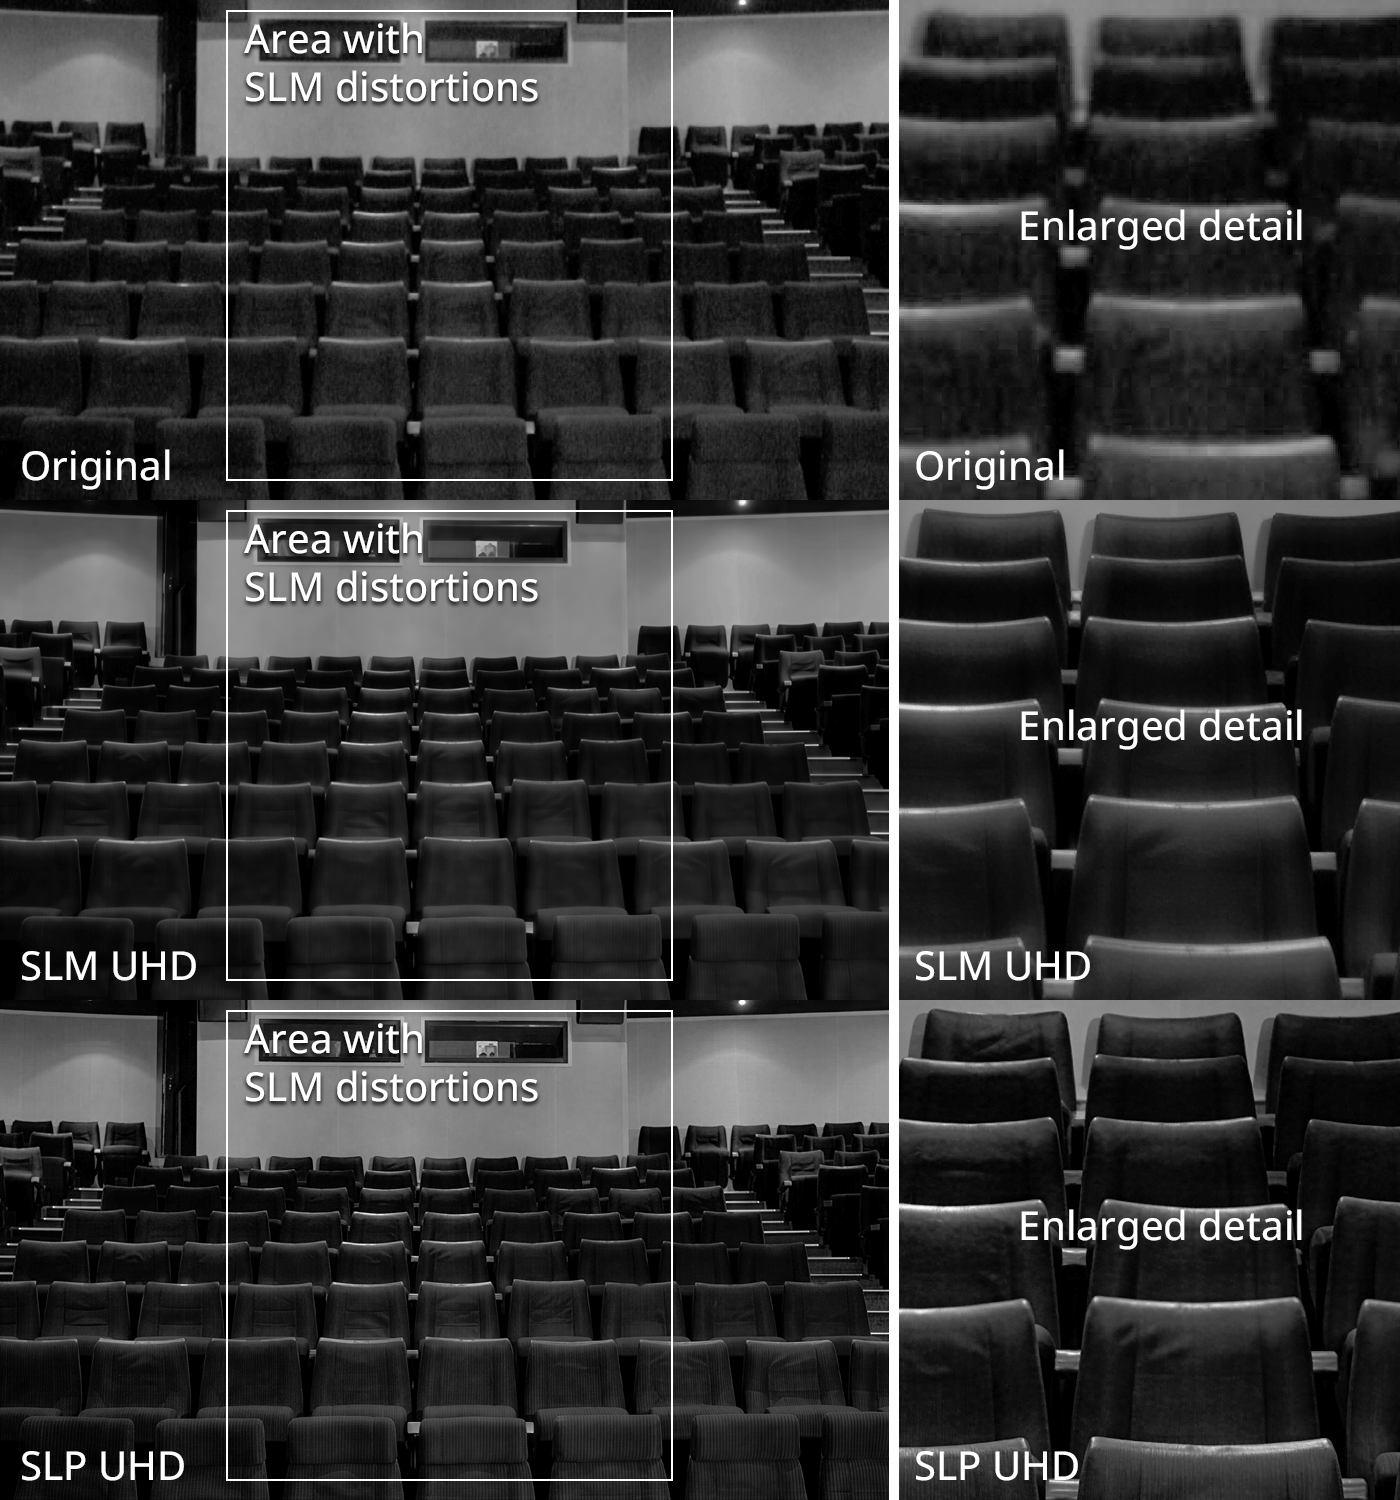
I don’t seem to have this distortion problem when the Starlight Mini render result is smaller than 3840x2160px. That’s why, when using Starlight Mini, I always take the extra step of splitting the video into 4 parts (left/right, top/bottom), including an overlap area. After enlarging the four parts (SLM 2x to a resolution lower than UHD), I reassemble them and blend the overlapping areas.
Fortunately, this distortion problem no longer exists in Starlight Precise 2.5 (aka Starlight Precise), which saves a lot of extra work. However, since I often overlay the render results from “Starlight Mini” and “Starlight Precise,” this method of splitting the files is still necessary for me.
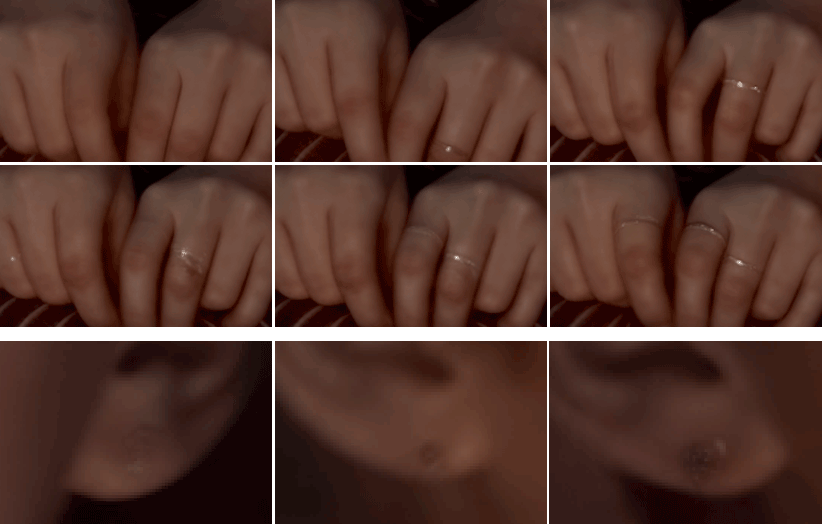
Unfortunately, Starlight Precise requires post-processing in other areas; for example, when upscaling old Hi8 footage, I noticed people sometimes end up with stud earrings (which, on top of that, look like screws?!), even though they never had pierced ears. And on hands, rings appear and disappear on different fingers. Not to mention the many moles and birthmarks that look like skin cancer. 
Here’s an example of jewelry that Starlight Precise sometimes hallucinates and adds in upscaled frames – the persons weren’t wearing any jewelry:
Despite everything, it’s amazing how much older videos can be improved, and I’m grateful that these models exist and look forward to more new ones!
Here is an example (just a small section of a single frame) from an old SD recording with very low resolution and low quality filmed with low light only, which was upscaled in several passes using different models and settings, including overlays with different opacity settings and rendering the results again with different models… (and color-corrected) :
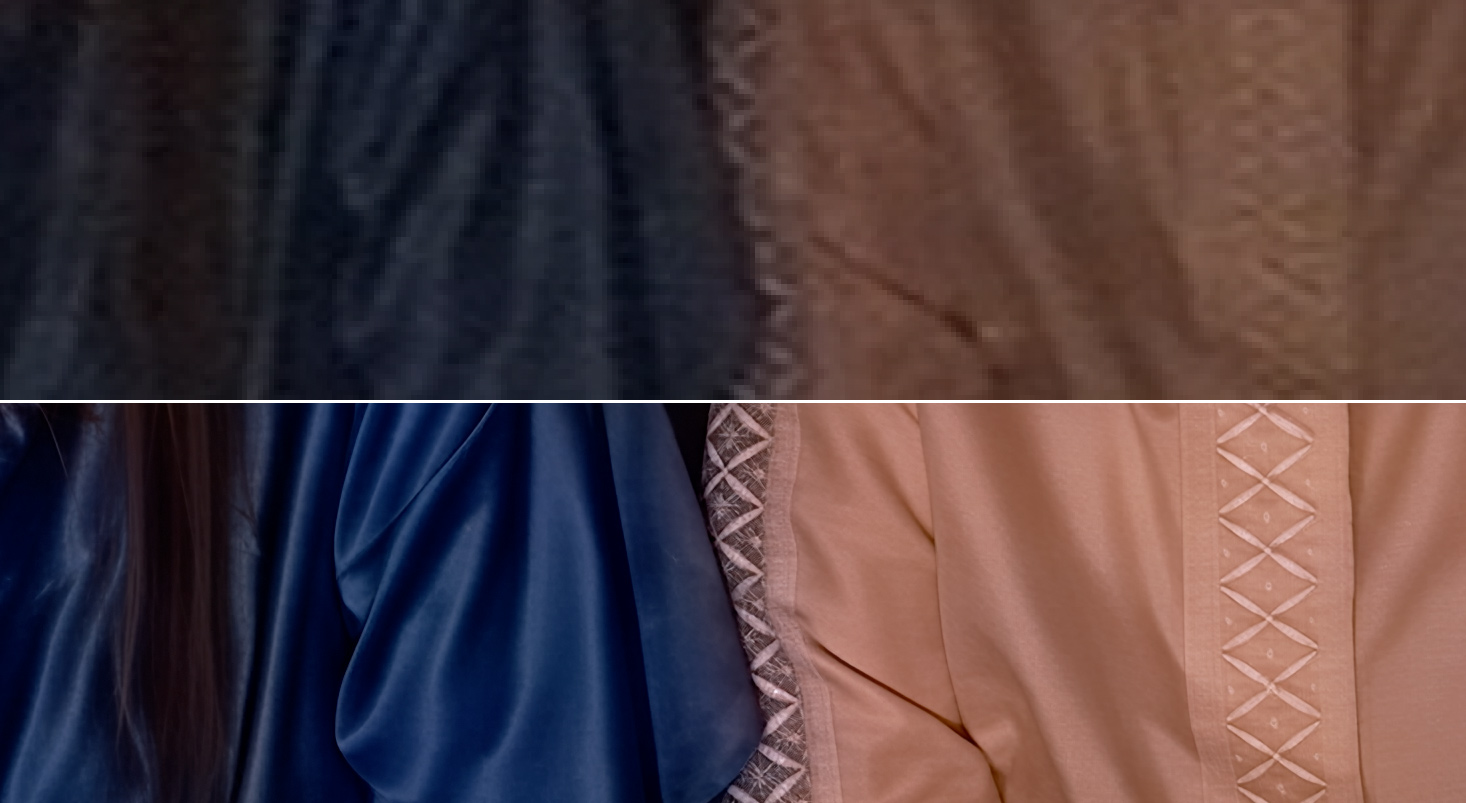
On the left, the hair is visible again, and you can even make out individual strands; the silk fabric has the right texture and sheen; on the shirt on the right, the sewn-on decorations and embroidery are clearly visible again (though I don’t know if they really looked like that, it looks very realistic).
I noticed a slight darkening as well and had been wondering about it. I even experimented with a small gamma boost in the near-black areas using FFmpeg, but I ended up discarding it because I didn’t like the result. At the time, however, I didn’t realize that only the lower part of the image was affected, nor did I expect that…but that would certainly explain it.
Yes the model can invents stitch patterns or adds buttons that were not in the original fabric etc, maybe that’s okay in a way, everything we see is just our brain’s interpretation of reality, so maybe the model can be a little creative as well and this is the magical transform part 
Although if it starts adding teeth on a body where there is no face (that happened to me recently with SLM), then it gets a bit weird creepy
What’s interesting is taking your SLP sample and running it through SLM afterward. I’ve noticed that SLM sometimes changes liitle things quite a lot—very small details can end up looking completely different.
It would be interesting to blend an SLM upscale with an SLP upscale. If both add their own details, maybe we could get gain extra detail from both. On the other hand, some parts might end up looking strange then. Sounds like a fun experiment, has anyone tried this?
@Mayday: That’s exactly what I did here with this old clip: I ran several passes with SML, SLP, and other models, layered the results with different opacity levels, and then repeated the renderings and layering several more times… it took weeks with endless hours of running Topaz videos until I achieved this result (and this was just a very short clip, about 3 minutes long). And I’m not done yet
Have you tried a 3 pass method yet? I’m running it but it’s going to take a few days. I spread out the frame removal.
- Remove 0 frames (Bottom layer: 100%)
- Remove 8 frames (Middle layer: 50%)
- Remove 17 frames (Top layer: 33.333%)
Hopefully it’s good enough. Running it on a 6 min chunk, but the full video is 19 min.
After spending relentless hours and money by using different models including SLM and SLP , nothing has worked to retain original details, these models gave totally different faces on Zoomed in than original. SLP is good creating details but they are totally different than original in my SD video. Finally I have found the best way to retain original details to attain 1080p or 4K. Here is the work flow involving multiple different softwares:
-
Use Aiarty Video Enhancer: use “Smooth-HQ V3” at 70 strength. Upscale to 4X.
-
Rerun the upscaled with Aiarty VE : use “mo-Detail HQ V3” at 50 strength --upscale 2X.
-
Run file from 2 in SLP —upscale 1X or 2X
-
use SLP file again in Aiarty VE: use “supervideo vHQ” at strength 70 – upscale 1X or 2X.
-
Can use Iris MQ V3 Dynamic at 50 with other values 0
Aiarty Video Enhancer is faster , will not take long time , SLP is slower will take time. Let me know how this works or it is just me getting good results.
Generally, it seems that relatively neutral upscaling followed by downscaling introduces fewer face distortions. All reconstruction models distort small or low-pixel faces to some degree, and Proteus Natural does as well. I’ve had cases where SLP produced fewer distortions than Proteus Natural, but it depends on the footage.
What I don’t like about the up/downscale approach is that downscaling always reduces the level of detail, and when you use a cheap enhancer, it can lead to poor reconstruction or artifacts.
So I don’t have a good solution. My impression is, that going higher with the SLP (or SLM) upscale, this helps, you get fewer “alien” faces. ok 2160p is our limit, but you can downscale afterwards and go on with the second pass of upscale.
