Topaz Video AI: Star Trek Voyager 4k Testsample

My project makes progress. Here some test samples

4k Video testsamples
Sample1.zip (28.4 MB)
Sample2.zip (16.0 MB)

  • QTGMC 720x576 deinterlace, (ultraslow, ffv1)
  • Spline resize 720x576 → 768x576 (ffv1)
  • NLMeans denoise Filter, Handbrake (preset film,light)
  • TVAI 1st: RheaV1 4x upscale 768x576 - > 3072x2304
  • TVAI 2nd: Theia Fine Tune Details V3 (it takes Rhea plastic look)
  • downscale 3072x2304 → 2880x2160

To do
-finding optimal denoiser/level, it’s a little bit too glossy.
-plastic look is reduced but not completly gone
-it’s a little bit oversharpen

and for sure the disfigured faces problemativ on long distance shots. Best results delivers non face recovery models like Proteus here, but scene based models is a gigantic effort when you have 140+ episodes

2 Likes

Dont know how the Source look like, so i cant judge how effective the result was :slight_smile:

Are you that famous Star Trek AI freak (i dont mean that in a bad way, i’m a freak too ^^) that want to restore all Episodes from Star Trek - Forgot Name ^^ ?

For me the result is nice to look at (But i am on 1280x1024 19" so many big scale things look better for me as for other).

When it’s to glossy, to plastic, and to oversharpen, i would
use GrainFactory (with tought out Mixing Zones ! GrainFactory use Random Seed -.- when it calls AddGrainC, which i dont like. I changed the Seed Param from -1 to 0 inside the GrainFactory Script), f3kgrainPlus (for a slight touch of Chroma Grain)

Then i would use Limited Sharpen, with Edgemode 2, and different X & Y Settings, and something like overshoot 1, undershoot 3, to ““sharp”” the Grain, to give more Depth.

When i want to sharp more Vertical, then i use a bigger ss_y value, as for ss_x

I know i know, normaly it should be the other way ! It’s not logical, but for some reason, that’s the result that i get, if i use it like that, especialy with edgemode 1.

I love it to test crazy things out like that.

LimitedSharpenFaster(strength=70,wide=true,overshoot=1,undershoot=2,edgemode=1,ss_x=2.2,ss_y=1.2)\
LimitedSharpenFaster(strength=48,wide=false,overshoot=1,undershoot=3,edgemode=2,ss_x=1.4,ss_y=2.2)\

Distance Shot Problem: Layering, Grain and Fake Blur can help. But sometimes it’s better to leave distant faces untouched ! A natural looking Blur, because something is in the distance, is still better, as a Gum Face :slight_smile:

1 Like

Thanks for the Input. Here are two samples, left original deinterlaced unenhanced upscaled to 2160p (upscale with paint.net) on the right side TVAI 2160p enhanced upscale

Sample1 Star Trek Voyager - Imgsli
Sampew Star Trek Voyager - Imgsli

1 Like

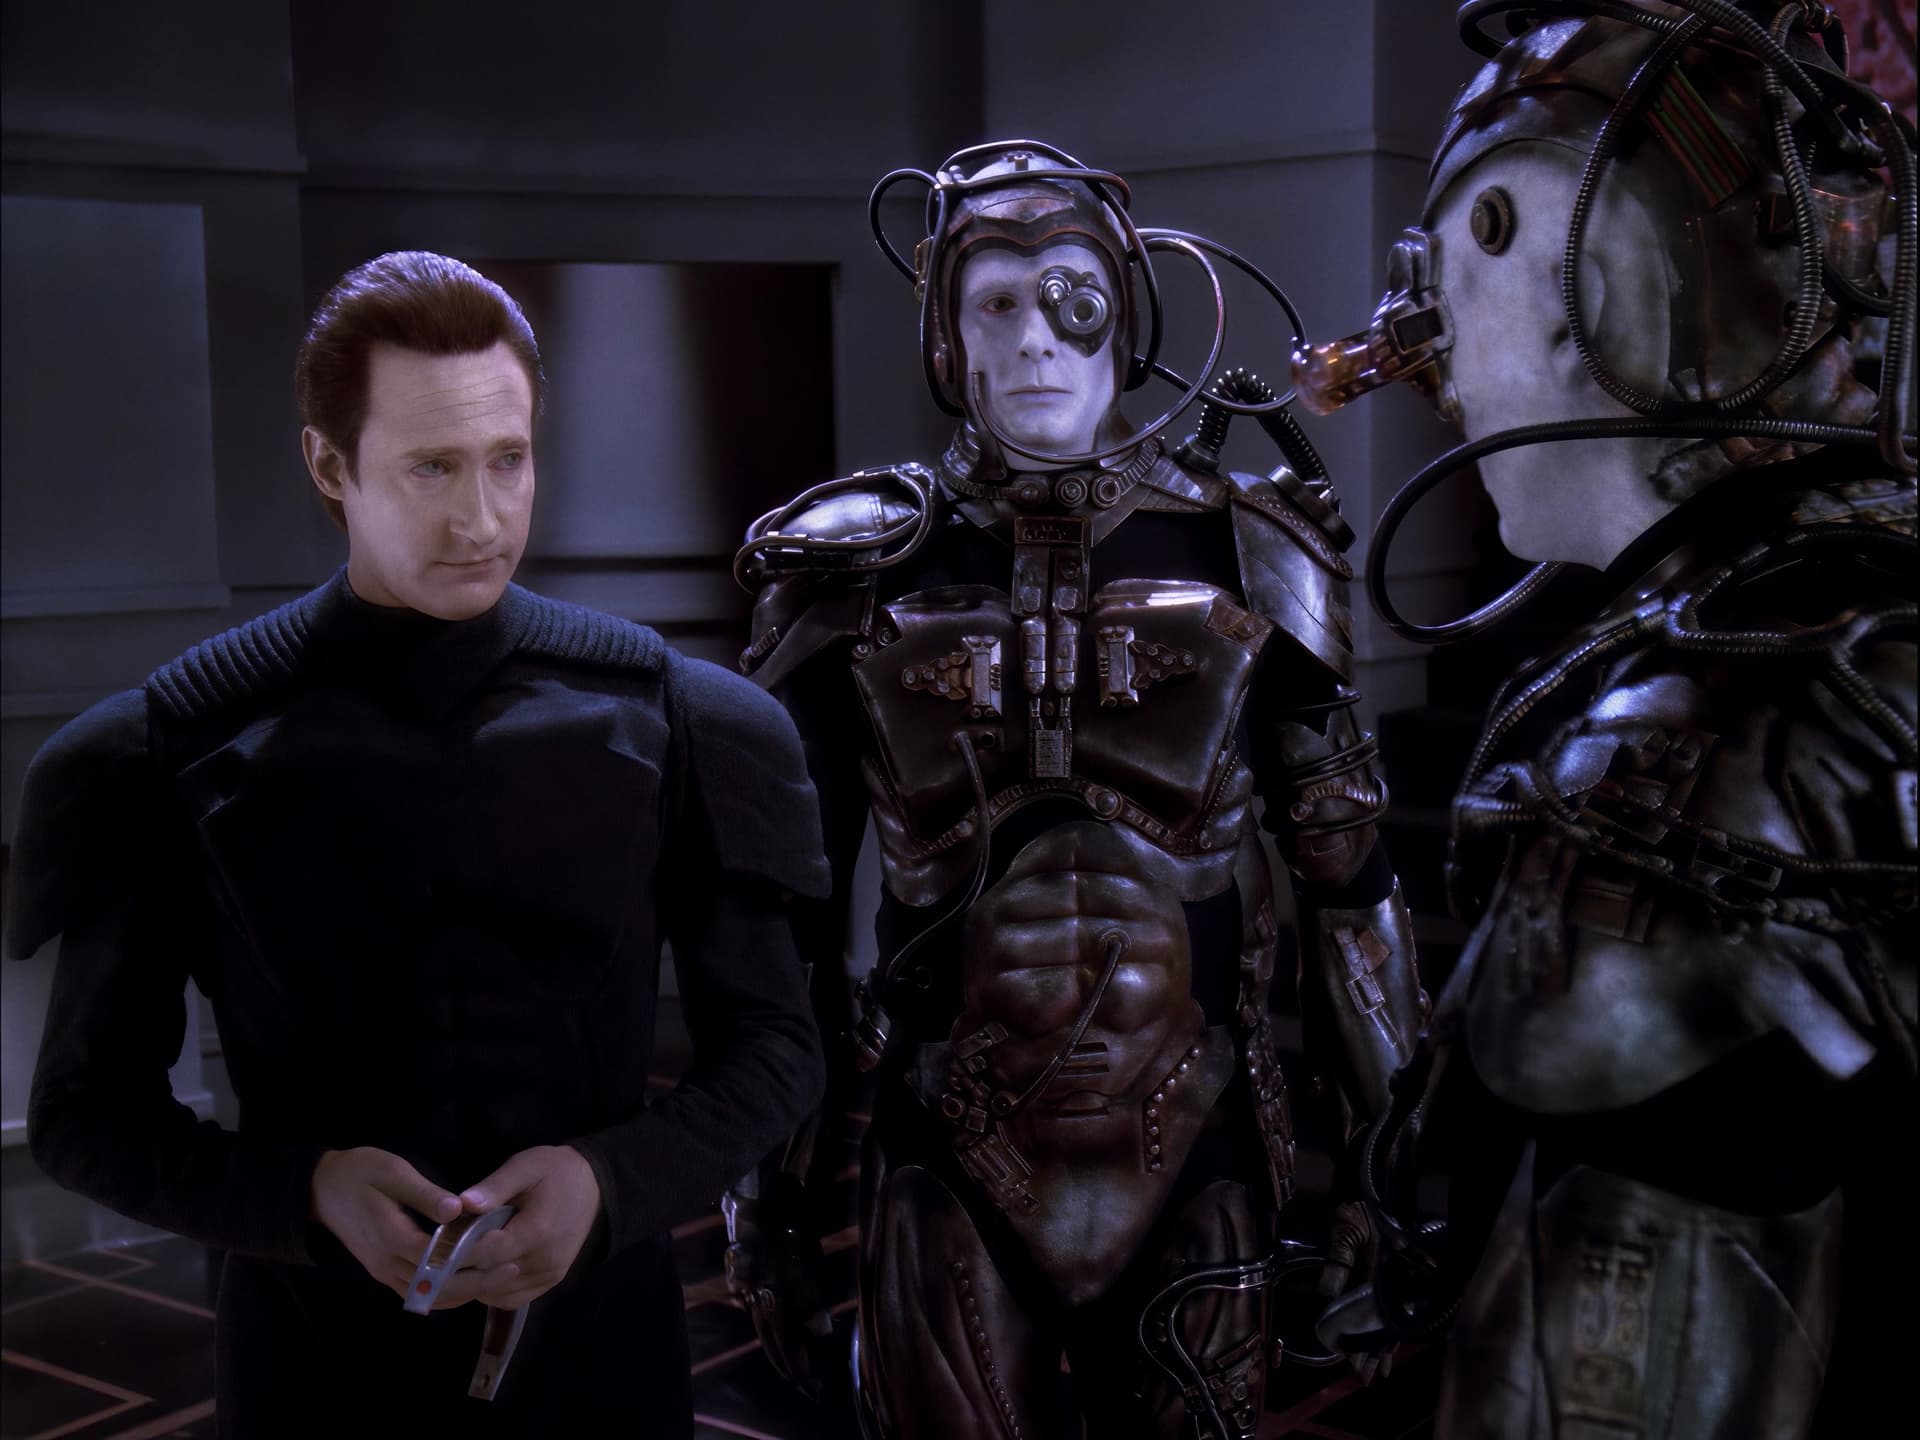
Finaly someone here, who has realy a reason to use AI, and a Source that i realy consider as Low Quality.

Good job so far :slight_smile:

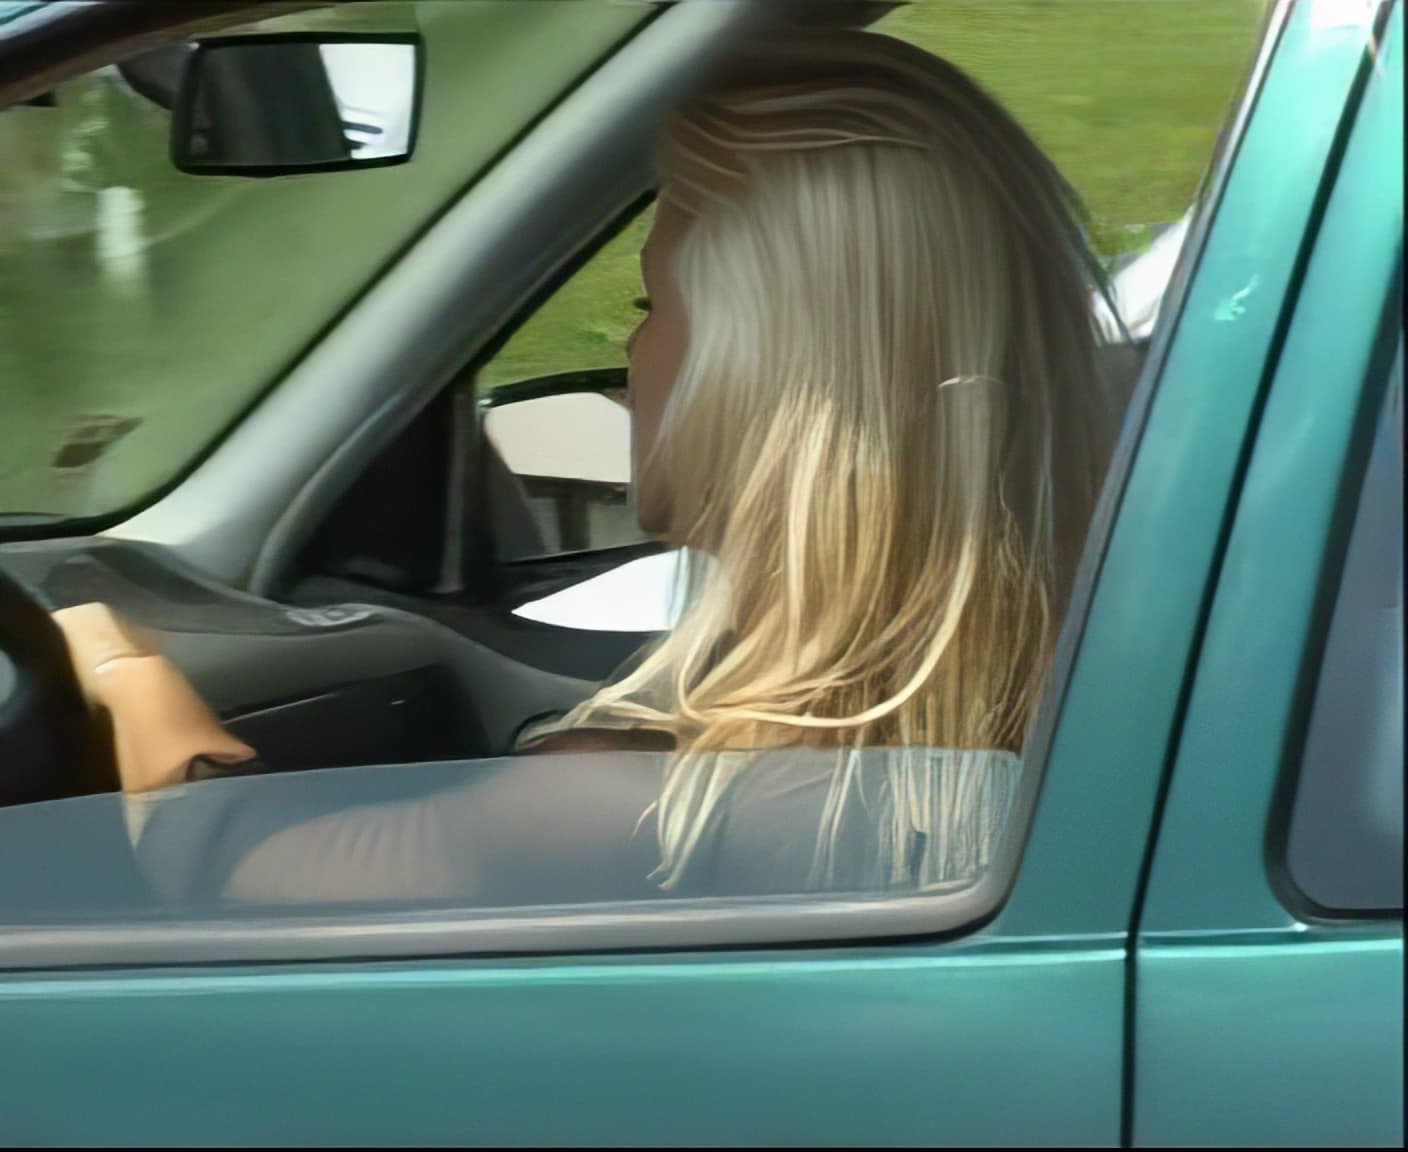
I like that you look out, to keep gradients & shadows (or better: increase) on the cheeks,necks. Those are very important parts.

Getting out Detail from blonde hair, is harder as from dark one, on the other hand, if the dark hair is in the shadow (like in the second Sample Image from you) then it can get tricky. (You can try to trick the AI, by changing the Contrast & Brightness so that Video AI sees more. If it worked, you change both to the old values back)

I got some nice results with blonde hair @ extreme blocky source when i used Proteus V3 first @ Original Res with VideoAI 2.6.4 and then processed the Output from that again with Proteus V3 @ 2x.

First Step was to deinterlace the complette File.

QTGMC(Preset="Slow", ShowSettings=false, TR2=3, EdiThreads=3,\
GrainRestore=0, SLMode=3, Sharpness=1, Border=True,\
NoisePreset="Medium", NoiseProcess=1, ChromaNoise=false,\
NoiseRestore=0.7, Sigma=1.5, NoiseDeint="Generate", StabilizeNoise=true,\
FPSDivisor=2, ShutterBlur=0, ShutterAngleSrc=0, ShutterAngleOut=0,\
Lossless=0,SourceMatch=0, MatchPreset="Medium",\
MatchPreset2="Medium",MatchEnhance=0.5)

Then Post Processing (was needed, because at many points there are so extreme blocking artefacts+Mosquito Noise that Video AI alone is not enough)
of the Complette File.

Deblock(quant=24, aOffset=2, bOffset=0, planes="y")
MosquitoNR(strength=14, restore=128, radius=2, threads=0)

LimitedSharpenFaster(strength=60,wide=false,overshoot=1,undershoot=1,edgemode=1,ss_x=1.5,ss_y=1.5)
LimitedSharpenFaster(strength=40,wide=false,overshoot=1,undershoot=1,edgemode=2,ss_x=1.5,ss_y=1.5)

Board Software did convert the PNG Screeshots all to jpg.

Screenshot directly from DVD Source: Normal yadif Deinterlacing 25fps Discard Bottom Field) Horrible Blocking Artefacts (very bad Encoded. Most b Frames look better as the p Frames ! Normal it should be the other way, but the guy who encoded the DVD used very bad Settings) the more you zoom in, the worse it gets.

704x576 Anamorphic

1_@OrgRes(Anamorphic704x576)

Step1 | 76 Frames Cut Out with AviSynth+

MosquitoNR(strength=16, restore=0, radius=2, threads=0)
FFT3DFilter(sigma=0, plane=0, bt=3, bw=32, bh=32, ow=16, oh=16, sharpen=0.0, dehalo = 0, sigma2 = 0, sigma3 = 2, sigma4 = 2)

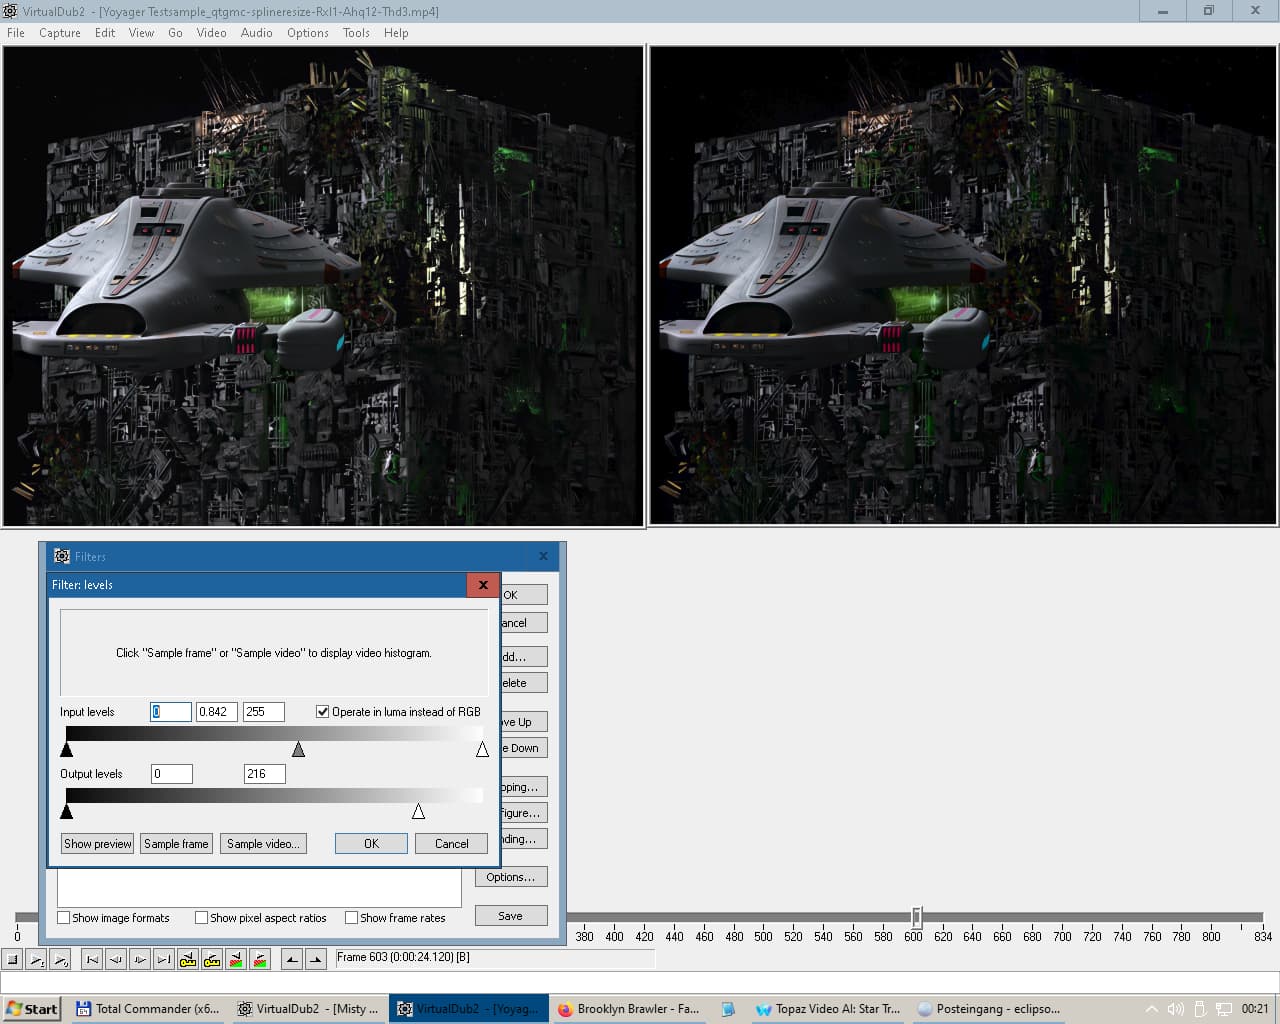
Step2 | Output from Step 1 to Video AI 2.6.4
Protheus v3 100%
100,20,0,30,10,0

Step3 | Output of Step2 in Video AI 2.6.4
Protheus v3 200%
30,50,0,0,10,-10

Step4 | Output of Step3 to AviSynth+

FrameNuum = last.FrameCount # Why ? See at bottom from Post *
DeleteFrame(FrameNuum - 8) # Why ? See at bottom from Post *
LimitedSharpenFaster(strength=50,wide=true,overshoot=5,undershoot=1,edgemode=2,ss_x=1.5,ss_y=1.5)
f3kgrainPlus(luma=200, chroma=400, mode=1, temp=60, adapt=65, sigma=1.0)

Done ! 2 x Anamorphic Pure,Extreme,Horrible *hit to Gold

Screenshot directly from DVD Source: Normal yadif Deinterlacing 25fps Discard Bottom Field. A portion with ““Good Source”” xD Quality
Zoom it and you will see the mess :smiley:

704x576 Anamorphic

2_@OrgRes(Anamorphic704x576)

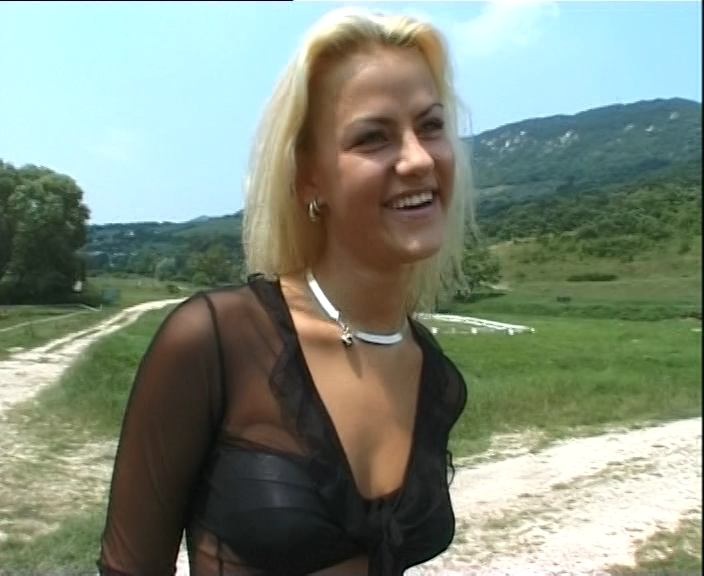
Step1 | 970 Frames AviSynth+ Cut Out to Protheus v3 200% | In Rare cases scale directly to 2x work better.
70,30,0,3,15,0

Step2 | Output of Video AI 2.6.4 to AviSynth+

MosquitoNR(strength=11, restore=128, radius=2, threads=0) # Helps vs Hair Shimmer
LimitedSharpenFaster(strength=60,wide=true,overshoot=1,undershoot=1,edgemode=2,ss_x=1,ss_y=2)

Done ! 2 x Anamorphic *hit to Gold

It’s shocking how good Video AI with Proteus V3 can be (and how much detail can be exracted, from a blocky source) especialy in combination with AviSynth.

_* Reason for “DeleteFrame(FrameNuum - 8)”
If 2.6.4 gets a Input that was a Output from 2.6.4 it will duplicate one Frame (8 Frames before the last Frame) and eat up the last one.

So the Cut must be 77 Frames, by duplicating the last Frame (because 2.6.4 will eat the last one) and the Dupe Frame (8 Frames before the last one) must be deleted.

I did the duplicating of the last frame with AviSynth and my Tool (which creates the cuts) before i exported the 76 Frames Cut. That’s why just Delete Frame is visible here.

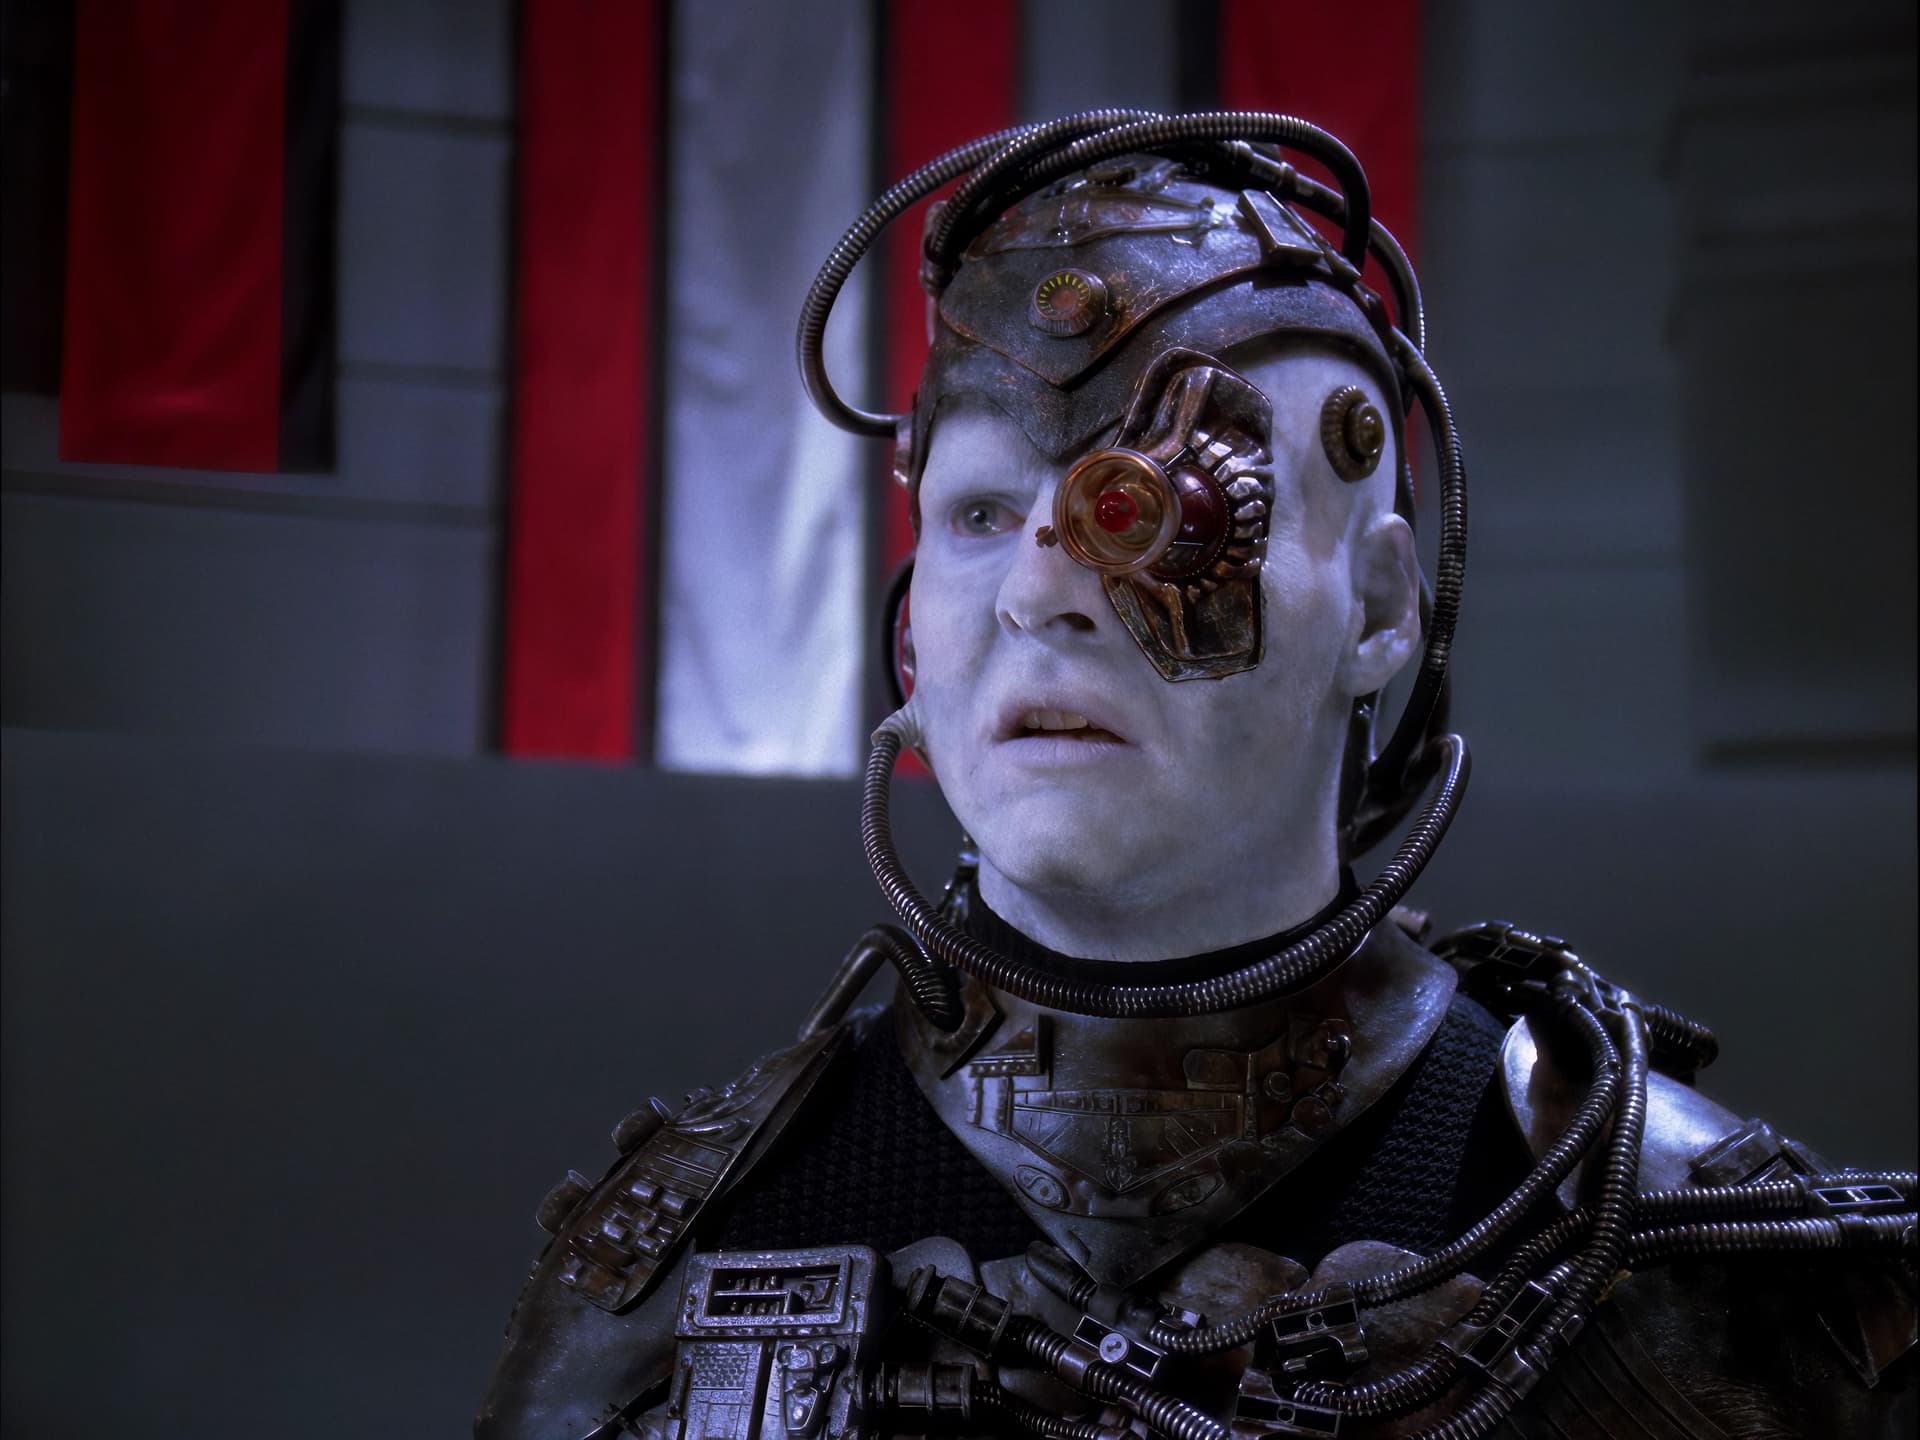
pssss: Video AI screwed up one Eye at the guy from your samples. It’s the same problem with Photo Ai and Giga Pixel. It’s most times the same. One Eye is good, one get’s distorted - Eye lids change angle. Make it better first without upscaling can help, because of Contur repositioning. After it’s better, uspcale by 2 x Steps will do most times a better job in keeping the Contures at the right position)

1 Like

Thanks @onur.u

But I used Hybrid and haven’t dealt with Avisynth yet and can’t even get it to work :woozy_face: It tells me ffms2.lib is not an x32 application, but I only found the library in 64bit. Maybe it was a fault installing Avisynth under “Program Files (x86)”? I have found a very good tutorial and I did exactly what he said, with newest downloaded versions, but the tutorial reference to older versions, the video is 3 years old

It’s my first test avs

I think I have a good eye to see what is good and what is not wanted, I usually analyze at pixel level (zoomed) what exactly happens to understand the function behind and get the best out of it, but no avisynth experience, I have to learn it.

What I often did is layering, upscale with two different models, then overlay it in my video cutter software and set opacity for example to 50% both merges into one. Then I import the result into TVAI and do the finish, most with Artemis, sometime with Theia or Gaia. I really get sometimes amazing results with this. But I didn’t this yet with Voyager, is planed to do some testsamples on this way.

What I did now is QTGMC deinterlace settings “very slow” and spline resize to 768x576 complete Season 1-3 (rest is on to do), output ffv1, with Hybrid as a base. I hope that wasn’t a mistake and that i haven’t messed anything up and don’t have to throw them away, what you think?

You have to place ffms2.lib in

c:\Program Files (x86)\AviSynth+\plugins+\

LSMASHSource/LWLibavVideoSource is better as FFmpegsource (A Quote from the AviSynth Wiki “May be frame accurate on good days”

http://avisynth.nl/index.php/LSMASHSource/LWLibavVideoSource
http://avisynth.nl/index.php/LSMASHSource/LSMASHVideoSource

The only drawback is, that it need to create a Cache File (will take some time !
If you watch the Tool (that opens the AVS File) with Taskmanager, you will see that HD Activtiy is high, and that a .lwi File will be created in the same Folder as the Source File)
once for avi & mkv (after that it keeps Video and Audio perfect in Sync and Seeking is very fast and accurate)

Let avisynth create the Cache File first, before u use the Trim Command.

For Mov & mp4 u can use LMash Source (doesnt need a Cache File)

ViD = LSMASHVideoSource(“D:\StarTrek.mp4”)
AuD = LSMASHAudioSource(“D:\StarTrek.mp4”,Track = 0)
AudioDub(ViD,AuD)

If you want to Process mpg2 Files, i recommend you to stuck them in
a mkv Container.

What i do is to open the first VOB File (per Windows RClick Menu) with avidemux, then when avidemux ask me if “several files with sequential filesnames …” should be loaded, i click yes.

Jump to Keyframe Parts (Shift Up & Down) mark in & out, and save with without ReEncoding as MKV File (dont forget to set the Right Aspect Ratio and Color Space. If Aspect Ratio is set → Just then Option in VideoAI for Square Pixel is aviable)

Normaly mp4 Container and mpeg2 should work too, but i always convert Audio to PCM (less Risk of Audio Sync issues) i dont care for more as 2 Channels (especialy with Pron ^^) MP4 Container doesnt allow PCM.

If your Source has normal Blocking (and a normal amount of Mosquito Noise)
you can consider using Source Match & Lossles mode in QTGMC.

http://avisynth.nl/index.php/QTGMC#Source_Match_.2F_Lossless

If you got “mehrere zusammenhängende, richtig eckige Blocks” (siehe Bild oben, mit der Chick am Lenkrad), play around with Shutter Blur.
http://avisynth.nl/index.php/QTGMC#Shutter_Speed_Motion_Blur_.2F_Frame_Rate

and

Post Process (after qtgmc, and before VideoAI) with

http://avisynth.nl/index.php/Deblock_QED

If you deblock to much, Filters like MosquitoNr will do a worse job (Video AI too)
there is a fine line and sometimes it’s just better to deblock the Chroma, and let Video AI do the rest.

I always use MosquitoNr (very unstable under Windows 8,10,11) first, then Deblock and/or Denoise never the other way around.

Keep an eye on smoothuv ! it’s very good !

http://avisynth.nl/index.php/SmoothUV2

Treshold 8-13 will do most time the job :wink: it’s very subtle with that. It’s good for cleaning green analog smear on skins perfectly.

There are 3 ways to Overlay with AviSynth.

http://avisynth.nl/index.php/Merge
http://avisynth.nl/index.php/Layer
http://avisynth.nl/index.php/Overlay

https://github.com/Alexkral/AviSynthAiUpscale :wink:

Raw & Dirty Upscaler ! (the Priority from that Upscaler is that it doesnt alter the image with Denoising etc. It’s a Raw Upscaler, which i prefer sometimes with Live Action.)

FFV1 is a little bit slow at Decoding (Huffyuv with Prediction left or plane is brutaly fast, even when used with CPU Decoding alone) but still the best lossles export option in Video AI.

I always have to convert FFV1 to Huffyuv first, if i want to watch a File in a Player that uses FFDShow (because the Decoding from FFV1 with FFDshow has a bug).
Got my reasons to use & prefer FFDshow over LAV in MPC-HC.

It the Blocking is not to extreme, try sourcematch & lossles mode first.

Filter without Scaling to 768x576 (you can still look the Input in right aspect Ratio with VDub2 and Cubic Scaling. OpenGL or Direct X must be enabled in the Preferences) Video AI can upscale (at once ! If you Resize before. One Generation loss more) to Correct Format, with less lost detail as Spline.

Sometime (very rare) directly Deinterlacing with Video AI will give much better results.

50fps got it’s advantages and disadvantages.

Disadvantages with AviSynth:

  • MosquitoNR will crash even more/faster
  • Smooth out more Grain/Grid/Texture with QTGMC

Disadvantes General:

  • Perceived (my Monitor is a small 19" Eizo with PVA Panel, 10 Bit Lut, Matt no stupid gloss Display. PVA is not that fast, but on a small Monitor Motion Clearity is still okay) grain/grid/texture (on legs, arms, necks) between contures is less in faster motion, because we see less difference between Frames. Frame Times are shorter.
  • Shaky Cam from Interlaced Live Action Material is even more annoying (double the perceived movement) it’s harder to “übersehen”

Advantages:

  • More Sharp Contures in faster Motion.
  • More Clean Contures (less Blocking & Mosquito Noise) in faster Motion (Frame is less Time visible when played) because less difference between Frames. Blocking & Mosquito Noise pattern is distributed over double the frames.

When it comes to Codecs: Double FPS is better ! Doesnt need Double the Space (even with XVid *) just around 30-35%, and it helps Codecs (especialy ASP ones :wink: )
to keep Contures Cleaner.

_* which i prefer with a Custom Matrix for SD Resolution (anything over 1280x960 and XVid will probably Crash with AviSynth. It’s very fast with Custom Matrix and SD. But it will lose a Ton of Speed near HD and/or more) over x264/h264

XVid at Bitrates >= 5500kbits (need so much, because of the Grain ! AI produced Grain on white walls take a Ton of Space. I can clean only very subtle otherwise Detail/Shades/Grit on Skin is lost) just keeps the Grain better, and many times it creates Grain on places :wink: not like x264.

I tried sooooo much with x264, at high Bitrates and SD Content with AI based Grain on walls.

It can’t keep the Shadows (the darker the area, the more stuff will lose it’s Form) without altering there form & will always smooth out gradients (arms, Legs, Necks) more ! (can help against banding. With XVid i use the Pattern Creation behavior from XVid for that :wink: )

Before h264/x264 creates something ugly it will smooth out (by nature) even if Deblocking is disabled ! and a Ton of Bitrate is used. (no matter what AQ Mode & Strenght is used, or psy nonsense, with or without MB-Tree. AQ Mode *ucks It just pushes Prioritys around (and still does a bad job at that) but need way more KBits for that. Why not leave it out, which is faster, and lower the CRF ? So many Functions in x264 make just sense for Material without Grain, or just in theory)

XVid will create way faster dirty contures (even with very high bitrates) but with Double the FPS, not so fast. Another thing that XVid creates (when the Bitrate is a little bit starved, but not so much that blocking occurs) are patterns :smiley:

I got my own 5 Costum Matrixes, i always compare.

Original Lossles with 2 x264 Outputs (1 with Recommended Profiles and Tunes and 1 Handcrafted which is way faster, need less space and smear out less) and 5 XVid Outputs (any use a different Custom Matrix)

All x264 (CRF) & XVid (2Pass) Outputs got the same Bitrate.

One XVid Outputs got Patterns/Grain/Grid on Flat Darker Places (were in the Original was no Pattern :wink: just a plain surface) but keeps hard contures not so good, the other keeps hard contures better+cleaner, but create less Grain/Grid, one keeps here more, the other there etc etc

But with 5 different “dirty” Outputs i always find some where the contures are still good, and it has enough grid & depth for my taste.

I just got to find a way with AviSynth (that i understand) to create a Luma Mask from white Walls. With that i can DeNoise just (for the most part) the walls.

When i found a way i’m shure that i can use 2000-3000kbits less for 2 Pass XVid for SD.

@onur.u I will check this out thanks!

I found a other flow that works, here are some TVAI upscales compared to the original. This is not the final, but the direction I would go, means keeping max details shiny but not dead blured not to slippery, it also must be a bit runchy. I added fake texture/some noise to give it even more structure. :slight_smile:

especially the first image compare is amazing, watch it @ fullscreen and zoom in (mouse wheel). This is RheaXL power with some tweaks, preparing before upscale and after, no other model comes close to this.

Of course, the problem still exists and it sucks: long-distance shots of Rhea’s face are distorted badly, this is unusable. For these scenes I have to work with Proteus …yes it’s a long way…

1 Like

Here is a 33s 4k Testsample :slight_smile: unzip it, inside is mp4 video
4k Yoyager Testsample (qtgmc-splineresize-Rxl1-Ahq12-Thd3 and more).zip (24.4 MB)

all added encoding times, for a 5min video which I did, was about 4h :laughing: it’s crazy how slow Theia is

Can just post very shortly, must repair my Car (Radlager Vorne).
When i’m home again, i post full lenght :slight_smile:

Now :slight_smile:

I was confused first at what i was looking, because i clicked the big picture first :smiley: then after thinking for around 20 seconds what is in the background, i guessed that it looks like a Borg Cube :smiley: after that i clicked the small imgsli link, i was happy to guessed right :smiley:

The Borg Space Picture looks great :slight_smile: there is just one problem, it’s to bright at the moment. The spaceship in the foreground stucks to much out, so it looks to much, Cgi/aufgepappt (and oversharpen, but i’m on 19" so stuff with very high res can look faster oversharpen. I’m on 10Bit, sRGB Scaled, but my PVA Display is not very bright, but with the 10Bit Lut it has a relative wide Gamma Range)

I screwed around with the Gamma & Output Levels


dont know how it looks on you screen, but after the Gamma Correction, it looked more real, and cinema like :slight_smile:

The Second Picture, is it Proteus or Rhea ?
For me personaly it’s a little bit to smooth (need a little bit more grid for my crazy taste), but nothing what cant be tweaked with a little bit of work, but the spagetti artefact at the neck is hard to overseen. Maybe another “Recover Detail” strenght will help ?

The Third Picture looks very good ! Very good result :slight_smile:

I watched the MP4, some parts look very good, but there are parts where the Model created weird vertical lines.

Frame:
0-16 (Borg Head Left - Vertical Artefact Lines)
330-429 (Very Good Grid on right Part of Borg Face in Foreground, Left Part Vertical Artefact Lines)
534-570 (Face Right @ Top)
700-785 (Neck & Eye from Captain after Face turned to Side, Strange Vertical Lines on Chair etc, Bob Marley in Background)

Maybe different Recover Detail helps ?

Your Source is hard (you got my respect) no wonder the AI screwed around.
The borg skin Colors and Star Trek none human faces are anything other as a easy source.

Heio, you’re right, the, the ship looks to bright, I didn’t adjust gamma fo the test yet. Your gamma adjustements are good, it’s really more film like.

What it so impressive to me here is the ammount of gained details in the cubus szene. My impression is, that not everything is present in the source, Rhea must have added structures here, invented something, partly not wanted because it’s problematic, but here is ingenious.

Yes the second one is a bit to smooth I mention this also, which is surprising because it is made with the same settings and model as the cubus which is hard.

Second picures is RheaXL, everything was made with RheaXL :grin: People say you can’t use RheaXL, so no, the model is usable as you can see but it is very difficult to use and not for all, for partitial scenes, the conditions have to be right

After RheaXL some tuning is needed, to rid of plastic look, and to make the pixel blocks more homogeneous. I did the finish with “Artemis Medium Halo” + second enhacement “Artemis HQ” This sounds a bit confusing two times Artemis but they do completely different things and complement each other very well, especially when the template is RheaXL. Afterwards it looks finely structured, it does denoise and Artemis Medium Halo gives possibility to add noise that does not look artificial because then Artemis HQ runs over it.

I think your right, not everything is present in the source (but we should not forget that a Computer can ““see”” way more as our eye) and rhea guessed something together which looks very good. What rhea added, is perfectly distributed which helps.

Any model (except Theia xD) is usefull sometimes :slight_smile:

Not Confusing at all :slight_smile: i do often the same :slight_smile:

Sometime first Artemis Strong Halo then Artemis High, sometimes the other way around. I think i used nearly any Artemis & Proteus combination in the last 2 years.

What is confusing are the Artemis Dehalo Names :smiley:

Artemis Medium Halo, dehaloes much stronger as Artemis Strong Halo.