Updated Studio 2 to v2.2.0 and was checking it out. Thought I would compare it to Adobe Camera RAW to see if one produced better results than the other.
That’s when I noticed how Studio 2 was changing my Canon .CR2 files upon opening.
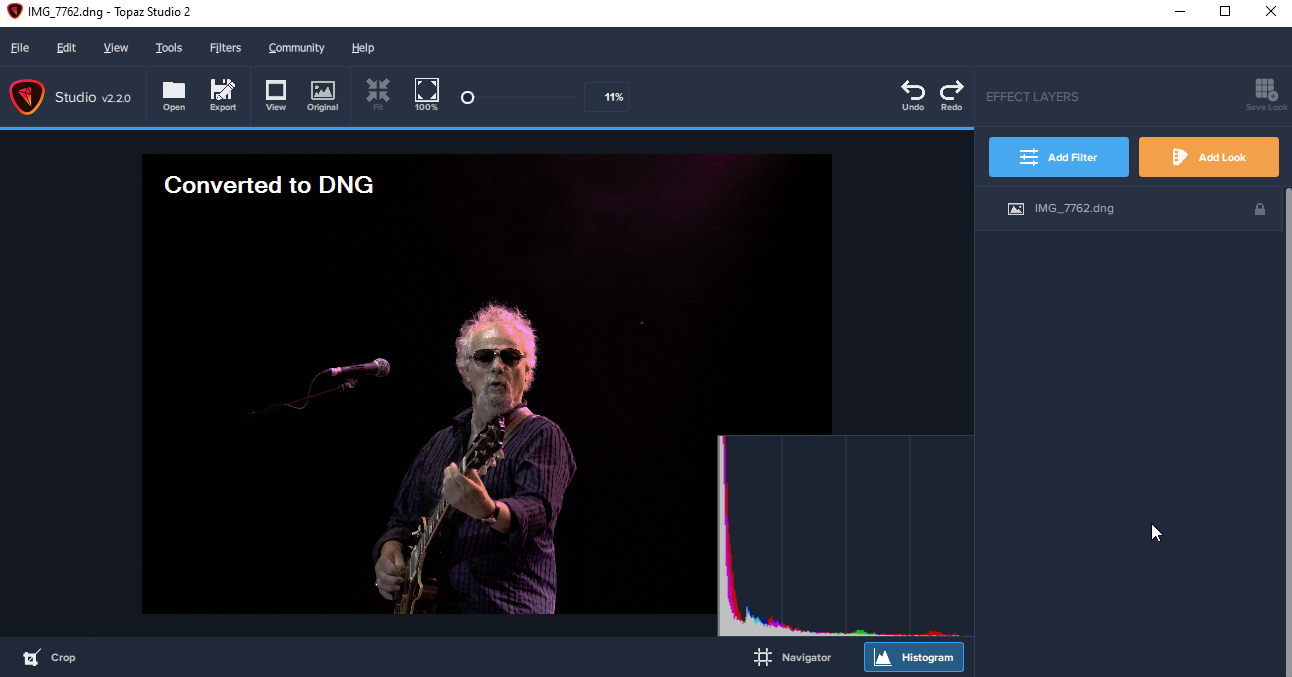
I tried converting the files to DNG, with the same results.
With newer Canon RAW files (6D Mark II), there was an issue with a magenta cast on the images when opened. V 2.1.0 from October 2, 2019 says that was fixed. I wondered if they just cheated and filtered out a bunch of magenta when opening files. Nope. Here’s another comparison between Studio 2 and Window Explorer with a DNG file with less magenta. (Explorer Preview Pane resembles ACR).
So, wanting to cover all my bases, I went back to 2016 and opened a RAW file from my old Canon T3i. Surely that would work. Sadly, the answer is also, “No”.
I found the “Roadmap”, which is nice to share, but it says nothing about fixing RAW file support.
With some products, the “System Requirements” page will list supported file types. There is absolutely no information I can find where file support is spelled out for Studio 2.
So what’s going on with this? Is it known? Is it on the “to be fixed” radar?
If you have access to ACR, I suggest you use it (or something else) for the Raw processing and export to Tiff for further processing in Studio. Otherwise, you will be wasting lots of time.
Ray, at least most of what you are describing is known to Topaz and will be corrected. I contacted one of their Software Engineers about the main problem I’m having with RAW files. I only shoot in RAW so it is a big concern of mine. I was told it was happening because the Topaz library needed to handle RAW files has not yet been updated since some of the newer software has come out. If you were shooting in JPG you wouldn’t see some of the things you are experiencing the problem is the RAW files. Most people shoot in JPG so that format probably does get more priority. I’m perfectly willing to wait until they have worked out all of the bugs because I do like Topaz products, I know it will all work out, and that gives me the patience to hold on. In my case it is primarily the color change that annoys me. I’ve got a work-a-round I use to solve my problems and it is done in Photoshop. I use the Topaz software I need and if I get the color change problem I take the image back into Photoshop and go to my Adjustments window. In there I click the icon which will create a new Curves Adjustment layer and then I create an “S” curve which solves my problem. If you are not familiar with what I’m talking about, contact me back again and I’ll try to be more specific and give you a step by step instruction guide.
The excellent advice given to you above by jgr00ms2 should easily solve the problem as well. The basic idea is that for right now, any other format other than RAW files will produce great results in Studio.
Thanks JLG and Terry. As Beta Testers I guess you’ve seen what goes on and what Topaz may (or may not) be doing about it. It seems like I’ve been waiting years for things to get to a point where Topaz can actually be my starting point.
Funny thing is, I kind of like how Studio eliminated most of the fog from the stage. I would, however, prefer to be in control of these things. I am now experimenting in ACR and Photoshop to see how I can accomplish this myself – on purpose! I’m actually making some headway in that regard.
Terry, since you offered, I wouldn’t mind a quick overview of how you use the Tone Curve to compensate for a colour shift like this. It’s one of the tools I haven’t experimented with very much. You can post here, or send me something via DM, whatever you prefer.
Hi Ray, Sorry I took so long. Had to go out for awhile.
The easiest/fastest thing to do, and what should solve your problem is what JLG suggested, and which I’m using a lot. Simply convert the RAW files to .tiff files, saving all that RAW information and then pull it into Studio. It should solve the problem right there. Studio does excellent work with Tiff’s, jpg’s, and a few others, but just not RAW right now .
However, below are the Images/steps to get to the curves tone adjustments if you want to try this way. I didn’t understand what you were attempting to do at first. It isn’t what I thought it was.
Be sure to read the post from AiDon just below my post here. When I read his post I saw it was much more explanatory than mine, so I came back and edited my post here to keep from muddying up things. Maybe our combined explanations can make it a bit clearer.
Step one is to just load in a photo. Be sure to click on each of these photos to open it up to see the entire image.
Don’t be concerned about the photo I used. I just put that one in order to get Photoshop to show what I need to show you. The photos have no relationship with the adjustments in this case.
Step two is to locate the Adjustments window. If you don’t see it in Photoshop, go to “Window” at the top left of your Photoshop screen. Go down to “Adjustments” and click on it.
Hi all, the issue with RAW conversions is known and is scheduled to be looked at as per previous posts. Note that currently Studio 2 uses an older version of LibRAW where development has been stymied with David Coffin leaving and no more support for DCRaw.
But, for those that don’t have access to another RAW converter such as Capture One Express (Sony & FujiFilm) or DPP for Canon or Nikon ND-X RAW or using the RAW converter from other Camera Manufacturers, you can use Studio 1 which is a free download in the legacy products for Topaz Labs. You can see from this comparison of a conversion of a Sony A7iii uncompressed RAW in both Studio 2 and Studio 1:
Which is still a little flat but a much better starting point. Then with a little “S” curve to bring out the highlights and shadows and a little exposure and contrast you can get to this.
I thought I’d try rolling back to an earlier version as I’m sure this was working better previously. However, I can’t find any installers for previous versions. Since I’ve been using the Online Installer, I don’t have any previous installers.
Do any of you know where I might find a (legitimate) installer for V2.1.0?
I’ve filed a support request for this, but this might be faster.
Version 2.1.0 is when the problem first appeared so that won’t be of much help. There is (was?) somewhere on this forum a link to the version 2.0.13 installer which doesn’t have the problem - but I can’t locate it just now.
I have uploaded the Studio v2.0.13 to my dropbox. It is an offline installer so it is nearly 600MB. It can be downloaded here. I may delete it in the future.
Artisan-West’s version may be what you are looking for but I want to make sure you understood my and AiDon’s fixes. What we are suggesting is to run your RAW image through Studio and save it as a dng or tiff. Then to take that dng or tiff into Photoshop and do the adjustments as AiDon presented above. Studio is washing out much of the color in the RAW files and the adjustment using curves should do a good job to compensate for that. Did that not work for you?
Loading any raw file into any version of Studio after 2.0.13 doesn’t work at all - at least for me. Don’s suggestion above relates to opening a raw file and adding a curve in Studio 1 (no need for Photoshop), not Studio 2, but you can use a version of Studio 2 prior to 2.1.0. You can’t fix the current Studio 2 issue with a simple curves adjustment as it’s not an overall colour cast, rather blues are becoming magenta and neutral tones just basically become darker. To use Studio 2 you really need to convert your images first, as, again, Don suggested, but converting to DNG just gives you the same problem.
Thanks, Artisan for the download link. I’ve rolled back to that version. Unfortunately (as I suspected), for my Canon EOS 6D Mark II files, 2.0.13, I get the dreaded Magenta Overlay, as I do with Studio 1. The reason I was looking for 2.1 was because the Changelog says:
Users importing RAW files should no longer have them turned magenta
But what I’m hearing from you well-informed folks is that a different kind of colour shift started with this which has yet to be resolved. I was almost certain that I had Studio 2 properly opening my RAW files, but perhaps I hadn’t noticed the colour shift with the files that I had tried.
I understand the workflows you are suggesting, but Studio 1 doesn’t work for me either. For now, the only option seems to be to convert to bitmap by opening in Photoshop or other image editing program and use Studio – or just the individual modules – as a plugin. Most of the time I don’t go further than Camera Raw, only jumping to Photoshop if I’m doing some special effects. I’m holding out hope that I can someday use Studio instead of Camera Raw and I can pretty much get rid of Photoshop.
Thanks, again for your patience and suggestions. I’d still be interested in trying 2.1.0 just to see what happens. Maybe it will only work with my RAW files, which don’t work anywhere else.
I discovered Studio v2.3.0 in the downloads section. Downloaded and installed and it appears it has resolved the issue with CR2 from Canon EOS 6D Mark II. I hope it is the same for others.
Thinking about this has certainly muted my excitement about the forthcoming Canon EOS R5 Mirrorless. Who knows how long it will take before its RAW files will be supported.