Education | Getting Started

Hi! I am new to Topaz Photo (I nearly went with DxO…). I cannot find any training info on the new subscription version of Photo v1.3.3 and onwards. The Photo AI Youtubes material is misleading as it seems the flow has changed and options are different. Even there is no UM to cover optimum flows, sharpening options etc, from Topaz (that I can find)?

eg. what are merits of sharpening versions: Standard/Strong/Lens blur/Lens blur V2/Motion blur/Natural/Refocus/Wildlife (BETA)/Portrait (BETA). It is hard to predict how each works and they seem to depend on the subject.

eg. what is the best order for flow?

eg. can Sharpen be applied with multiple masks independantly (sharpen subject and foreground differently)?

Thanks. Julian

Hi Julian.

You can find all the information you need within the Documentation ( Help ) Pages.

You access the this information both from any Device or from Topaz Photo within the Topaz Photo app simply Click on the Help Button Top Right and Select Learn about Features or you can Click on Help on the Left hand Side and select Support and you will be directed to Documentation ( Help ) and Support

Alternatively going to the main Topaz Website Click on Desktop App and Select Documentation from the List or from the Menu Button on other devices.

Here’s some Shortcuts to get you started

eg. what are merits of sharpening versions: Standard/Strong/Lens blur/Lens blur V2/Motion blur/Natural/Refocus/Wildlife (BETA)/Portrait (BETA). It is hard to predict how each works and they seem to depend on the subject.

eg. can Sharpen be applied with multiple masks independantly (sharpen subject and foreground differently)?

Yes and No,

No, you can’t apply one Sharpen Enhancement and then apply different Masks and Sharpening Models to that one Enhancement

Yes, you can add Multiple Sharpen Enhancements with different Models and Selection Masks

eg. what is the best order for flow?

Recommended order

RAW Denoise (if RAW file) → Dust and Scratch → Super Focus → Remove Noise → Sharpen → Remove Object → Adjust Lighting → Balance Color → Recover Faces → Preserve Text → Upscale

Hi! I am new to Topaz Photo (I nearly went with DxO…)

In my humble opinion, you made the choice there’s nothing wrong with DXO it’s a fantastic application.

However it can only handle basic filters like Sharpening and Denoising and can only be used with RAW files

Topaz Photo on the other hand, can also handle a RAW Workflow and also, work with JPEG’S, TIFF, and a host of other files plus a whole lot more including incredible Upscaling, Dust & Scratch, Super Focus Wonder and Recover.

Incidentally, when you Import a JPEG or any 8-bit image onto Topaz Photo and Export it as a 16-bit TIFF file Topaz Photo doesn’t just put a 8-bit image inside a 16-bit container it actually converts it to a full 16-bit file nobody else does this only Topaz how incredible is that.

If you need further help you contact the good people at Topaz Support here’s the link to contact Topaz Support directly

help@topazlabs.com

Alternatively you can ask the Community or Myself

Welcome to the world of Topaz hope you enjoy

1 Like

Many thanks And-e,

your answers were incredibly helpful to answer most of my questions. I have worked through most of the help instructional videos and although they point to the Photo AI tool I can see that much of the content is applicable, but there are differences, such as new models for sharpening and the Lighten V-1/V-2/V-3 which just seems to be a strength of filter control?

What my wish for in improvements (within my first 24hrs of testing…) is some form of dialling back the wow-factor to a “woah - lets just set this back a little bit towards reality..” I have noticed that some of the criticism aimed towards Topaz is for over-the-top effects which can depart from reality. In a Ps layer stack one has the possibility to walk away and then come back after a cool-off time and decide how much to dial back the effects so as not to go into the realms of fantasy. I am a new-comer to Topaz Photo, but I have noticed that there seems (to me) to be no easy way to repeat the actions from the previous conversions, again, later, in order to build on the review over time and reflection (cool off period). I wonder how Topaz experienced users approach this? I understand that I am probably missing some fundamental usage flows. Sorry, I am at the beginning of the curve.

Meanwhile I shall look out for a UM which reflects the current tool version more accurately. (I had no idea that I arrived so early on the learning curve for Topaz Photo.)

Julian

Many thanks to you Julian.

Lighten V-1/V-2/V-3 which just seems to be a strength of filter control?

Yes, I definitely see how it may appear that way but believe me there’s more going on under the bonnet.

I hope this is a simpler analogy, an easier way to think of Adjust Lighting is to think how Photoshop’s Screen and Multiply Blend Models work Screen will brighten everything with varying degrees except for the Whites and Multiply has the opposite effect by darkening every except for the Blacks and if you apply both at the same time you end up with a flat image.

Adjust Lighting does a similar thing but, instead of being a global adjustment Adjust Lighting does it intelligently on a pixel by pixel level adjusting the Exposure, Contrast, Highlights and Shadows for individual pixels for each and every image and you can fine tune it afterwards.

some form of dialling back the wow-factor to a “woah - lets just set this back a little bit towards reality..”

All Enhancements have manual controls and of course if you find a happy medium you can save a Preset.

In addition, you can also go into Preferences and customise most of the Enhancements for Strength, which Models you want you can even customise Autopilot

The Shortcut for the Preferences Menu is press the Command/Control key plus the Comma Key

In a Ps layer stack one has the possibility to walk away and then come back after a cool-off time and decide how much to dial back the effects so as not to go into the realms of fantasy.

If you use Topaz Photo as Standalone Application you can indeed return your image to Topaz Photo and adjust previous settings if you’re not happy.

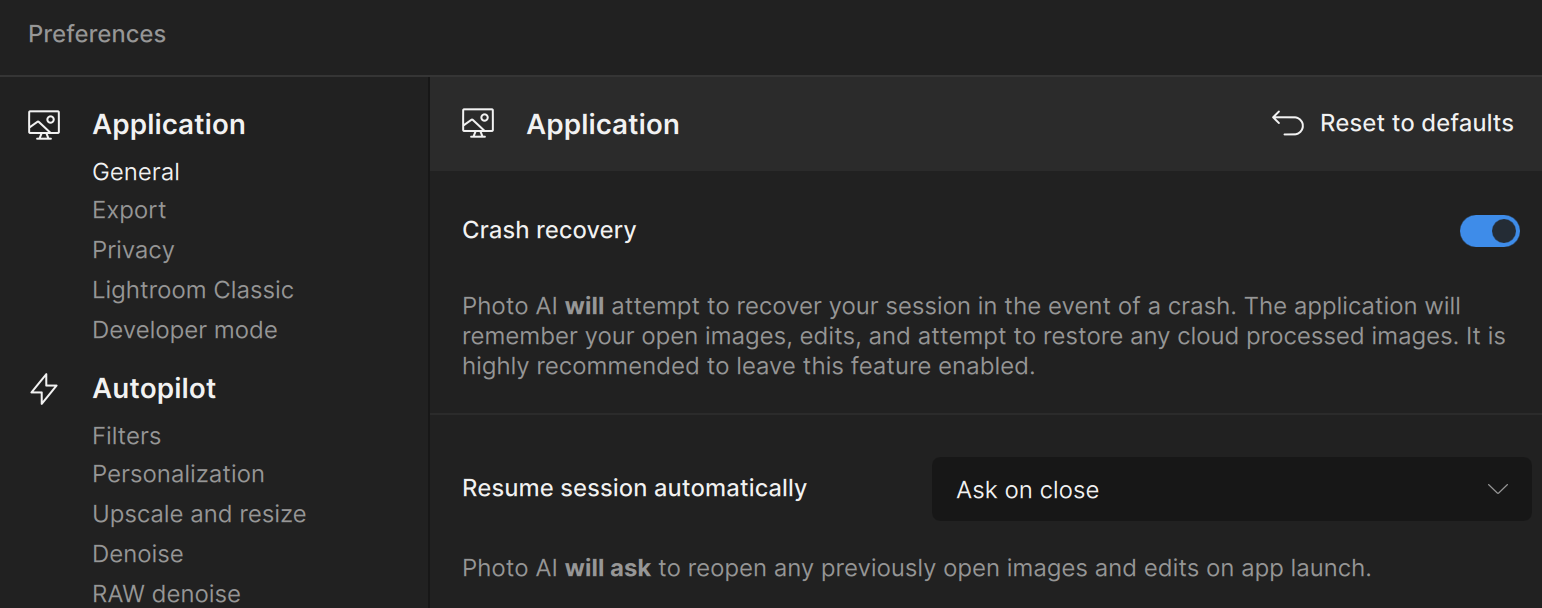
This ability was introduced with the Crash Recovery option so, if Topaz Photo Crashes you won’t lose your adjustments.

But please bear in mind this only works with open images within your current session meaning you open an image or images in Topaz Photo add Enhancements Export those images but, don’t close the images and you need to keep your current session open.

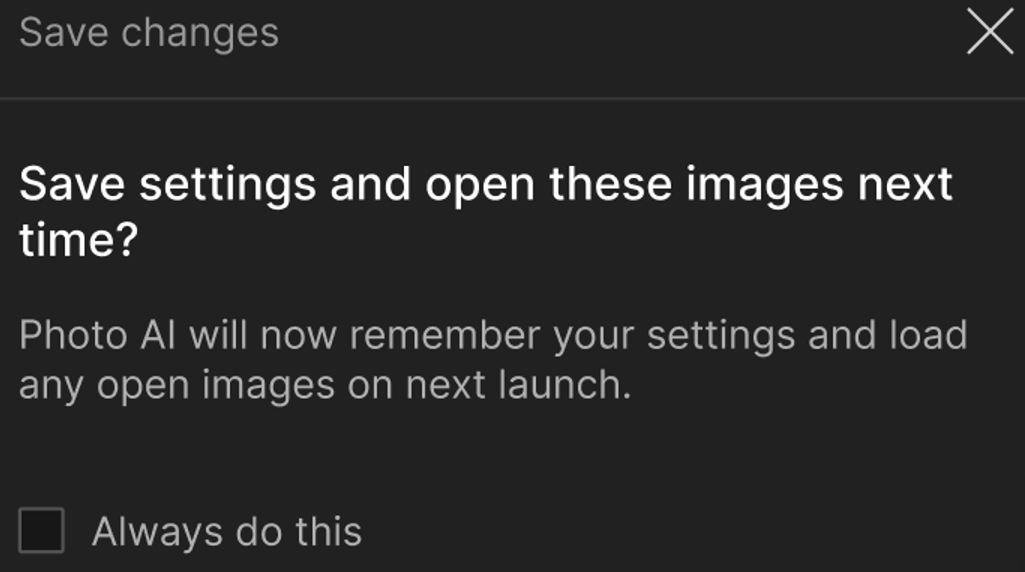
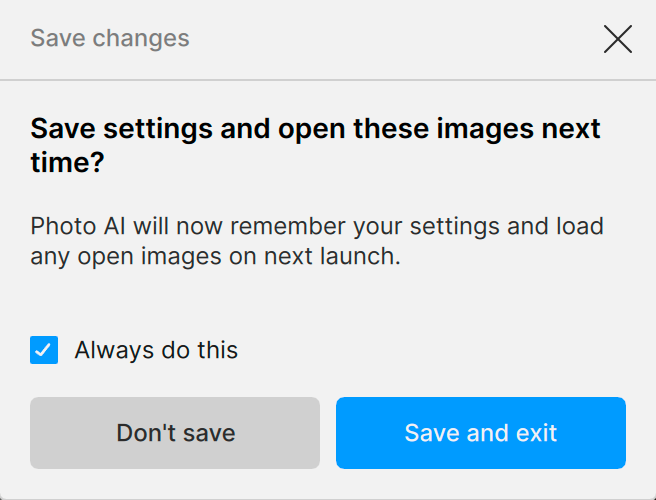
Now when you close Topaz Photo you will be asked to Save Settings and open these Images next Time

This feature isn’t on by default you have to enable it within the Preferences Menu simply open the Preferences Menu or Press Command/Control plus the Comma Key to open Preferences then click on General on the left hand side and your options will appear on the right next scroll down until you see these options

However, this isn’t possible using Topaz Photo as a plugin within Lightroom or Photoshop as it’s the host application that creates the duplicate TIFF image or Layer.

Having said that, although Smart Objects are not officially supported by Topaz but, that doesn’t mean you can’t convert your Layer into a Smart Object and use that layer with Topaz Photo.

there seems (to me) to be no easy way to repeat the actions from the previous conversions, again, later, in order to build on the review over time and reflection (cool off period).

You have the ability for Batch Processing and as I mentioned if you use Topaz Photo as a Standalone Application you can go back after the fact, Create Presets, Batch Processing or as a unsupported Smart Object.

Hope this helps

A couple more tips for you for example, the Sharpening Models just because they have names for specific Sharpening that doesn’t mean you have to stick to those labels for example the Wildlife Sharpen Model is also great for Fabric and remember with the application open you can chop and change as much as you like experimenting is a good thing and after a while of trying you’ll soon know which Models work best for any given scenario.

That pretty much applys to all the Enhancements including Upscaling another example you can apply the Upscaling Enhancements to any image and you don’t have to Upscale it simply select 1× in the Scale Factor option and the Enhancement will be applied without Upscaling.

Many thanks And-e for your answers.

This does shed a lot of light on getting Topaz Photo to operate as I want, though I am starting to realise that the AI is a wild card in the mix. I have had some amazing results so far on certain shots, and a few where I am better to stick with the LrC and Ps (also Bridge now that I am coming from a RAW file).

I get your analogy with the multiply and screen blend modes of Ps. That helps a lot to understand the V1/V2/V3 Lightening tool. It seems that +ve is like multiply and -ve is screen. V2 seems to allow greater flexibility and is not so heavy handed as V3. Now I need to try it out on more images…

Smart objects sounds like a fantastic possibility to fine tone down the Topaz output, which I shall try out.

(Cooling off): “If you use Topaz Photo as Standalone Application you can indeed return your image to Topaz Photo and adjust previous settings if you’re not happy.” I am still unsure of how to repeat a full set of edits a few hours later with only a small tweak change to the original settings. After exporting, all the edit flow and settings are lost as far as I can see, unless I am missing something. I see that I could create a pre-set, but that only seems to work for one manual edit step such as lighting in TP, so not helping me to revisit many steps together.

I guess that what I am seeing is that TP, in a LrC or Ps flow, should be left as the initial denoise and sharpen step to a 100% and 75% completeness, and leave lighting and then final sharpening to Ps where it can be finely tuned and directed at parts of objects. I like to add a final sharpening to the eyes, lips/beaks and natural lines of the head and claws (birds…).

Thanks for your help.

Hi Julian,

Apologies it’s been a long time since I set up the ability to edit previously saved images I forgot you have to manually enable it.

I have amended my original reply with the correct information

Hope this helps

Thanks for this additional comment. I had this enabled already, but I still do not see the same settings come up when I reload the last picture. I just tried this with a photo which I used Super focus on, exported it, then loaded again from the thumbnail on the right side and my photo came up with default settings with no extra items such as Super focus.

I used Super focus on, exported it, then loaded again from the thumbnail on the right side and my photo came up with default settings with no extra items such as Super focus.

That’s true, the Thumbnails on the right show the last few images you have loaded previously however, these Thumbnails don’t represent the image at the time you saved them after Enhancements had been applied.

They do infact represent the time that you imported them before any Enhancements were applied a little confusing I admit.

I still do not see the same settings come up when I reload the last picture.

This has nothing to do with the Thumbnails and the way this works is a little different for a single image than, multiple images.

Single Image:

Open Topaz Photo, as a Standalone Application then, Import your image for Editing apply your Enhancements then, Click on Export and the Export Window will open with the different Save options next choose how you want to Save the image and Save you will then, be presented with two more options Close Window and Save Again.

Save Again, is for if you want to Save a copy of your image to another location or different file formats

Close Window, will simply close the current window and return you to the Main Interface, so you can continue refining your image.

The option you want is Close Window, to return you to the Main Interface, once you’re back in the Main Interface simply Close Topaz Photo Down and the next time reopen Topaz Photo your image will return with the previous Enhancements and Settings you Applied.

Please remember this only works with the Standalone version and also, if you open Topaz Photo and Import another image then Topaz Photo will only remember the Settings for the current image.

Basically, Topaz Photo only remembers the Previous Session at any one time.

Multiple Images:

This works a little different for Multiple Images but, the principal is much the same.

If you Import several images into Topaz Photo the Main Interface will change slightly a Film Strip will appear with all your images this is also the same for Batch Processing.

The only difference from the previous information is now you are free to work on Multiple Images adding Enhancements and Saving them but, now when you Close Topaz Photo Down and reopen it later all your images will reopen with your previous Enhancements and Settings you Applied.

Don’t forget Topaz Photo only remembers the Previous Session at any one time.

Hope that helps clarify it a little better for you

Andy

Good evening Andy,

I tried this as you mentioned below but I cannot replicate the effect of saving my last edits for the last photo. I tried both as a single image called up as open image from TP, and also as a batch job. In both cases, when I save the image, close the export window, close TP and then reopen it, I have no view of the thumbnail to reopen with enhancements saved, only the thumbnail to the right side which pulls the image back, but starts again with no saved settings. It is ok for me to manage with this. I do think that this is an area with improvement potentials. TP uses so much memory that a few 100MB saving the last state would not be a burden (I do know that this is not the only issue…)

On Wednesday I shall gain likely a few 1000’s of photos from a Red Kite sanctuary, so then I shall be looking for the simplest and smoothest flow. (If you know of a pre-cull AI which recognises bird eyes I would be VERY happy, I have tried many candidates but none I have tried work reliably :frowning:, people’s faces, yes)

Anyway, thanks for your help.

Julian

Morning Julian.

In Preferences, you definitely have “Crash Recovery Enabled” so, that the Toggle Switch is Blue and underneath that you definitely have “Resume Session Automatically” set to either “Ask on Close” or “Always”

If these two factors are in place then, this should be working for you in addition, I mean by Close Down Topaz Photo either Clicking on the X for a PC in the top right corner or Selecting Exit either way you should see this box below unless you have Clicked on Always or Always do this.

Hope this helps and when you have time Please let me know how you got on.

Good morning Andy,

Crash Recovery: enabled.. check

Resume session automatically: Always .. check

Close by Clicking on the X.. check

Then..

I do not get the message (I have never seen this in my V1.3.3 version):

What is do get after closing the Export window) is:

And in the top right corner:

You will not receive that message if you have Resume Session Automatically it set to Always.

Everything is set up correctly and the only thing I think of is it could be the fact you’re using a Mac.

Try opening Topaz Photo then, import an image and apply something obvious like Sharpening at 100% then press Command Q to force Topaz Photo to Quit then, relaunch it

Hope do hope this works everything is setup correctly and it should be working

Andy

Here’s all the information I can find from Topaz regarding this option

Save Session

Topaz Photo can help save your editing session by automatically preserving your progress when you exit the application. This ensures that all adjustments, edits, and enhancements made to your images are stored safely, allowing you to seamlessly resume your work later without losing any of your changes. Whether you’re tweaking lighting, colors, or adding effects, Topaz Photo’s session-saving feature keeps everything intact for a smooth, hassle-free editing experience.

Click the Check box for “Always do this” if you batch process regularly, saving a session can be valuable to your workflow and increase efficiency.

image

Crash Recovery and Session Save

Crash recovery and session save are here to safeguard your work and provide peace of mind during longer projects or batch processing.

Previously, a crash could result in the complete loss of your progress, leading to frustration and wasted time, especially when processing multiple images. With this new feature, your work is automatically saved at regular intervals, ensuring that even in the event of a crash during work or export you can recover your progress and continue right where you left off.

The application automatically remembers images loaded, enhancements used, and export progress. On the next session, you have the option to recover the application state.

Screenshot 2025-01-21 at 3.46.20 PM

As a bonus, the crash recovery features makes it very easy to enable session saves. Closing a session with images open now asks if you want to save the session so you can pick up your work at a later time. Selecting save and exit will save the application state and reopen it on the next session.

Screenshot 2025-01-21 at 3.46.48 PM

Use the Preferences menu to change the default behavior for crash recovery and session save.

Screenshot 2025-01-21 at 4.51.19 PM

Might be time to call on the good people at Topaz Support here’s the link to contact Topaz Support directly

help@topazlabs.com

Andy

Thanks for your help Andy. I work on PC not Mac. I saw the below setting, and this does keep the image after it is exported.

Now, when I exit TP and restart, my last picture comes back with its edits…

Thanks for your time.

Julian