Best Settings for Fast-Moving VHS Footage (Soccer Games)?

Hi all,

I’m hoping to get some opinions and advice on how I could further improve old VHS footage that has a lot of movement in it.

The footage in question is football (soccer) from old VHS tapes. I’ve attached a sample where you can see the source and then my attempt at improving using TVAI.

I’ve found that using some of the models make the footage look really fake and far too smooth, especially the player shirts and the pitch. Random faces also appear in crowd scenes! Below are the settings that I’ve used to improve the footage quality but keeping some of the original detail:

Video Type: Interlaced
AI Model: Iris MQ
Recover Detail: 20
Mode - Manual:
FC: 28
ID: 18
Sharpen: 6
RN: 4
Dehalo: 22
AA/DB: -43

I then ran a second pass to upscale x2 and increase the frame rate to 60FPS

Any help would be greatly appreciated.

can you upload the source file? I want to try something

Hi,

Thank you for responding. I’ve uploaded 3 source clips to the G-Drive folder. They’re all from the same VHS which is a compilation and so you’ll see samples from 3 different games.

Thank you

Hi, I notice it is not the original from the camera and was h264 encoded, very badly or not deinterlaced. I first had to find out it’s topfiled or bottom field interlaced, which is not so easy as both give similar results, which is often a problem when it comes to material that has been re-encoded, bottom field gives a tick sharper results and I have deinterlaced all with QTGMC setting very slow.

After that I croped the bottom black bar including frayed and color fringeaway, because I find ugly when something flickers at the bottom of a screen, it’s about 6 pixels, on one of them I did 4pixel bottom and 2 pixel at top, then I lowered left and right black bars and I have centered the content, results in 760x570 (instead 576) which is also exaclty 4:3

Then I adjusted a little bit contrast, gamma, colors and uploaded the adjusted source files here, you can download it and I think this is a solid base doing upscales from
https://drive.google.com/drive/folders/1YskJCDbynuGt9O2Q626zaB0f6zPvAOR7?usp=sharing
Encode was made x264 very slow, CRF12, because i didn’t want to fill my cloud with lossless files

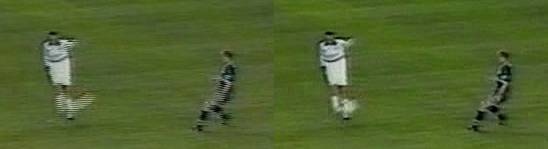
Unfortunately upscale tests gives me also blured results and I have tried almost every model. This is the kind of source material that TVAI does not handle well. Long shots faces with few pixels generate moon faces + models interpret a lot of the content as noise/artefacts that aren’t, then it does smoothing, it blurs.

Especially Proteus which is one of the best models to reduce discoloration and film artifacts is not suitable here at also reduces details a lot. It’s only 25fps and source is very heavy interlaced, which also leads to blurred movements camera pans are too fast for 25fps. Frame interpolation doesn’t help here - on the contrary, fps increase in TVAI turns blurred images into even more blurred interpolated additional frames.

Artemis, HQ or Medium Quality delivers me the best of the poor results. So I think wait until there is a better model doing this. If you are deeper into avisynth you can certainly do a lot, but I am the wrong person for that. Or Starlight, I suspect that will deliver much better results here. Maybe because it’s a historical record, Topaz Labs might do it for free, it doesn’t hurt to ask :slightly_smiling_face:

1 Like

Thank you so much for your efforts, the adjustments you made has definitely improved the footage.

I made a mistake, now I can clearly see it’s top field interlaced, and better is BOB flag, doubling framerate helps a lot (not in any cases, but here it’s good) I upload new correct deinterlaced 50fps version soon :slightly_smiling_face: (but without color corrections I am too lazy today)

EDIT: Ok it’s up! Double framerate helped a lot, movements are smoother now.
https://drive.google.com/drive/folders/1YskJCDbynuGt9O2Q626zaB0f6zPvAOR7?usp=drive_link

1 Like

Wow they’re incredible!

What do you mean by BOB flag and can you let me know exactly what you did to get these results?

Thank you for your help :smile:

I described this here You can see the “BOB” checkbox in one of my Screenshot there (it’s not yellow marked). BOB causes the frame rate to be doubled during deinterlacing.

I recommend do deinterlacing always as first step. Choose and force “top field first”, do deinterlace “very slow” and choose “FFV1” lossless codec in Hybrid for export.

Then you can import the deinterlaced result into Virtualdub and do the bottom crop with Filter “Null Transform” crop 6 pixels away from 576 to 570. Then add filter “Resize” and instead resize choose there Letterbox… it fits 760x570
VDub

Export (best is AVI or FFV1) and you can import this into your Video editing software to adjust contrast/gamma a little bit, if you wish, often more contrasty vids gives better upscale results.

1 Like

You can do all of the above pre-processing with Hybrid which is the way I go. De-interlace fields are detected automatically but you can change it manually if it’s wrong. it has all the options in one tool. I’d also recommend a bit of de-halo to prevent it making your upscales look worse. It will make your picture initially look a bit softer but will prevent “enhancement” of high contrast edges.

2 Likes

yes you can do crop/resize and much more in hybrid. Personally I like VDub when it comes to visual view with free scale window when croping. When you follow source preparation lossles pathway, the good thing is you can do several steps by swichting between different programs you like. But when you can handle all in one program, it’s the faster way.

1 Like

This information is fantastic, thank you so much! I’ll post some results once I’ve completed my project

Thanks again!!

1 Like

great thread. thanks a lot

Not sure BOB is actually going to help here if QTGMC is used to deinterlace. Since it will only line double the original footage from half height frames. The only way to get rid of the motion blur is by using a faster framerate to capture to begin with at full frames rather than interlaced. Topaz is really bad for this type of footage with so many faces at middle to long distance most models can’t cope with it without creating monster faces/distortion.
I resized it with Hybrid using lancoz with the aforementioned de-interlace and dehalo without upping the framerate.

Then imported into Resolve and cropped and recoloured a bit with a bit of denoising.

https://1fichier.com/?a0sgdr4izq9c85xfwfv6

1 Like

Can I ask which Dehalo you used + settings, into Hybrid? There are severals. I’m looking for a slightly low invasive Deblur for my footage.

I checked frame by frame what BOB in this case does and it is absolutly best you can do for this footage. Here is a very small image section from unscaled video: left original and on the right the deinterlaced one, by doubling frame rate.

Interlaced source, the half lines included in re-encoded progressiv video leads to the streaking frames during movement, which is so bad that it is simply perceived as smearing and not as content. BOB calculates second missing line and merges. This results in visible additional useful content.

01
02
03
04
05

So the additional frames shows movement and are not just simillar copies of existing. While the Soccer on the left has already kicked the ball in just 5 frames, the same process on the right tooks 10 frames until it’s on the same time index. Here you can see just 5, but every of the 10 frames contains movement.

When I did BOB with content “Star Trek Voyager”, I get aditional frames too, but they show me no useful more content, cheap copies with artefacts without additional movements, so I did no BOB.

This is why it’s so important to visual check deinterlaced results. Deinterlacing by doubling framerate can do great things, but can be also useless and just blows up file size, compared to none doubling deinterlacing…or in worst case BOB lowers quality.

3 Likes

This is very interesting, I didn’t know what BOB was prior to this thread.

Thanks both @Mayday and @wolfman42 for contributing and sharing insight … means I’ll be starting my project again from scratch but with much better quality as a result of your input :smiley:

of course, we now expect maximum performance from you :wink:

1 Like

I stick to default settings, for best result usually ticking the 4 middle de-halo options. IT really depends on how bad the halo is. All 4 can sometimes reduce the ghost edges when over-sharpened halo gets sharpened even more. But it doesn’t deal with dark edges quite as well. For dark edges actually Topaz de-halo works better as it seems to lower the contrast more but it’s only available on the models that denoise so it depends how much detail you want to lose or re-sharpen after. Pros and cons so it’s always a trade-off depending how bad the edges are.
I tend to de-halo then use an edge detect mask inverted to sharpen everything but edges. Sometimes it works others not so much.
Oh and text is not dealt with well in either option.