Using a 2-Pass workflow to improve quality and upscale to 1080p

What i mean is coarse pixel clusters (pixel accumulation with similar colors), gets finer structured. If you set more sharpness in TVAI, finer color gradations of adjacent pixels are calculated, but this also causes a kind of smearing effect.

In short the effect is similar to a glossy magazine, but details can suffer it’s a form of textures bluring but the image overall looks sharp. The higher you turn the sharpness, the stronger this effect becomes and it can even happen that the sharpness of the image as a whole does not increase or even decreases if you have turned the sharpness to 100 and then people are wondering why nothing happens.

In this case you only gain sharpness by turning deblur slider upwards. That’s why I mean TVAI sharpening doesn’t do what some might think, it doesn’t lead to more halo effects and square noses like in TVAI 2.6 times, but it has other negative aspects.

here is a example left side is sharpen +100, on the right sharpen 0

when you now zoom in, the seat, you can see how smoother pixelcluster gets, but you also can see “smearing” effect.

tvai sharpen changes the original it’s invasive and you can loose naturalness. So the perfect way is not to use sharpen at all and to control the pixel structure sizes by choosing the right upscale resolution and for models Iris and Proteus using deblur is allowed (Rhea mostly not) wich gives you the sharpness, also with presharpening of the source material you can control it. So then you are closed with which the models were trained.

1 Like

Hmm, I seem to be seeing other artifacts than you.
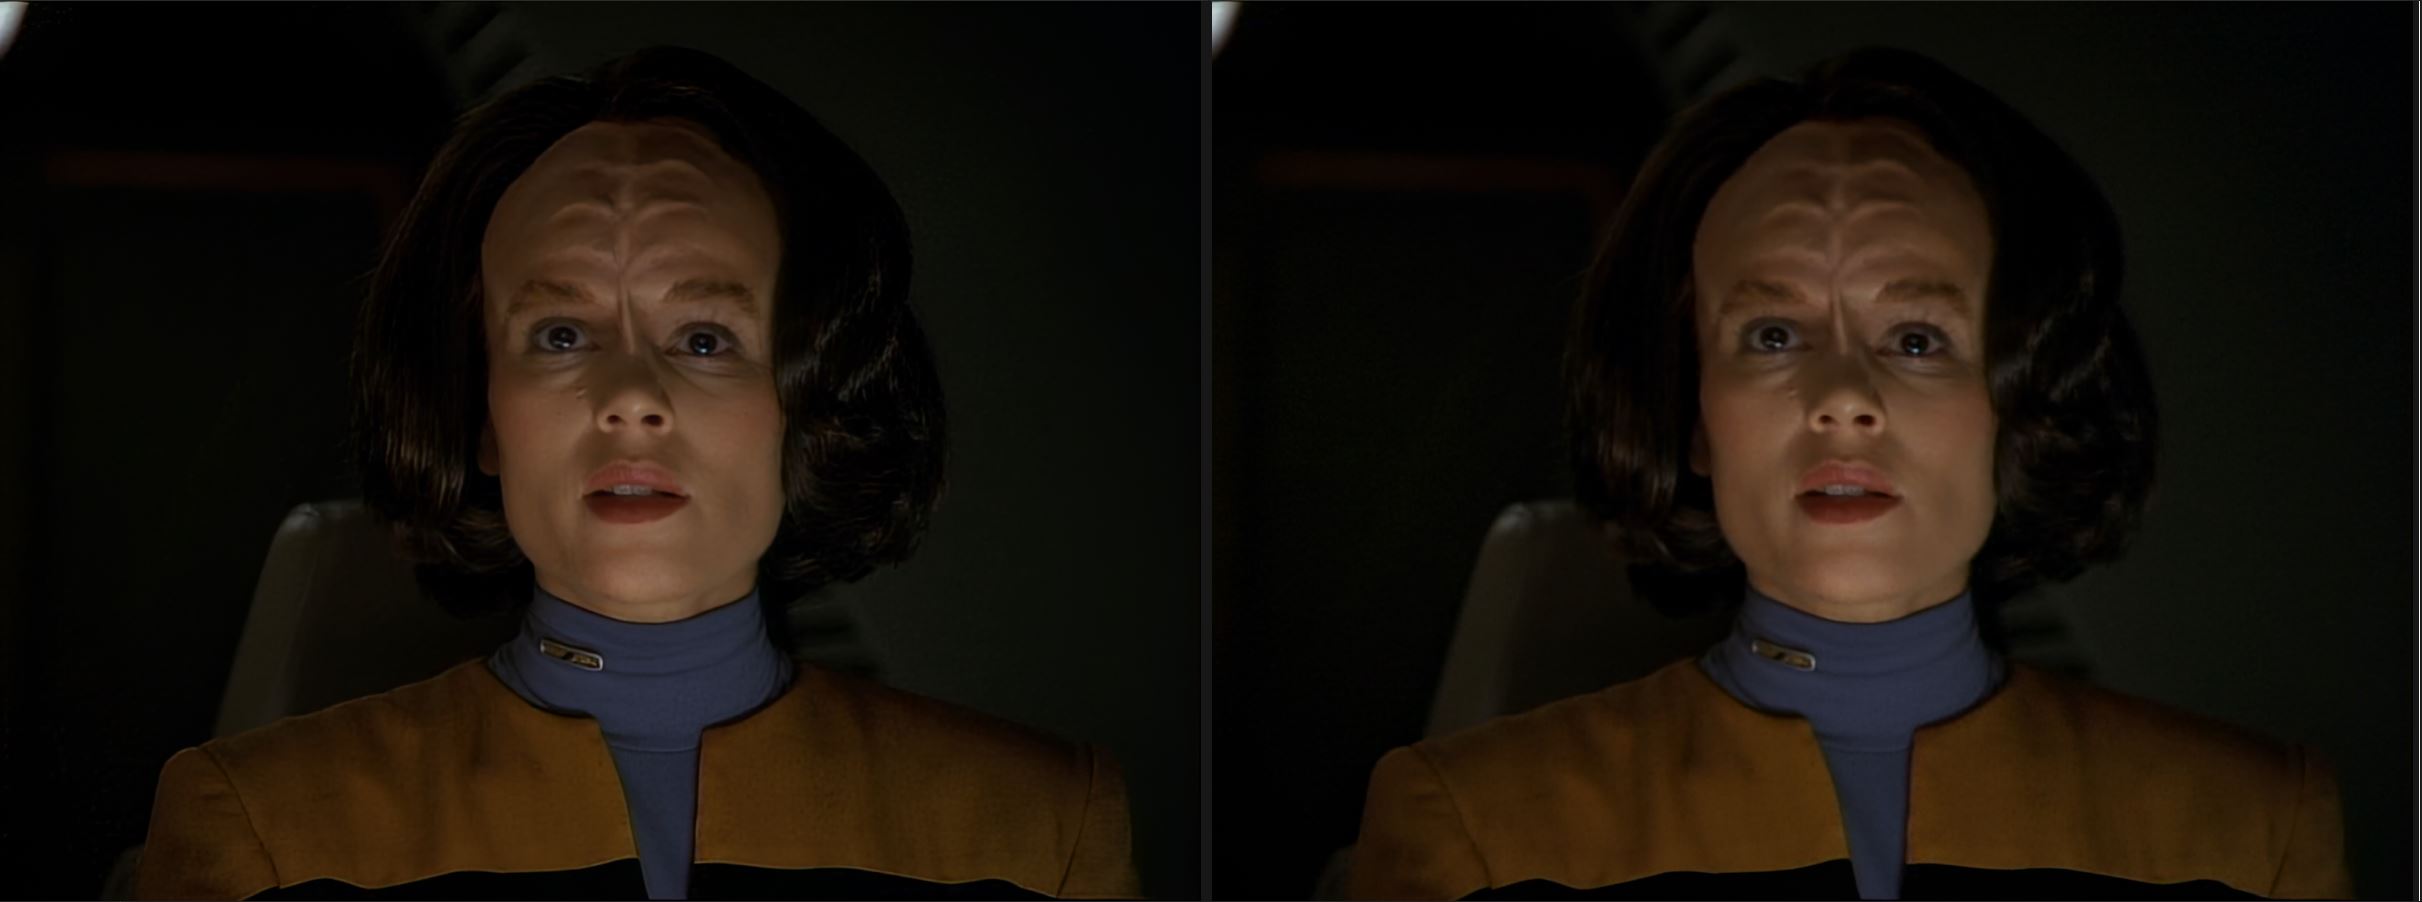
The left picture has great texture but horrible edges. The right poor texture (blurry) but great natural looking edges.

Even the background in the left (sharpened) image seems to have gotten rid of the “pixelated web of dark gray-to-black patches” that are so common for almost black background in analog → 8bit AVC1 quantization. It looks smooth where it should and sharp where it should (except for the edges).

The over-sharpened edge problem in the left picture seems identical to the Gigapixel flaw that renders the “standard” profile useless. It not only has severe edge ringing and color bleeding, but it also surfaces very noticeable “edge shadows” (like echoes of edges) as far away as 5-10 pixels from edges. It’s particularly noticeable at the center of the actress’ neck, just above the collar.

But aside from the edges, I think the rest of the picture looks very good and natural.

It’s strange that Topaz hasn’t found a general solution to this problem since it plagues all of the same generation of models (gigapixel and video). What I do for gigapixel is render one low-res and one high-res image. Then use edge detection to create an edge mask, expand the mask by a few pixels, alpha soften the mask’s edges and then blend the low-res image onto the high res using that mask.

That same easy trick should be trivial to have the Topaz products do automatically for the user. Yes, it’ll take 2x the rendering time, but the result is the difference between usable and unusable.

Now, that digression aside, I’m still not sure I understand what you mean by pixel clusters. Do you mean areas of high frequency perhaps? Or low frequency?

EDIT. I think I might understand what you mean after having cropped and center-aligned each still in a separate image and doing real A/B toggling between them. I see that the left image has misinterpreted noise as texture. Especially the actress’ lower left uniform (to the lower right in the image), where it boosted the noise frequency creating something that I suppose could be called “pixel clusters”. Is that what you meant? If so, it starts making sense. It’s the same problem as Gigapixel has for the standard and high models (profiles).

Actually it does. If you look at the edge separating the black and yellow part of her uniform, or the top of her forehead and her hair, it’s clear “halo” effects there (still, in present versions).

So Dehalo gets rid of the frequency spikes where noise is incorrectly interpreted as textures to be sharpened (like the smooth yellow gradients on her uniform in the right image), but leaves the edges alone, including the halos present in the image to the left?

As for the “plastic look”, yes, the more I look at those pictures in detail I see some of that on her forehead where she has what should clearly be soft ridges (bumps), but where the sharpness knob seems to have made model decide that the gradient crossed some discretion boundary for “sharp features” and decided to raise the frequency in those areas, resulting in a very artificial look there.

PS. What episode is that still from? I think my son has the DVD collection, and I found that particular scene still looking rather promising for experimenting with these knobs.

You’re right, when sharpen is used you get also Halo, but it’s not as the halo increase you get when simple sharpner is used, or some Avysinth sharpner scripts. My example above was poorly chosen and with model Proteus, with Iris it is much better visible.

What I want to say is that TVAI Sharpen dissolves existing simillar colored pixel “clusters” and reassembles them new and after reasembling you can get Halo for sure. There is no other way, how else do you want to make an image sharper without it becoming more and more pixelated?

Maybe textures looks better then when you zoom in, but it is invasive and can lowering naturalness of the image. I see this all the time. At first I used everything and then I didn’t use features like “Revert Compression” because I saw what it did bad things to the image naturalness, then I just used “sharpen” and “dehalo” and still got crisp results

And now I mostly just use deblur and I use sharpen rarely and still get as sharp as before results, but it looks even more natural. Believe me or not, less is more, but it’s not so easy as it sounds, you really have to set deblur optimally and choose the target resolution correctly, then the contrast increases. sometimes there is a very fine line to get the good results.

So I control the sharpness with the target resolution selection, which means that sharpening is built into the model does a better job than increase sharpen levler and I use only Deblur function. sometimes pre-sharpen of the source is needed a little bit, especially when Iris is used.

The crazy thing is sometimes Iris then no longer delivers fluffy images and I had cases where Iris was sharper and showed more details than RheaXL, mostly not over all scenes, this is also because Rhea sometimes delivers inconsistent results.