In general, I find results pretty good, with every image I tested seeing obvious improvement without appearing overly processed. I suspect in some cases the separate programs could yield better result, but the reduced workflow is probably good enough in a lot of cases.
The subject and face identification still has issues but works pretty well most of the time.
The program autopilot at times indicates severe noise but does not apply noise reduction (on) even though noise appears to be improved. Sharpen is rarely turned on in autopilot when at times it probably should be. The enhance option only seems to have minor impact, it is not clear if this is just a different sharpening option or intended to have more impact on specific types of images. Some clarification would help.,
The install ran quickly to my PC. Program launched fine. Previews processed w/in seconds (vs. minutes).
Things I’m super excited about in this latest rel.:
1- The ability to make settings changes manually w/out having to turn off the Autopilot switch.
2- The way I can hover on the symbol to the right of Autopilot’s “Subject Detected” to see a temporary overlay of where it sees a subject. The fact it doesn’t remain overlaid is excellent (and should prevent any confusion with a future masking feature…).
3- Ditto, it’s great to see the temporary popup boxes over faces in my photo by hovering over the symbol to the right of the Autopilot’s numerical face count. Having both the quantitative count and seeing with the face detection boxes where the robot thinks the faces are is a great help for post-processing.
I really appreciate that the previous usage inputs from us guys were translated into evolving feature sets for PAI by you guys.
Now, fingers crossed for the Ps plugin. I’ll try that next.
I often have the feel that the image is sharped too strong in auto mode even if no sharpening is being applied but also if the sharpening is turned on to the lowest possible setting.
That’s funny (in one regard and not another) b/c I always feel as if I still want to add more sharpening to what the DeNoise only Autopilot does. The not so funny part of that is, maybe my eyesight’s going …
Con’t. on Win 11 Pro PC. AMD = processor. Ps (2022) Plugin version.
The Ps plugin launched okay. And operated in the same ways I noted above for the Standalone.
BTW - I forgot to mention wrt the Standalone but I like it a lot for Standalone & Plugin - the notation that says, “Using Autopilot” so we know what’s what in that regard. I also like the toggle notation that comes up if we go ‘off script’ and create manual settings - I value the option that appears to “Reset to Autopilot Settings” if we aren’t so pleased with our noodlings.
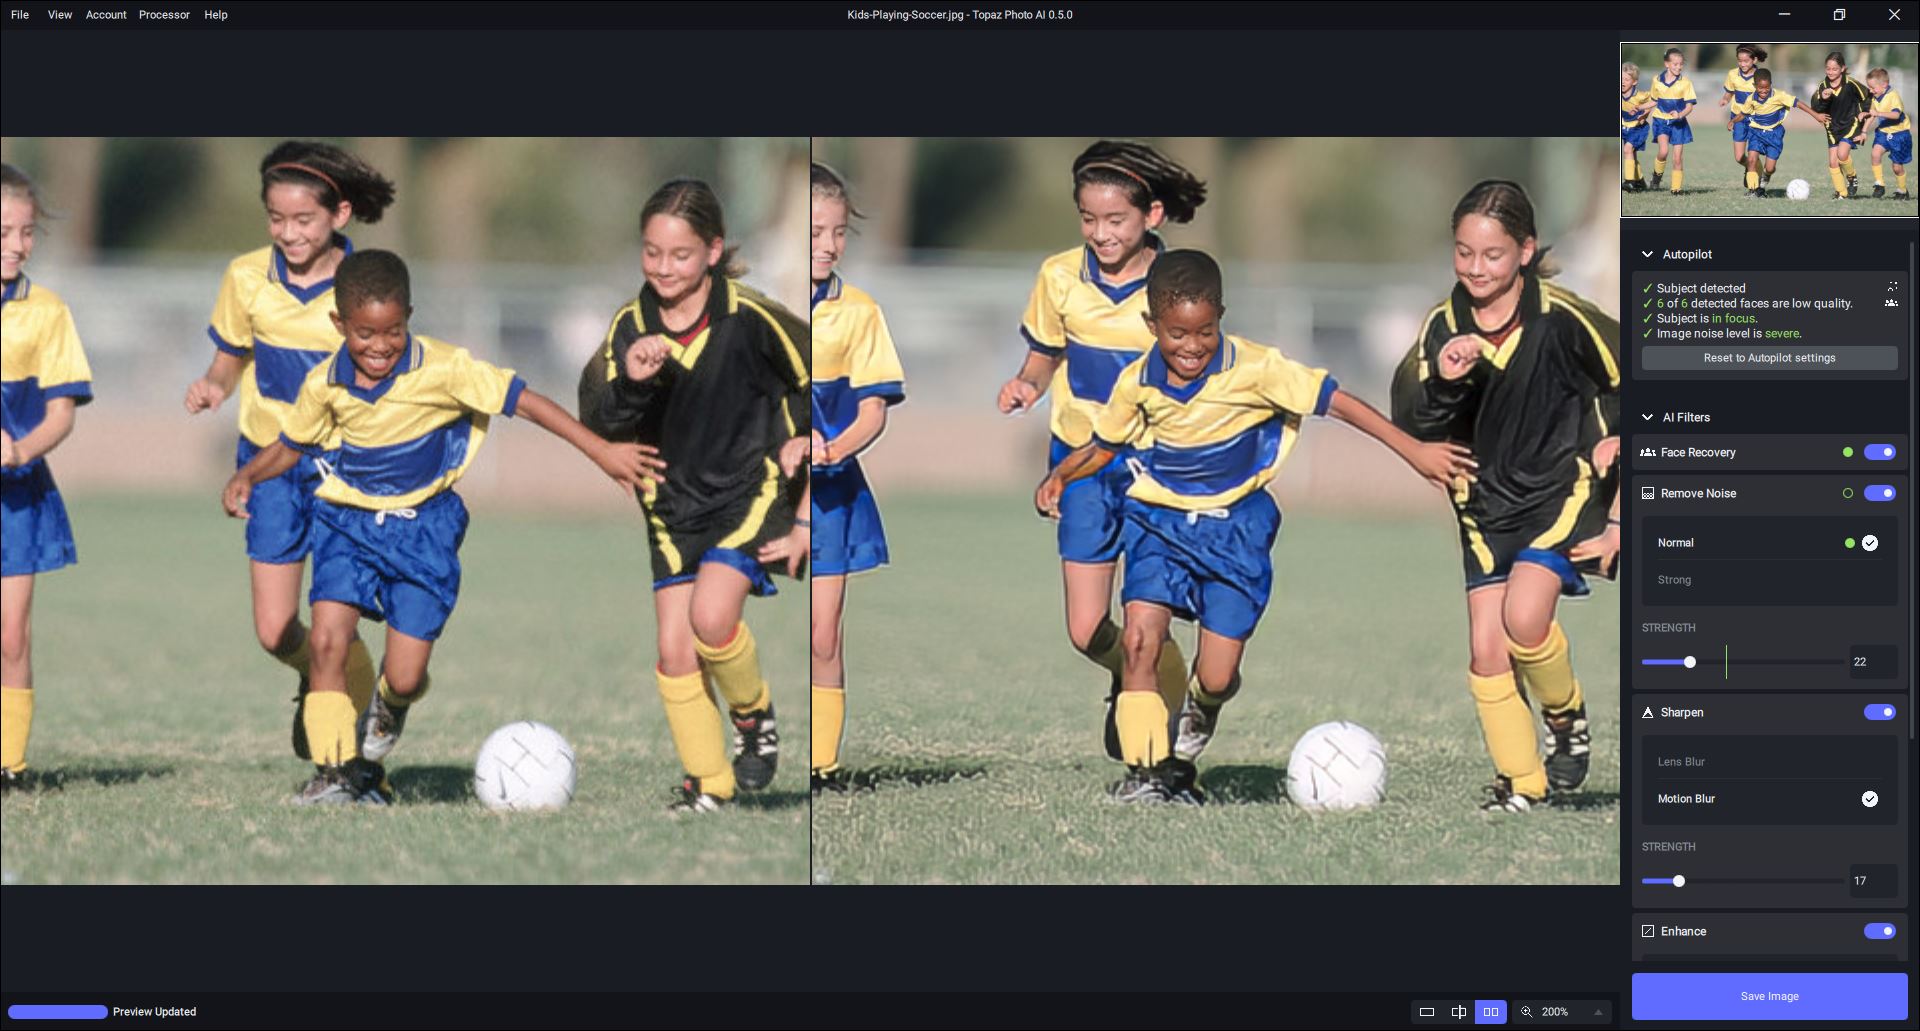
Autopilot detected 4 faces (temp squares were overlaid on the 4). What they had in common was that all were well-lit, all had relatively lighter skin tones (not all Caucasian, but no darker Blacks) and all were facing straight on to the camera.
One face that was somewhat closer to the foreground of the shot (white male) was well-lit and about 2/3 of his face is visible (the person with him is blocking about 1/3 of his face - but it’s clearly a face) was not detected. It seems as though a number of the people in the scene who had darker faces (either darker skin or in shadow) or whose faces were at a partial (~45 degrees) angle were not detected. [Earlier releases were able to detect straight-on, somewhat angled, looking down and profiles].The faces that didn’t get the Autopilot treatment were still sharpened in the processing as part of the overall denoising of the image. Autopilot didn’t activate sharpening. It rarely does.
Autopilot classified the jpg image as having “Severe Noise”. I don’t see that. At least not in the conventional sense of photographic noise. It’s a very old photo (2005). And likely from a very low m.p. camera (and way before I studied photog…).
The processed image saved to Ps from the PAI plugin. It was improved from the Background layer in Ps. But the output was heavily pixelated. See labelled snip. I’m not sure if that comes from a bad, early gen digital camera’s capture being sharpened or if something else is going on. But one of the terrific benefits of programs like GAI & PAI is being able to breathe new life into old, previously unsalvageable images. This pixelated appearance I got doesn’t really salvage the photo (though it’s a pretty crappy snapshot…).
No it is not a bug as it needs an automation plugin and not a standard plugin as the canvas needs to be changed in size. Of course calling the individual plugins works correctly.
Very impressed so far with 0.5. Couple things, I had to manually add it in to Lightroom classic; I have some low-res images that were captured from 8mm film from the 50’s and 60’s where it has problems finding faces, I’m attaching one here.
Please provide an option to disable autopilot on initial image loading so we don’t have to wait for it to run through all the detection/processing logic before we can set things manually.
I have a dedicated AI box next to my main PC with a small bluetooth keyboard I use merely to login to that box. Previously I could do all work with the mouse alone, PhotoAI is a huge downgrade there as now I have to leave the keyboard on and inevitably forget and the battery drains.
It also seems pointless to me that you can enter manual upscaling settings when the AI models only use specific percentages. Why would I want to resize 300% when 400% and shrinking down should look better due to the model used? Or does the software do this now?
I’ve only ever found 50%, 100%, 200%, 400% really useful so being able to just list those in the UI would be useful and using the mouse alone to pick them is a must for me By all means make it configurable, but how it currently works is a huge downgrade in how quickly I can get things done, doubly so with it forgetting the size I chose when I close the image.
Also if were not going to have a close button, can we at least have a right-click menu for close image and close all images? Having to go all the way to the File menu is so much more cumbersome to use. Your other applications should have this too as its much easier than trying to find a specific spot on the screen to click on.
I totally like the new approach, though, the Photo AI beta Natural scaling model was more like “forgiving” towards artificially made lens dispersion effect - the result (2x Natural, no Face Recovery) is sharpened despite sharpening turned off.
It’s a good result, I’ll admit, but at this point, I would postpone using chromatic aberration postprocessing (ArionFX plugin) until after PhotoAI session.
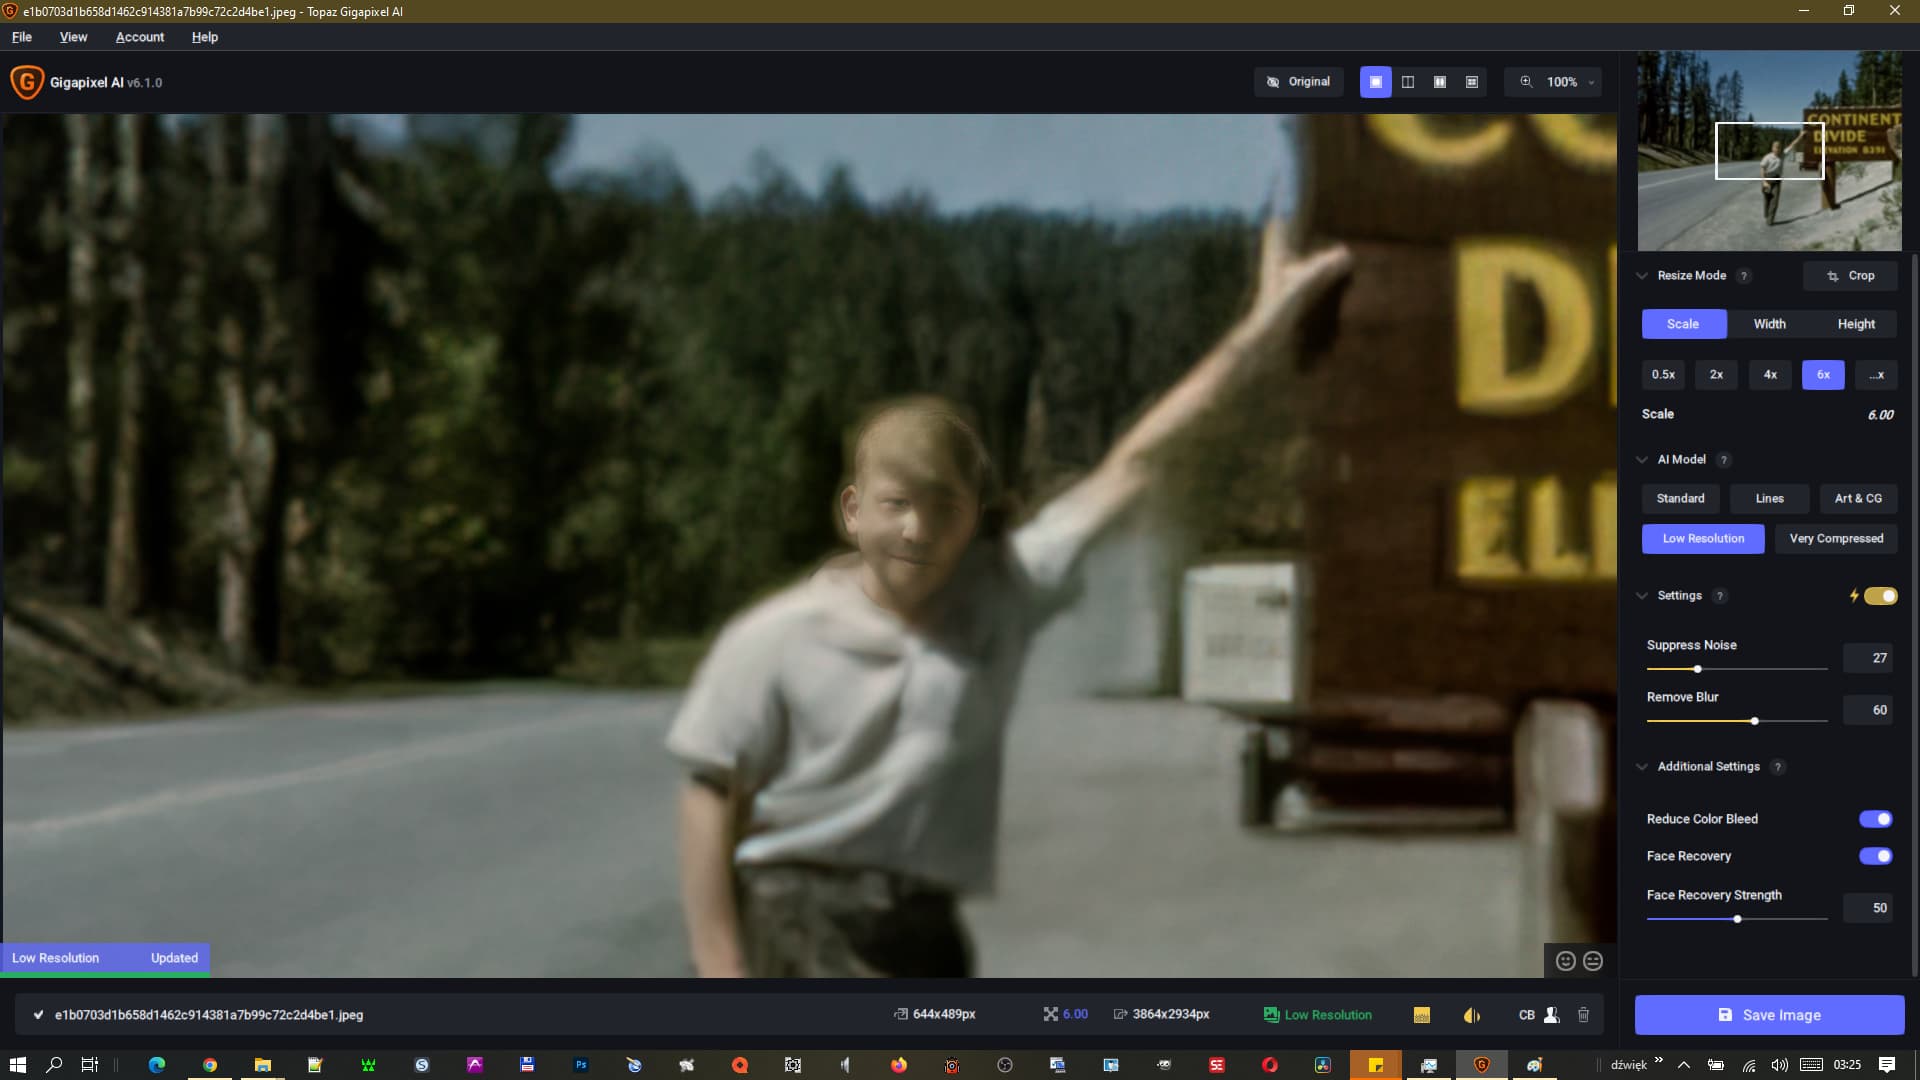
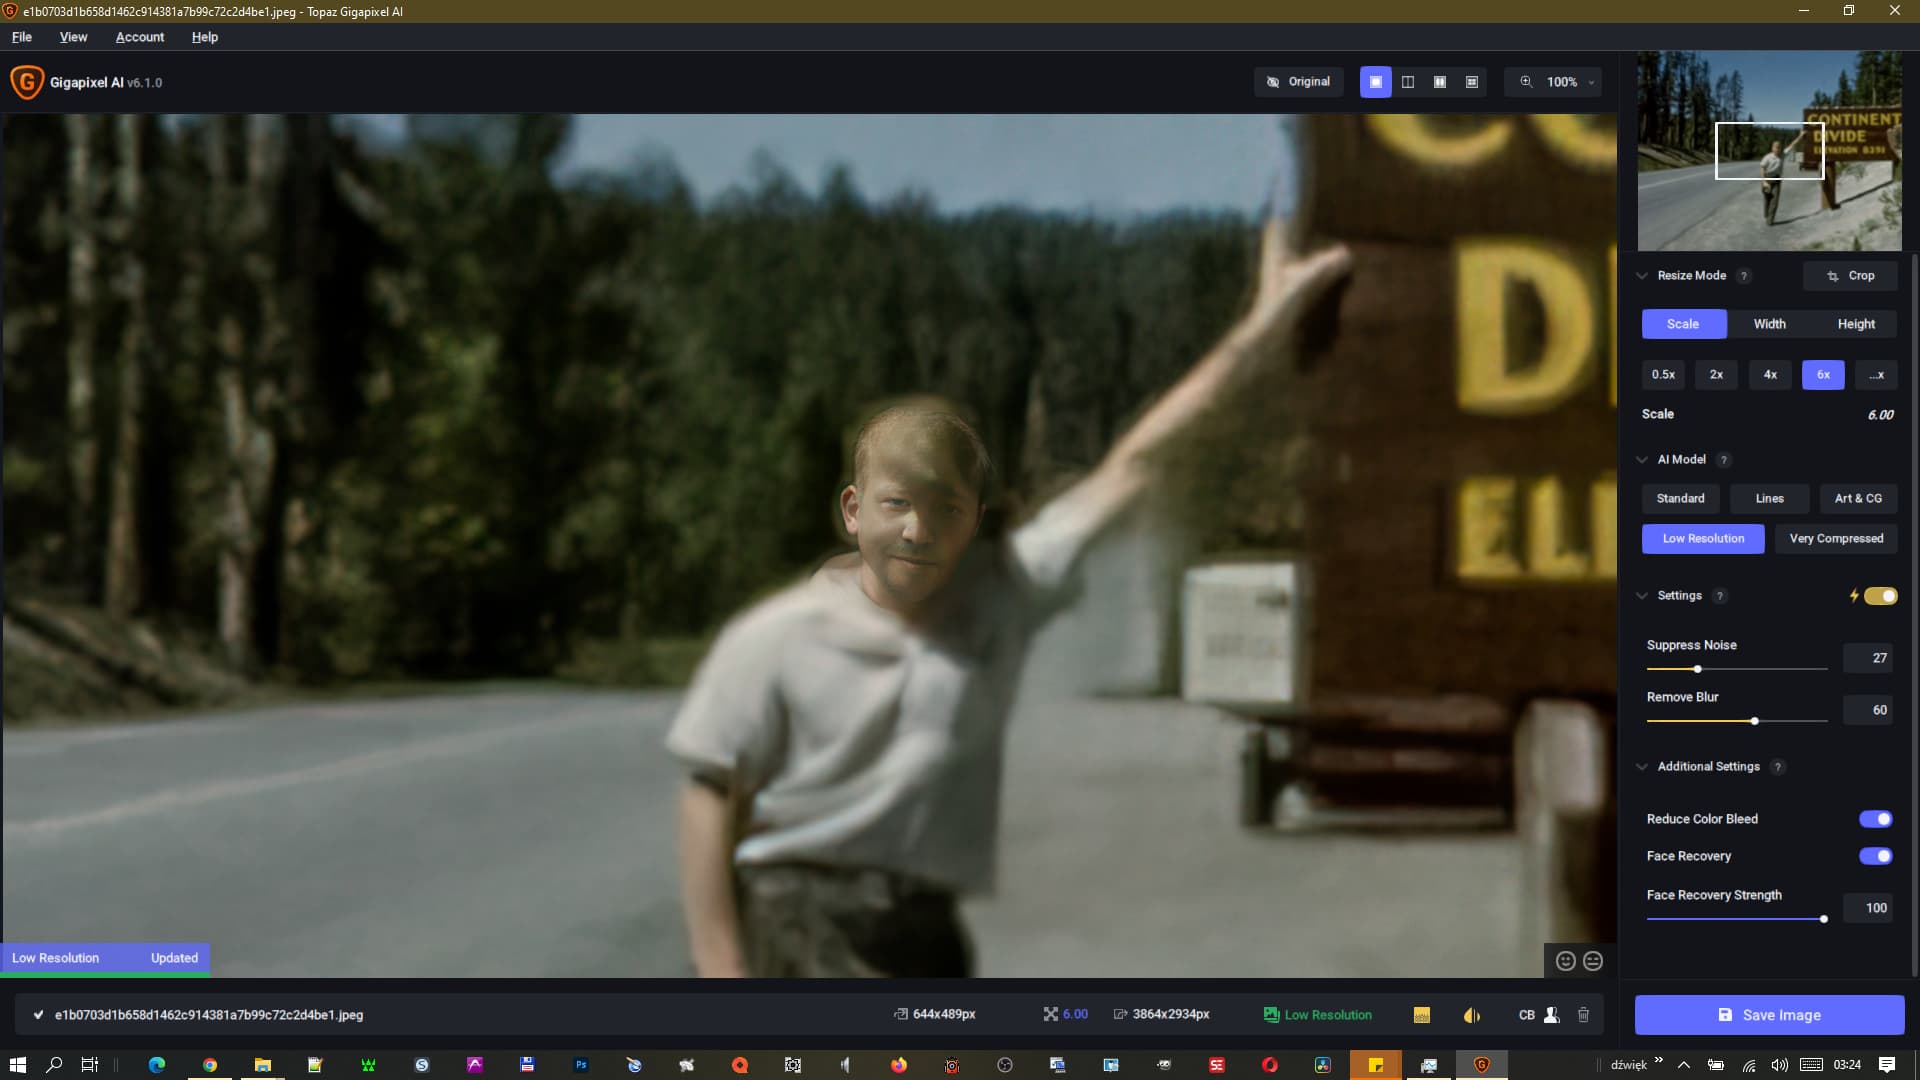
Just out of curiosity, I tried to upscale your image using Gigapixel AI 6.1.0 and it correctly detected and processed the subject’s face. Though the result looks a little bit off…
Autopilotconsistently states there is “Severe Noise” in the images I’m running. I honestly don’t even think they’re medium noise - I’d classify them as Low Noise. Latest pic tested attached. A-Pilot also always states the images are “In Focus” - I find I regularly want to add sharpening to the Autopilot settings (maybe it’s my eyes …).
I like that when I switch to manual settings there’s a Green Line on the slider spectrum (I’m assuming that’s where Autopilot would place its setting). That’s nice! I don’t have to retain a number value in my head and try to match it to the slider bar as I experiment with different settings.
Autopilot accurately detected the Objects and Faces in this image.
I tried Side x Side View this time - working @ 200%. NOTE: The squiggly worm artifacts that resulted in the Processed Preview pane at right (in the green grass). That’s not good. Nothing resembles that in the pic at left. See labelled snip attached.
RE: the Background - The program mostly retained the bokeh effect, but one horizontal streak got sharpened noticeably. That’s an area I’d mask out to avoid it getting sharpened when a masking facility is added.
Generally works well for me, but two of four faces (in a portrait of four people) weren’t detected. I think a button to add extra faces would be useful. The sharpen seems very agressive compared to Sharpen AI. I set the strength to 1 and it was still too harsh. I also miss the mask option so I can choose what gets sharpened. I really like having all three tools in one software package!