You are correct Adjust Lighting and Colour Balance work differently
Adjust Lighting:
Think off Adjust Lighting as a more sophisticated Shadows & Highlights adjustment rather than, a Curves or Level alternatively
If the image is Underexposed then, Adjust Lighting will automatically attempt to increase the Exposure in the Shadows without Clipping the Highlights and allow you to fine-tune the image after.
If the image is Overexposed similarly, Adjust Lighting will automatically attempt to decrease the Exposure in the Highlights without Crushing the Shadows.
Balance Colour:
Works great where you need to correct the Colour for a subject, particularly people that are affected by strong colour casts from say multiple Fairground Lighting or perhaps a Nightclub scene for instance
When part of the skin or face is overexposed and highlights are clipped, recovering those highlights often only shifts the white areas to gray without restoring any detail or correcting the skin tone. This approach is largely ineffective and offers no significant improvement over traditional image editors. With current AI technology, it should be feasible to regenerate overexposed skin by leveraging the skin tone and texture from other parts of the body.
Similarly, when hair is underexposed and appears solid black, simply increasing the shadow brightness without restoring detail is pointless. AI should be capable of generating details based on surrounding information to produce a more natural and accurate result.
This is a four-stop overexposed and heavily compressed JPG image from the internet. With traditional image editors, restoring the clipped highlights is impossible. However, with AI, it should be possible to recover some detail and color to a certain extent.
Agreed also it’s entirely possible with software like Photoshop to regenerate missing details for example Photoshop’s Remove Tool works wonders with adding details to Hotspots within the image.
However, as this Topic was a Feature Request for Photo AI I didn’t really want to bring another element into the mix.
Having said that, I did think about suggesting using either Photo AI’s Super Focus along with Focus Boost or Gigapixel’s Recover or Redefine Realistic and Creative Models for regenerating the missing information but, again as I hadn’t tried them myself and still haven’t on an Overexposed or Underexposed images I didn’t want to send our friend a wild goose chase.
Basically, sometimes you have address the question in hand and to be conservative with your reply.
Thank you for your reply they’ll always welcome and when ever I see your name appear I make a point of reading them always full of useful and interesting information
Actually, this would be a example for Topaz to incorporate a AI Model specifically for recovering Overexposed and Underexposed images like this currently, I thought it would come under Topaz Photo AI’s remit for consideration.
No, but, all things come to those who wait, in a future Release Topaz are going to implement a Photo Colourizing Feature for colouring Black and White Photographs but, I hope will also correct and boost colours within a colour image.
In the meantime, instead of using Colour Balance to enhance a faded photograph in the first instance believe or not, may I suggest, actually applying Adjust Lighting v1 first, before applying Colour Balance and Adjust Lighting v2
That’s because, unlike Adjust Lighting v2 where the Enhancement is trying to be merciful with the image Adjust Lighting v1, likes to overcompensate thus, boosting the colours.
When the adjusted light AI model was released, we expected more advanced capabilities. If it only adjusts brightness without recovering clipped highlights or shadows, traditional image editors can already achieve that without the need for AI.
For example, I tried to recover highlights of the 4-stop overexposed, low-quality JPG using Comfy with real AI.
The wall in the background was completely washed out, so the AI couldn’t restore much detail. However, for the little girl in the image, a true AI model should be able to recover skin tone and details based on its understanding of the image.
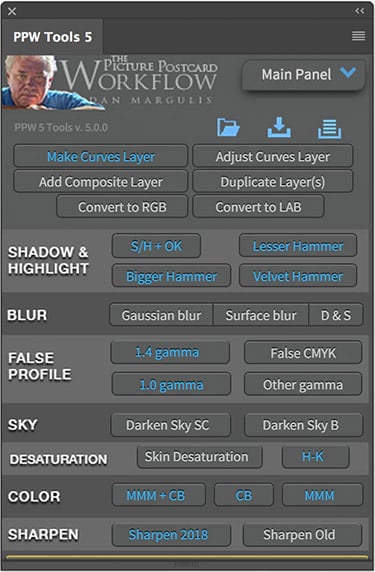
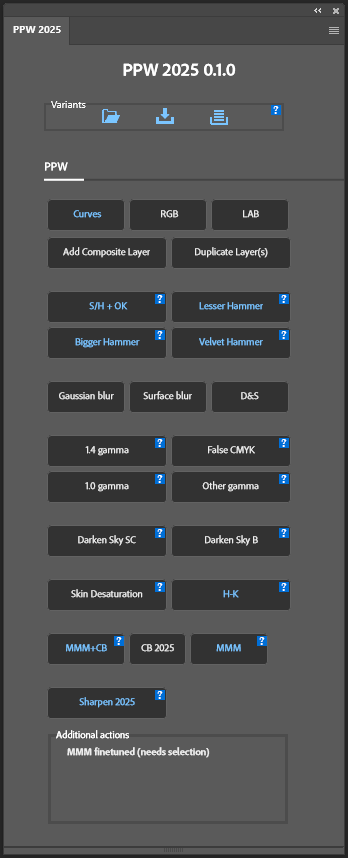
Thinking out side of the box, there’s a third method for recovering faded images and boosting colours and a lot more besides, using The Picture Postcard Workflow Photoshop Panel based on the work and overseen by Dan Margulis himself and the good thing is on his insistence it’s absolutely free.
The Panel was created in conjunction with Dan’s book The Picture Postcard Workflow but, you don’t need the book to use it as it comes with full documentation and there’s free video tutorials on YouTube.
In addition, if you don’t have to own Photoshop as the actions can be implemented into any Photoshop compatible Action Set
Here’s a link to a YouTube channel where you’ll find a playlist with twenty videos of training by Dan
Here’s the first one as a taster
Don’t be put off if you think there’s a big leaning curve because, most of it is pretty self explanatory the only two buttons you need know to get started is the Bigger Hammer Button for recovering the overall tone of the image and the MMM+CB (Man on Mars Method plus Colour Boost) Button for recovering and boosting colours.
And than … this didn’t was what I wanted to say, just a translation problem "[quote=“spieler-internet.de, post:1, topic:94764”]
Brightness and colour adjustments in Photo AI are something else entirely, aren’t they?
[/quote] not so important
As someone who receives poor-quality images from customers for websites on a daily basis, tools such as photo AI and Gigapixel are invaluable.
This is my homework assignment to learn and apply the tools and lessons in “Picture Postcard Workflow Photoshop Panel”. I’m not touching another image editor until I get these concepts under my belt.
That’s great news my friend also Dan has some books available on the >Internet Archive < including Photoshop L.A.B. Colour
The Canyon Conundrum and Other Adventures in the Most Powerful Colour space.