
Just a suggestion with the “Heal Tool” and mask in Topaz Studio 1. Here a sample ! I dont know in TS 2… Hope i help.

Brightness and Contrast, and gradient mask. A dedicated tool would be good.
Yes ! But i realize that Studio v 2 has a lot of features not again operational like in Version 1. Hope they will correct them soon.
Thank you, i am in studio 2, but will look at this variation…i like what you did with it…thanks
Al, I used TS 2 and used Brightness & Contrast, masked with a gradient mask to limit the adjustment to the top of the photo.
Then I used the Vignette filter, chose one of the greens in the photo for the color and again used a gradient mask.

If you want more info LMK and I will get you the settings
I feel like I am all thumbs when it comes to masking…it is like i am dyslexic between the masking, and the use of the white or the black…as often as i look at a video, I come away not exactly sure how to us a masking technique…I would like any, “more-info”. thank you
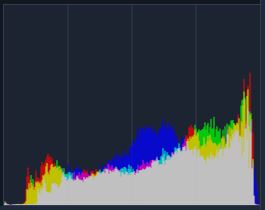
From the histogram, I’d say it’s not completely blown as it looks like it drops sharply just as it reaches the right edge. So it makes sense to first try expanding the highlights - stretching the highlight portion of the histogram to the left - to see if you can get any existing detail to show up. The simplest way is to use either the highlight and/or the white level slider. In this case, neither of those worked well as they both tended to just darken and make things muddy.
(Actually, the highlight slider in LR would work very well on this problem because it expands the histogram non-linearly; the brightest highlights aren’t effected as much as the darker highlights, and the effect on all highlights increases more quickly the farther the slider is moved.)
Anyway, to get the result below, I added three filters:
- Basic Adjustment - no change to sliders, blending to Multiply, opacity 25%, and masked the darker, blueish shadow areas on the right and left because Multiply blend mode can make dark things really dark, but I left it on the other non-highlight areas because brought out more detail in the mid tones.
- Basic Adjustment, no change to sliders, blending to Multiply, used Lumi mask to select highlights (luminocity 1.00, range 0.2)
- Curves - just a basic darkening curve, masked to apply just to the upper left corner.
The curve, before and after histograms and before and after images are below. Maybe I darkened more than you’d adjust things, but it seems like there is a decent amount of color and detail to be exposed as seen in the result.
Curve:

Histogram before adjustments:
Histogram after adjustments:

With my adjustments:

Original as downloaded:

Best regards
